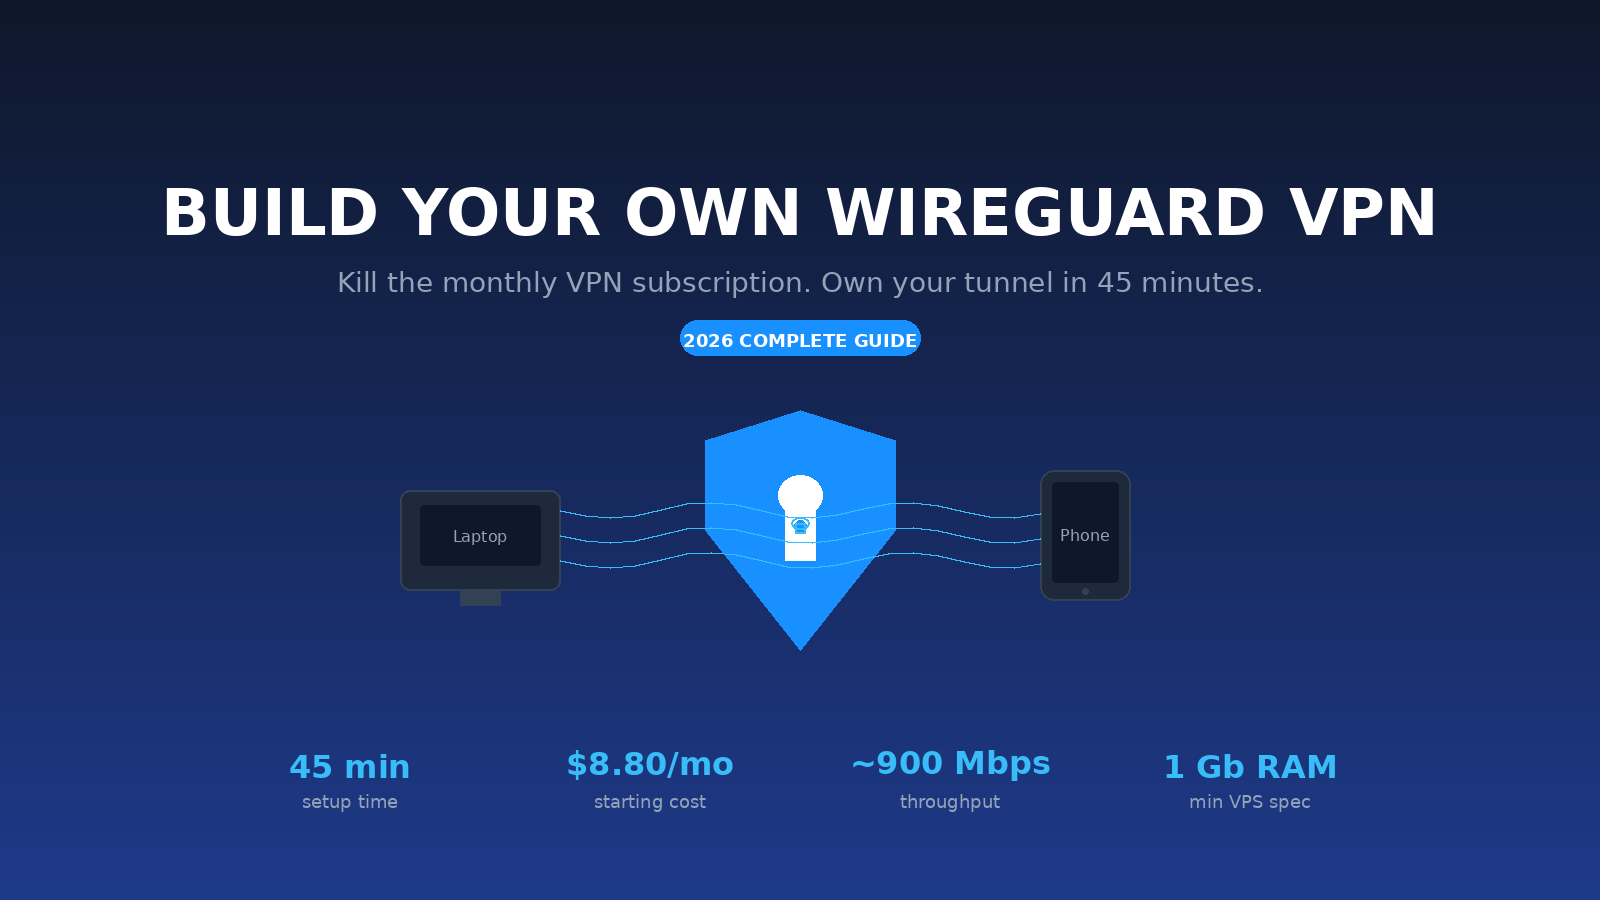
Why Self-Host Your VPN in 2026?
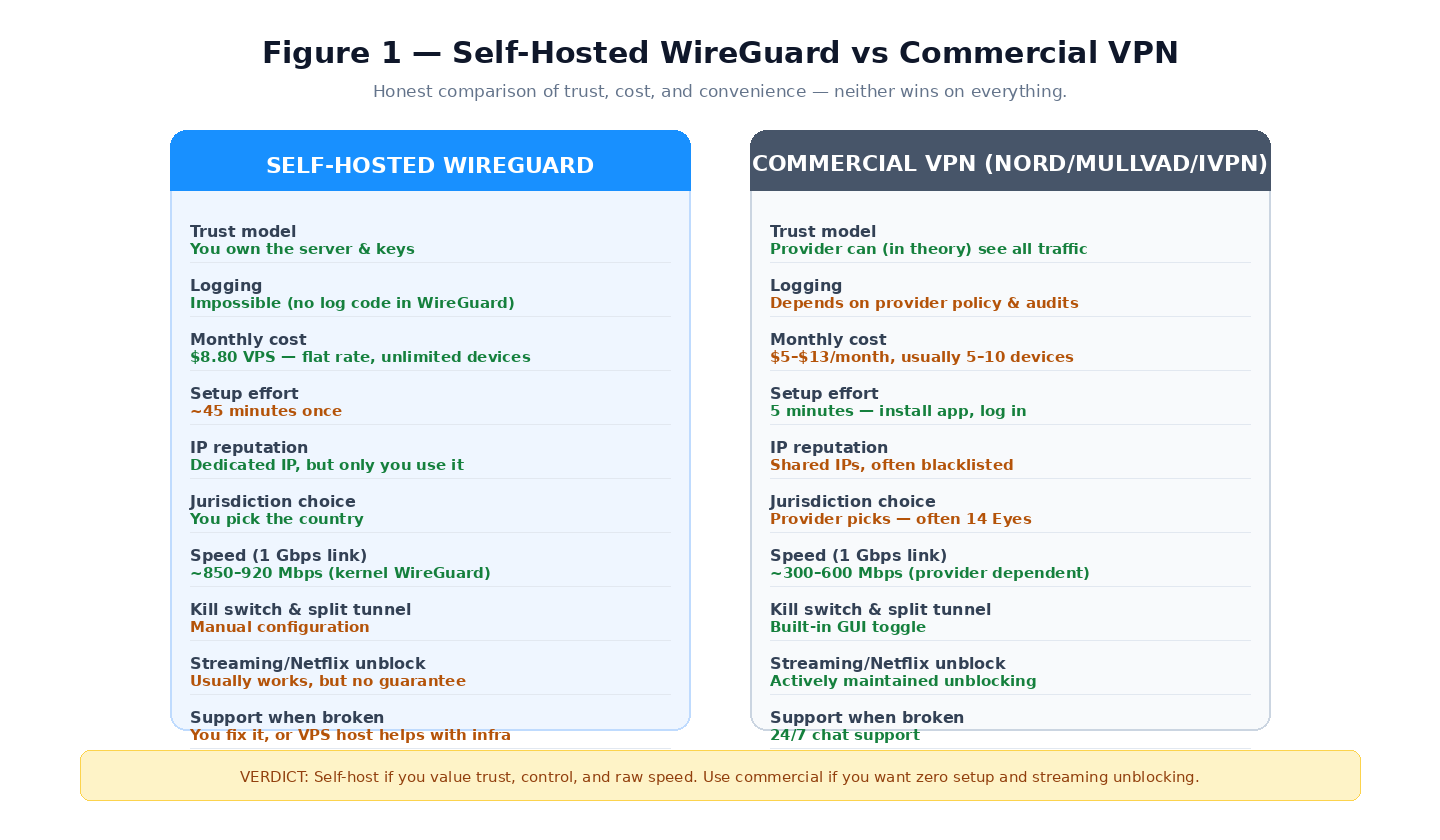
Commercial VPNs are in a strange place. The good ones (Mullvad, IVPN, Proton) are genuinely trustworthy — but they cost $5–13 per month, cap your devices, and hand you an IP address shared with thousands of other subscribers that streaming services and websites flag on sight. The bad ones log your traffic, inject ads, and have been caught selling user bandwidth. Both kinds ask you to trust them completely with everything you do online.
A self-hosted WireGuard VPN inverts that model. You own the server, you hold the keys, and there is no company in the middle that can be subpoenaed, sold, or coerced. It is also faster: WireGuard runs inside the Linux kernel and typically hits 85–95% of your VPS's raw line speed, compared to 30–60% for most commercial VPN apps.
The trade-off is real. You spend 45 minutes setting it up. You become your own support team. You do not get residential IPs for streaming unblocking. And you have to actually understand what your VPS provider can and cannot see — which is exactly what this guide covers honestly, without the "zero trust" marketing fluff.
The Trust Model: Who Sees What?
This is the part many "build your own VPN" tutorials skip. When you run WireGuard on a VPS, three parties can theoretically see your traffic:
- You. Obviously. You hold the private keys; you control the server.
- Your VPS provider. They can see the server's outbound traffic (in plaintext for HTTP, encrypted for HTTPS), when the VPN is active, and the billing info tied to your account. They cannot read WireGuard-encrypted traffic between your device and the server — but they can see that traffic exists, and they can see what the server connects to after decryption. This is why jurisdiction and provider choice matter.
- Your ISP / local network. They see only encrypted UDP packets flowing to your VPS's IP. They cannot read the contents, see what sites you visit, or distinguish HTTPS-over-VPN from WireGuard UDP on a non-standard port.
Compare this to a commercial VPN: your ISP sees encrypted traffic to the VPN company's IP (same as self-hosted), but then the VPN company replaces the VPS provider in the list above — and they simultaneously handle traffic for thousands of users, which makes them a much higher-value target for law enforcement, data requests, and subpoenas.
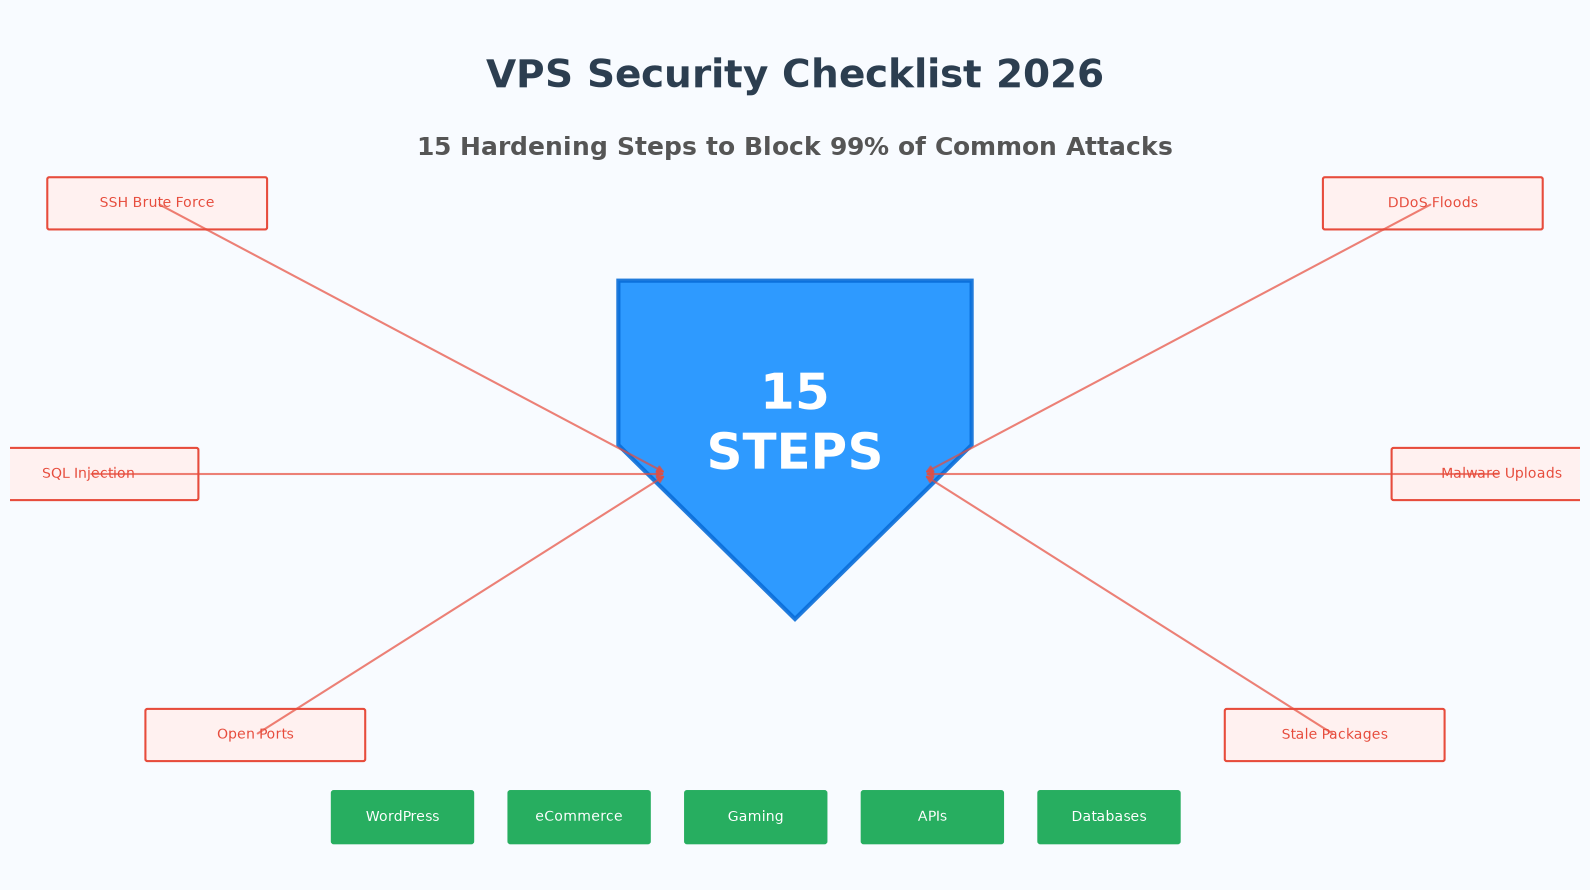
For a deep-dive on whether self-hosting actually meets your privacy goals, read our VPS security hardening checklist before you start.
Picking the Right VPS Jurisdiction
The "Five Eyes" (FVEY) is an intelligence-sharing alliance between the US, UK, Canada, Australia, and New Zealand. It expanded to "Nine Eyes" (adding Denmark, France, the Netherlands, Norway) and "Fourteen Eyes" (adding Belgium, Germany, Italy, Spain, Sweden). These treaties matter because a server hosted in a member country can be compelled to secretly hand over data, and that data can be shared with other members without your knowledge.
Avoiding 14 Eyes countries is not a silver bullet — a hostile VPS company in a "good" jurisdiction is worse than a transparent one in a "bad" one — but it is a reasonable baseline for a privacy-first VPN.
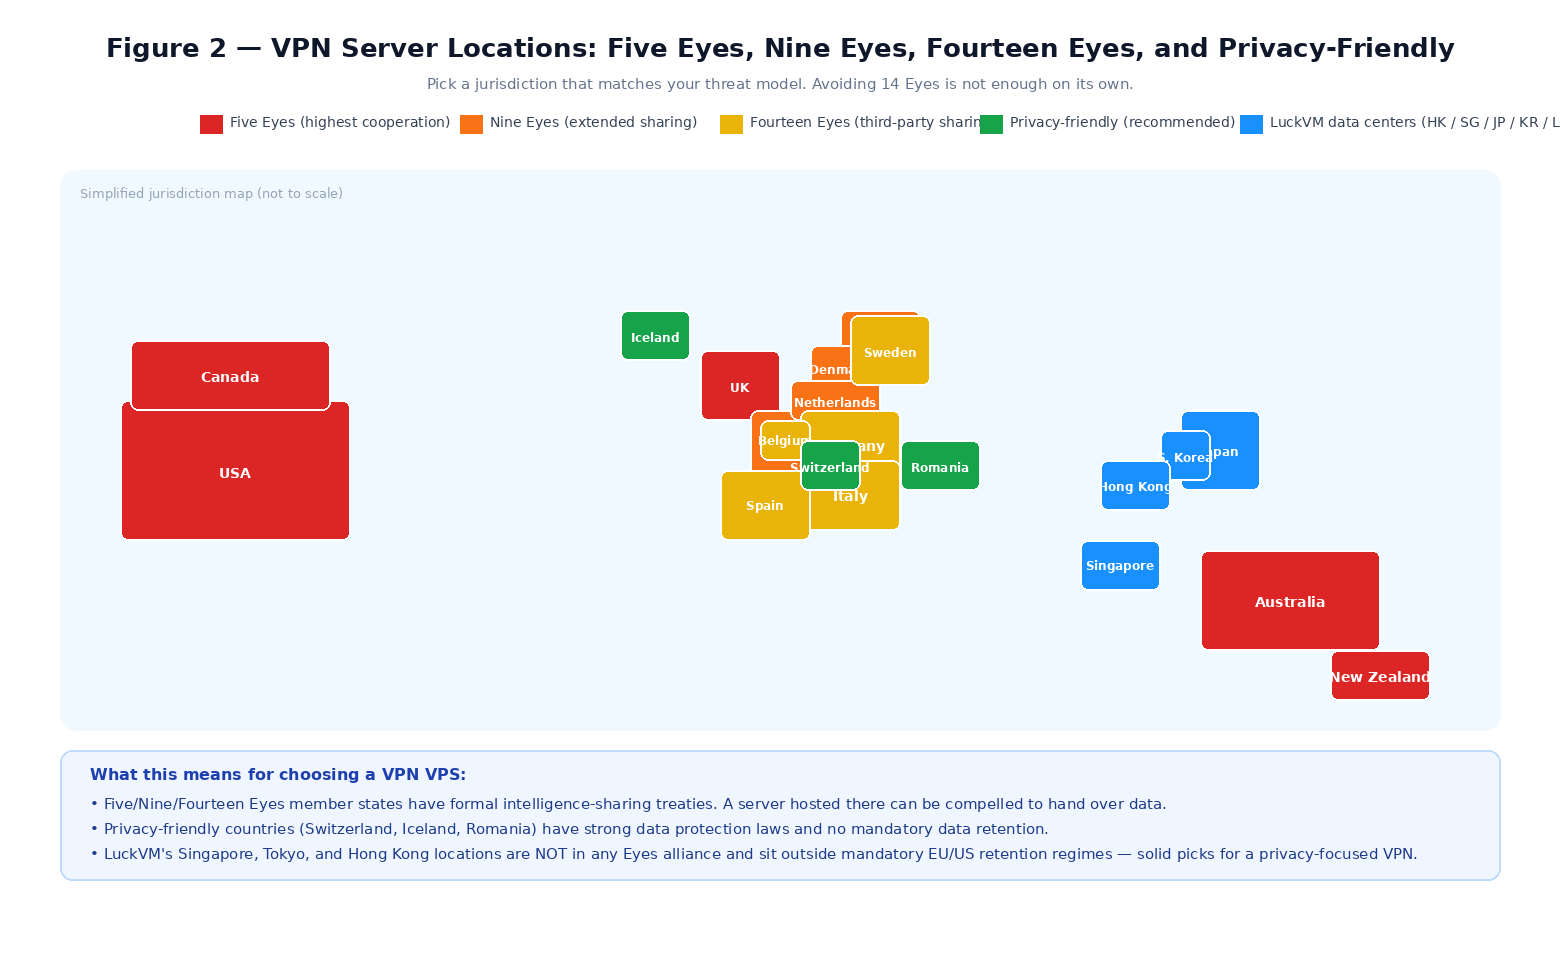
For Asia-Pacific users, or anyone who wants a VPS outside the 14 Eyes framework with excellent international connectivity, three of LuckVM's data centers are natural picks:
| Location | Eyes alliance? | Starting price | Best for |
|---|---|---|---|
| Singapore | Outside | $11.00/mo | SEA/Australia users, best neutral Asia hub |
| Tokyo, Japan | Outside | $30.80/mo | Fastest for Japan/Korea/China-adjacent users |
| Hong Kong | Outside | $8.80/mo | Budget pick, low latency to East Asia |
| Los Angeles, USA | Five Eyes | $8.80/mo | Americas users; not recommended for privacy-first setups |
If you want help deciding between these based on your own physical location and audience, see our guide to picking the best VPS location for latency.
What You'll Need
- A KVM VPS running Ubuntu 24.04 LTS or Debian 12. OpenVZ will not work (no kernel module access). Minimum specs: 1 vCPU, 1 GB RAM, 20 GB SSD, 500 GB/month transfer. LuckVM's $8.80/mo Hong Kong starter plan covers this.
- Root or sudo SSH access to the server.
- A public IP address (not behind NAT — all LuckVM plans include one).
- The WireGuard app on whichever client devices you plan to connect (Windows, macOS, Linux, iOS, Android — all free and open-source).
- About 45 minutes.
Step-by-Step: Server Setup
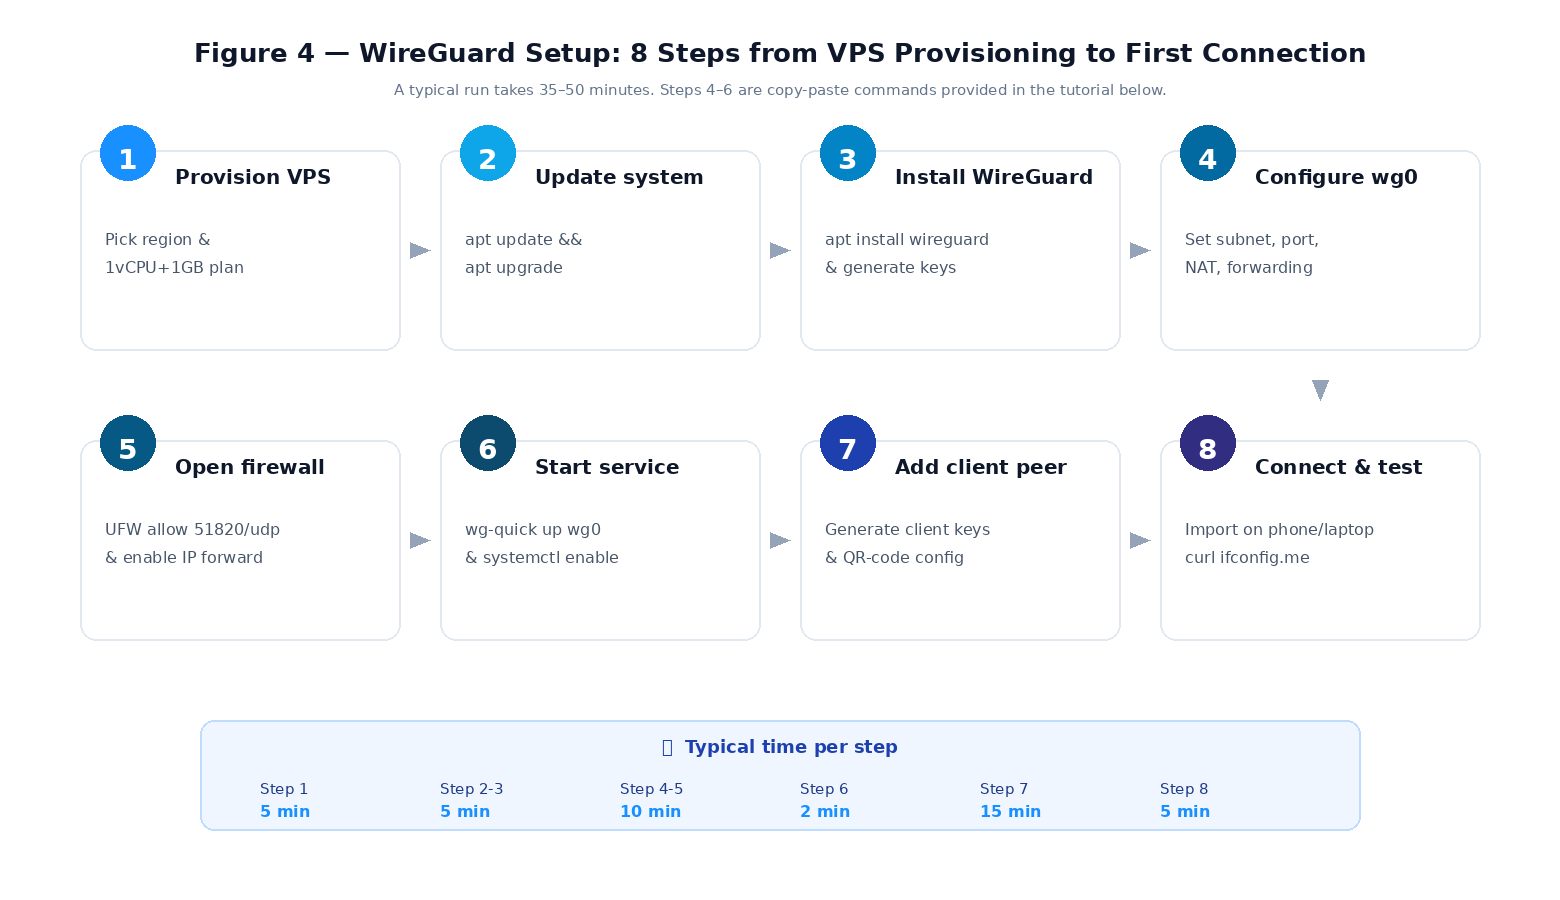
Step 1 — Provision the VPS
Deploy a fresh Ubuntu 24.04 or Debian 12 VPS in your chosen location. Set an SSH key (not a password) during provisioning. Once it boots, SSH in as root:
ssh root@YOUR_SERVER_IP
Step 2 — Update the system
apt update && apt upgrade -y
apt install -y qrencode curl
# Reboot if a new kernel was installed
reboot
Step 3 — Install WireGuard and generate server keys
apt install -y wireguard wireguard-tools
umask 077
wg genkey | tee /etc/wireguard/server_private.key | wg pubkey > /etc/wireguard/server_public.key
Record your server's private key — you'll need it in the next step. Never share this key with anyone — including in screenshots, support tickets, or chat:
cat /etc/wireguard/server_private.key
Step 4 — Configure the WireGuard interface
First, find your server's default network interface name (usually eth0 or ens3 or enp0s3):
ip route show default
# Look for "dev X" in the output — that X is your interface name
Create the WireGuard config file at /etc/wireguard/wg0.conf:
nano /etc/wireguard/wg0.conf
Paste the following, replacing SERVER_PRIVATE_KEY with the key from Step 3, and eth0 with your actual interface name:
[Interface]
Address = 10.8.0.1/24, fd86:ea04:1115::1/64
ListenPort = 51820
PrivateKey = SERVER_PRIVATE_KEY
PostUp = iptables -A FORWARD -i wg0 -j ACCEPT; iptables -t nat -A POSTROUTING -o eth0 -j MASQUERADE; ip6tables -A FORWARD -i wg0 -j ACCEPT; ip6tables -t nat -A POSTROUTING -o eth0 -j MASQUERADE
PostDown = iptables -D FORWARD -i wg0 -j ACCEPT; iptables -t nat -D POSTROUTING -o eth0 -j MASQUERADE; ip6tables -D FORWARD -i wg0 -j ACCEPT; ip6tables -t nat -D POSTROUTING -o eth0 -j MASQUERADE
SaveConfig = true
Enable IP forwarding persistently:
echo "net.ipv4.ip_forward=1" >> /etc/sysctl.d/99-wireguard.conf
echo "net.ipv6.conf.all.forwarding=1" >> /etc/sysctl.d/99-wireguard.conf
sysctl -p /etc/sysctl.d/99-wireguard.conf
Step 5 — Open the firewall
If UFW is active (it should be — see our VPS hardening guide), allow WireGuard's UDP port and SSH:
ufw allow 22/tcp
ufw allow 51820/udp
ufw enable
ufw status
Step 6 — Start WireGuard and enable autostart
wg-quick up wg0
systemctl enable wg-quick@wg0
# Verify the interface is up
wg show
ip a show wg0
You should see the wg0 interface with the 10.8.0.1/24 address and listening on UDP 51820.
Step 7 — Add your first client peer
Each device you connect needs its own keypair and its own IP in the 10.8.0.0/24 subnet. We'll create the first client (give it a descriptive name like laptop or phone):
cd /etc/wireguard
wg genkey | tee client1_private.key | wg pubkey > client1_public.key
CLIENT_PRIV=$(cat client1_private.key)
CLIENT_PUB=$(cat client1_public.key)
SERVER_PUB=$(cat server_public.key)
SERVER_IP=$(curl -s ifconfig.me)

# Add the client as a peer on the server
wg set wg0 peer $CLIENT_PUB allowed-ips 10.8.0.2/32

# Generate the client config file
cat > client1.conf
Display a QR code that you can scan directly from your phone's WireGuard app:
qrencode -t ansiutf8
For desktop clients, copy client1.conf to your machine via scp:
scp root@$SERVER_IP:/etc/wireguard/client1.conf ~/Downloads/
client2, phone, etc.) and increment the IP to 10.8.0.3/32, 10.8.0.4/32, and so on. Each device needs a unique key pair and unique IP.Step 8 — Connect and verify
On your client device:
- Install the WireGuard app (links in Figure 5 below).
- Scan the QR code or import the
.conffile. - Toggle the tunnel on.
- Visit
https://ifconfig.meor runcurl https://ifconfig.me— you should see your VPS's public IP, not your real one. - Run a leak test at
https://dnsleaktest.com— DNS should show Cloudflare (1.1.1.1) or whatever resolver you configured.
Client Setup Across All Platforms
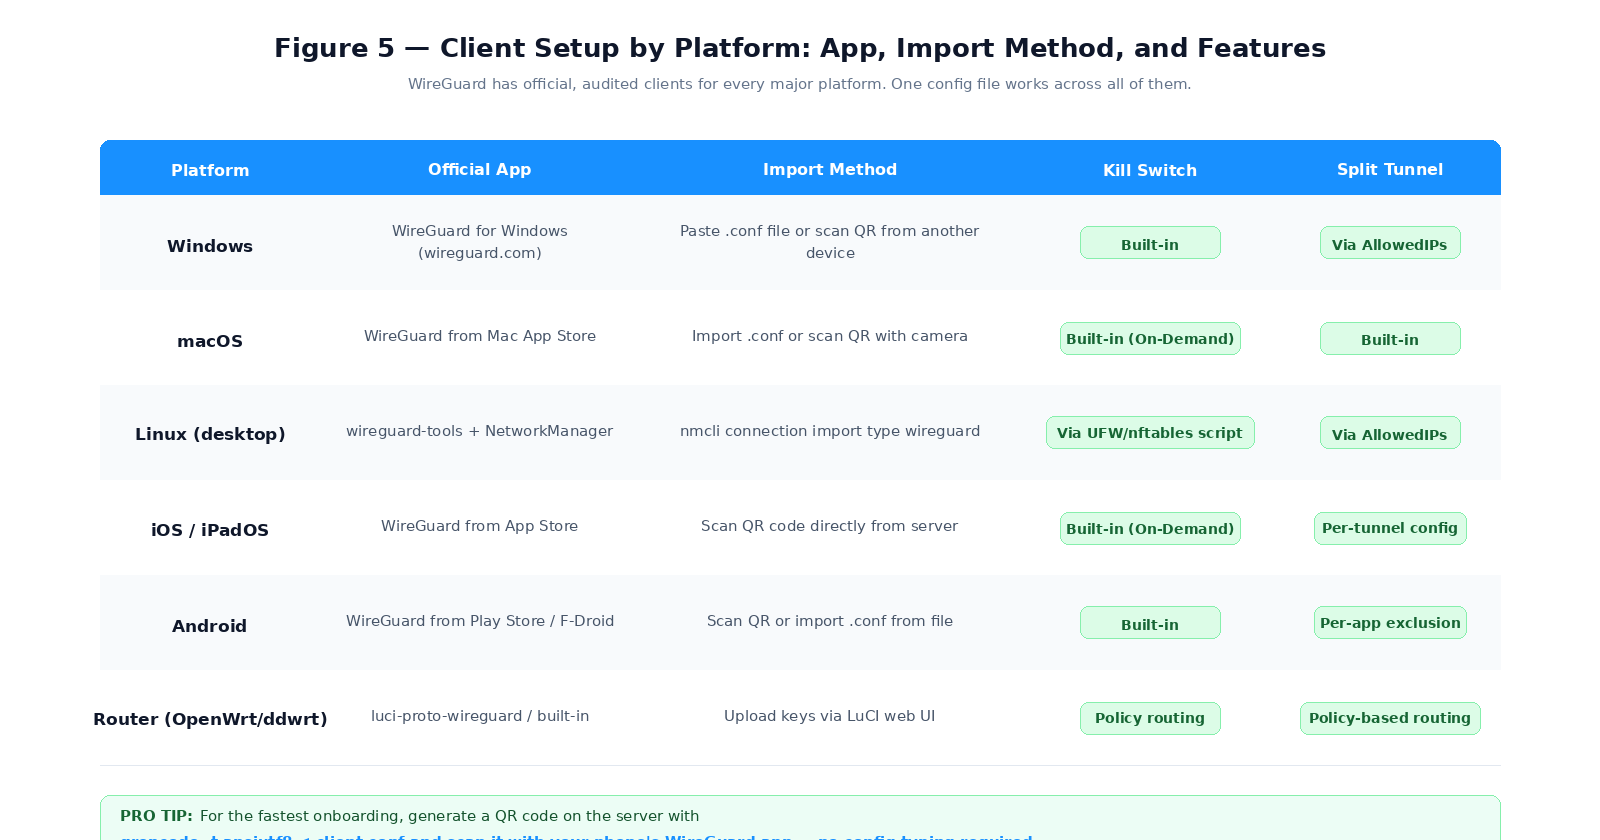
The client config file you generated (client1.conf) is universal — import it into any platform's WireGuard app and it works. The easiest mobile onboarding is the QR code method from Step 7 (no typing, no emailing files).
For Linux desktops that use NetworkManager, there is a one-line import instead of using wg-quick:
nmcli connection import type wireguard file /path/to/client1.conf
# Then manage it from your network icon like any other VPN
Security Hardening & Kill Switch
Change the default port (optional but recommended)
Using a non-standard UDP port (e.g., 51820 → 44321 or even 443/udp) reduces noise from internet-wide scanners. Just change ListenPort in wg0.conf and update the matching UFW rule.
Set up a client-side kill switch
All official WireGuard clients support a built-in kill switch via the AllowedIPs = 0.0.0.0/0, ::/0 line you already have — when the tunnel is active, all traffic routes through it and the system will not leak if the tunnel drops. For a stricter firewall-level kill switch (blocks all non-VPN traffic even when WireGuard is down), add these UFW rules on the client:
# Client-side: deny all outgoing by default, allow only via wg0 and LAN
sudo ufw default deny outgoing
sudo ufw allow out on wg0
sudo ufw allow out to 192.168.0.0/16
sudo ufw allow out to YOUR_SERVER_IP port 51820 proto udp
sudo ufw reload
DNS leak prevention
Set DNS = 1.1.1.1, 1.0.0.1 (Cloudflare) or run your own resolver (e.g., Unbound) on the VPS with DNS = 10.8.0.1. Do not leave DNS pointing to your ISP's resolver — that is the #1 leak people miss.
Disable password SSH and use keys only
This is not VPN-specific, but any server exposed to the internet needs it. Follow step 4 of our VPS security hardening checklist.
Performance: What to Expect
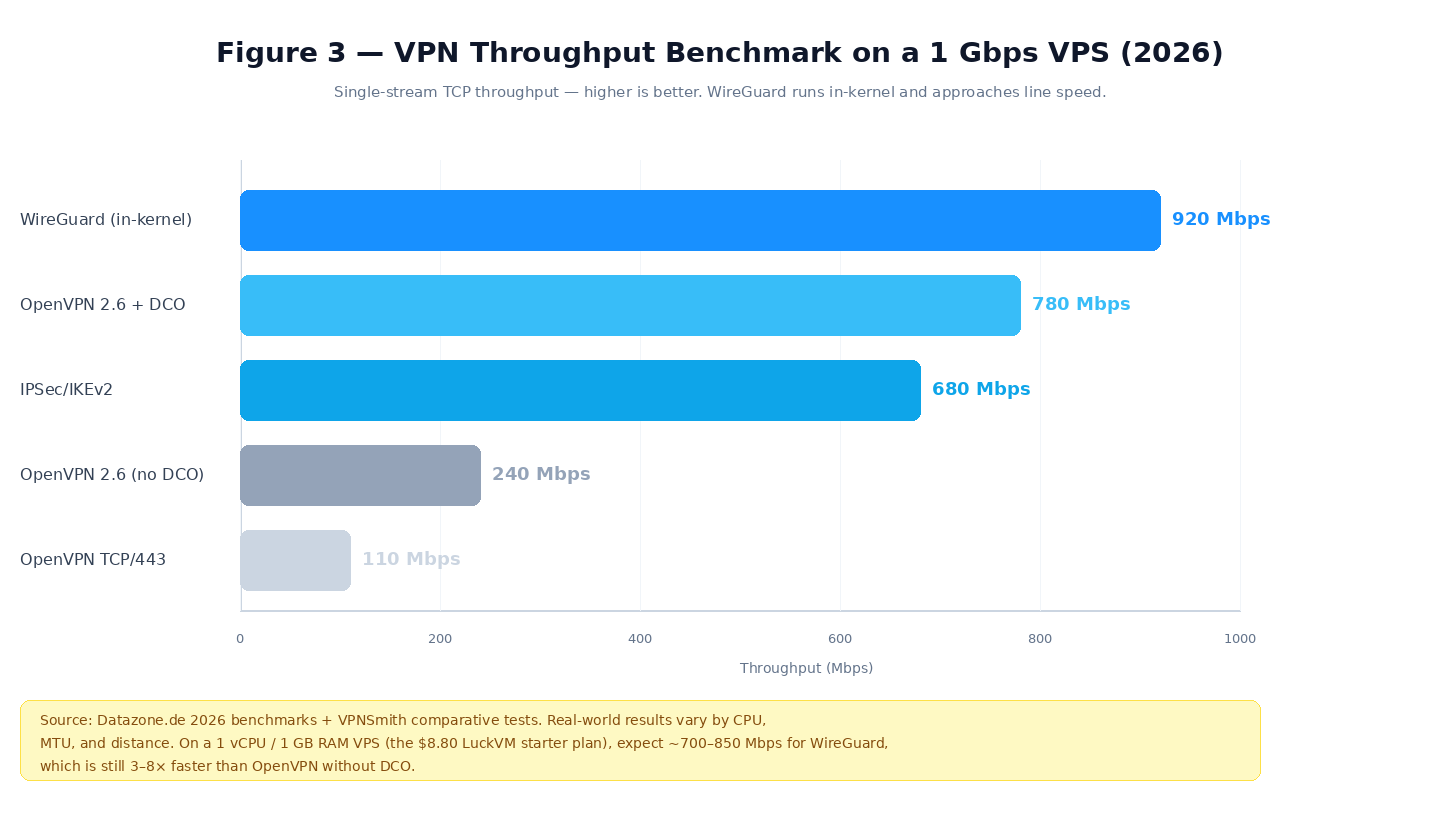
On a 1 vCPU / 1 GB RAM KVM VPS (the $8.80 LuckVM starter tier), expect these real-world numbers:
| Metric | Expected value | Notes |
|---|---|---|
| Throughput | 700–850 Mbps | Single stream; enough for 4K streaming and large file transfers |
| Latency added | +1–3 ms | Almost unnoticeable for browsing/gaming |
| CPU usage @ 500 Mbps | 8–15% of one core | Leaves headroom for other services on the same VPS |
| Memory overhead | ~40 MB | Negligible |
| Handshake time | Roaming between WiFi/cell networks is seamless |
If you want to benchmark your own setup, run iperf3 between the VPS and a client, or simply download a large file through the tunnel and compare against the raw connection.
Honest Caveats and Legal Notes
Running a personal VPN server is legal in almost every country. Using a VPN to conceal illegal activity remains illegal. This guide is for legitimate privacy protection on public WiFi, secure remote access to your own infrastructure, and bypassing geoblocks where you have a legal right to access the content.
Other important caveats commercial VPNs do not tell you:
- Your IP is not anonymous. A self-hosted VPN IP is used by you alone. If it is tied to abusive behavior, it traces directly back to your VPS account and payment method. It gives you privacy from your ISP and public WiFi snoops — not anonymity from a determined adversary who can subpoena your host. For strong anonymity, use Tor.
- Streaming unblocking is hit-or-miss. Netflix, Disney+, and BBC iPlayer maintain large blocklists of datacenter IP ranges. A fresh VPS IP may work for weeks and then get blocked. Commercial VPNs fight this battle full-time with residential IP rotation; you will not win it alone.
- Torrenting on a VPS has consequences. Most VPS providers (including LuckVM) respond to DMCA/copyright notices. Do not run BitTorrent over a self-hosted VPN unless you have explicitly confirmed the provider allows it and understand the takedown policy.
- You are the sysadmin. If WireGuard crashes at 2 AM, or a bad UFW rule locks you out, you fix it. Keep the VPS provider's VNC/web console bookmarked for recovery.
Frequently Asked Questions
Ready to build your own VPN?
Deploy a KVM VPS from $8.80/month in Hong Kong, Singapore, Tokyo, Seoul, or Los Angeles. All plans include a dedicated public IPv4, NVMe SSD, KVM virtualization, and 24/7 English support. Setup takes 5 minutes.
Deploy Your VPN VPS →