1. How Many Sites Can One VPS Run?
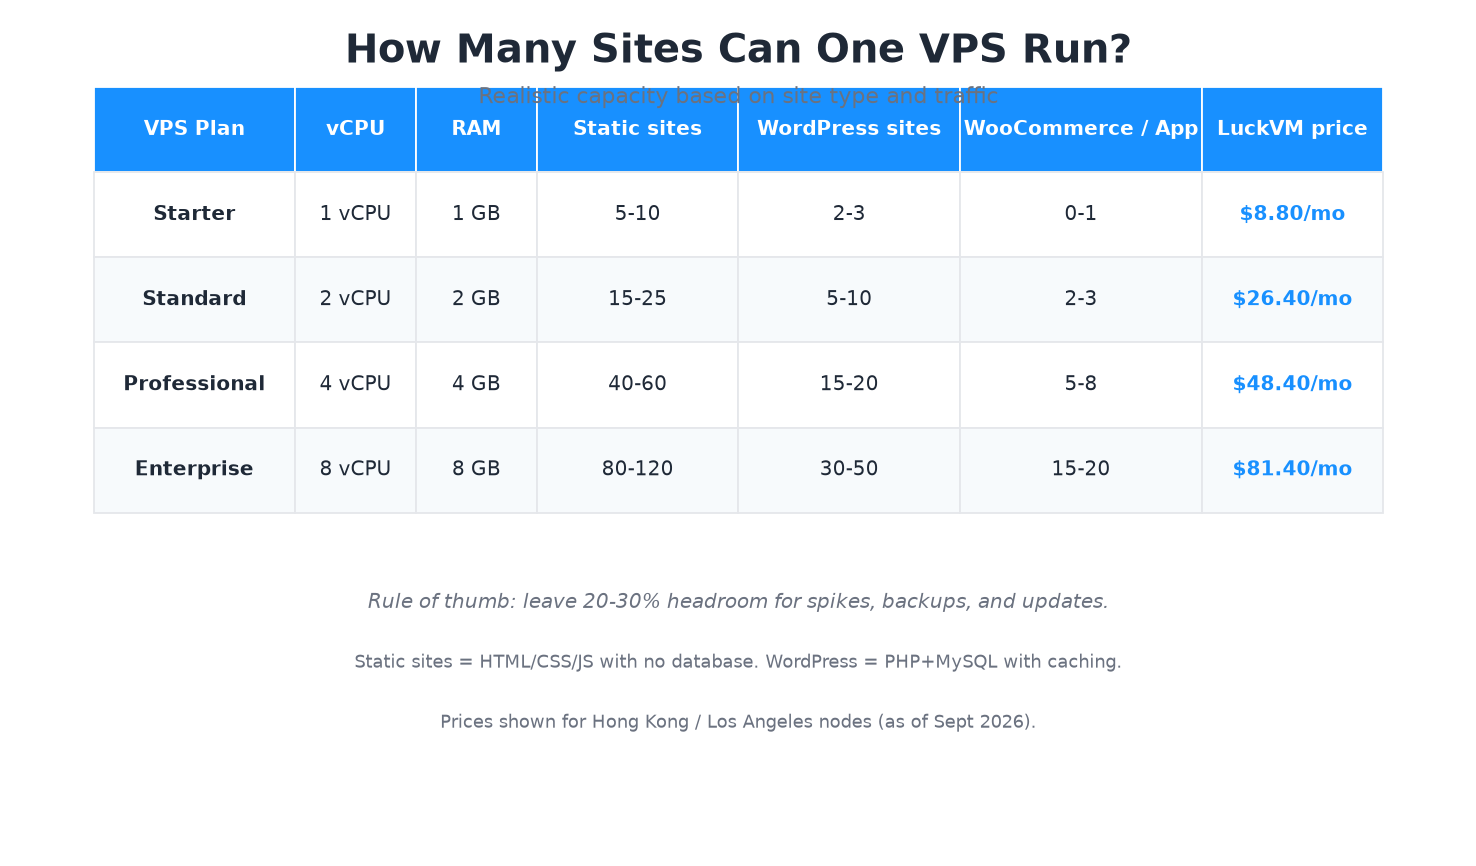
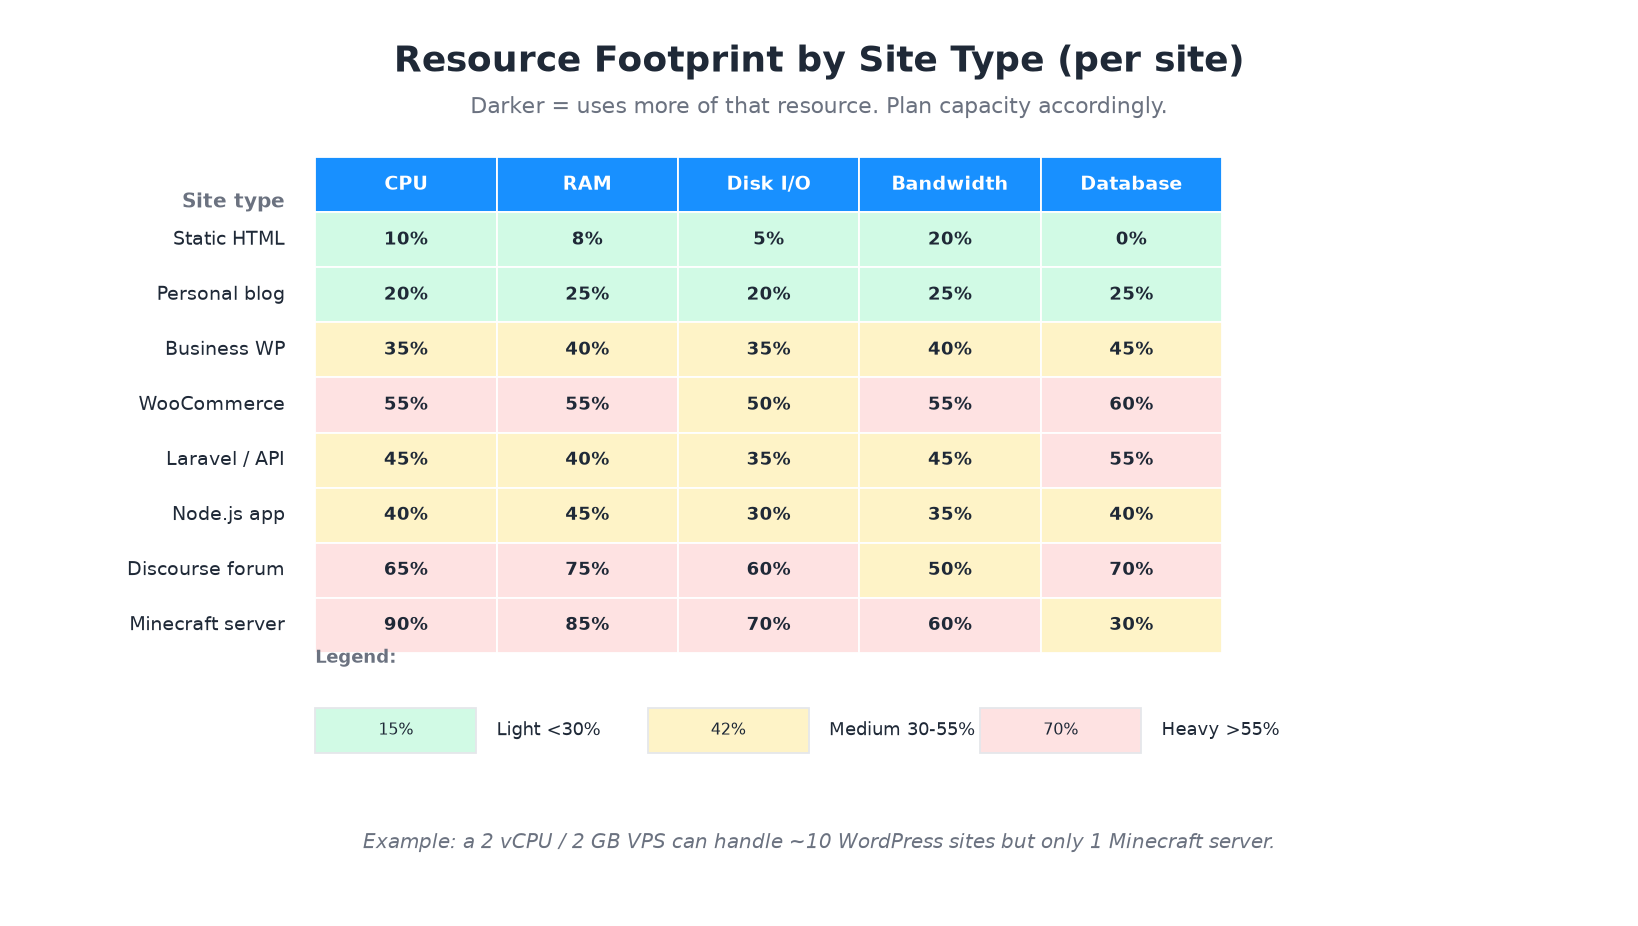
The honest answer: it depends entirely on what those sites do. A 1 vCPU / 1 GB VPS can serve 5-10 static HTML sites easily, but it will struggle with two busy WooCommerce stores. The table below gives realistic capacity numbers based on our experience running dozens of multi-tenant VPS instances at LuckVM.
Before you start stacking sites, look at your current resource usage with htop, free -h, and df -h. If your VPS is already at 70%+ RAM usage running one site, adding more will only make everything slow.
2. How One IP Address Serves Many Domains
You do not need a separate IP per website. This has been true since HTTP/1.1 introduced the Host header in 1997, and HTTPS got the same capability via SNI (Server Name Indication) in 2003.
When a visitor types https://blog.com into their browser, the browser resolves the domain to your VPS IP, opens a TCP connection to port 443, and sends an HTTPS request that includes the domain name in two places: the SNI extension (during TLS handshake) and the Host header (after encryption). Your web server reads that domain name and routes the request to the correct site's files.
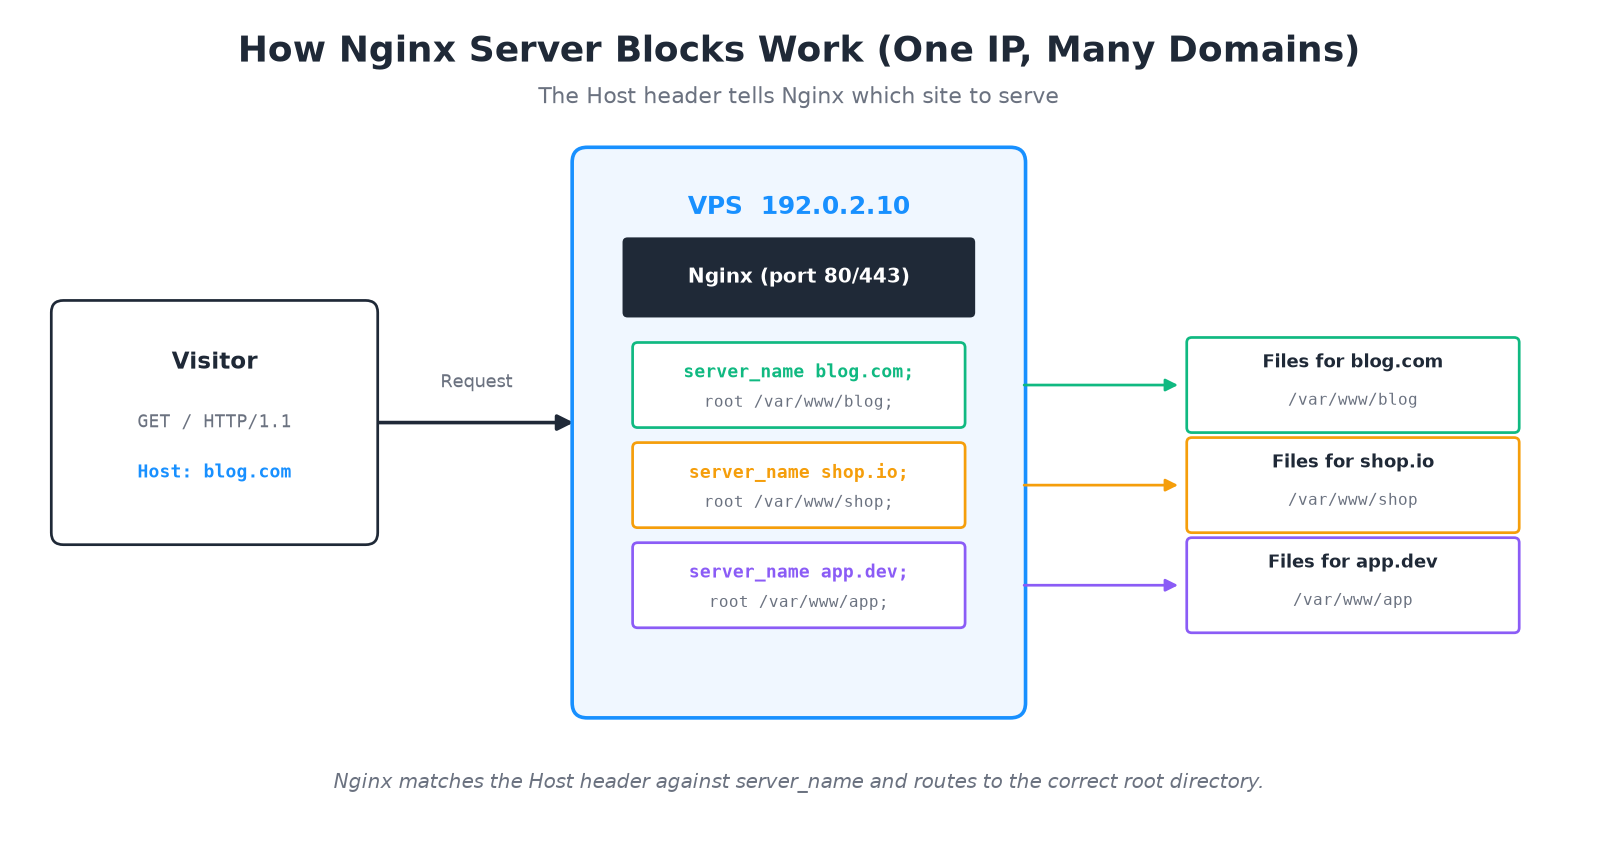
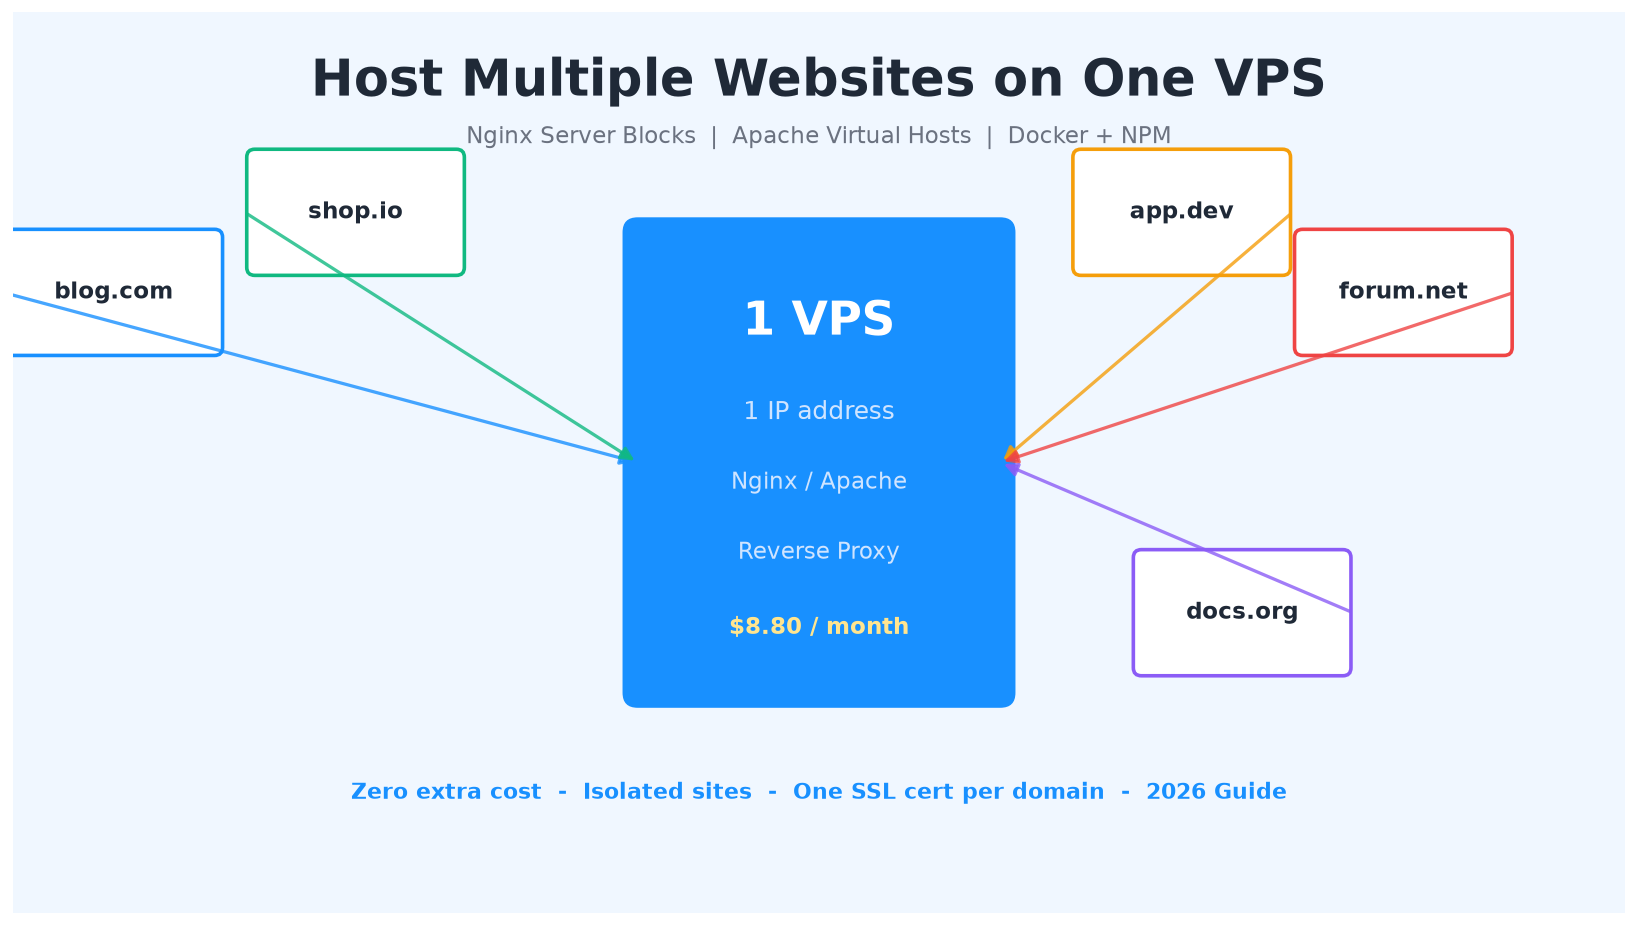
This is why you can host blog.com, shop.io, app.dev, forum.net, and docs.org all from a single IP address - the web server dispatches based on the domain name, not the IP.
3. Four Hosting Methods Compared
There are four mainstream approaches to multi-site hosting on a VPS. Each has tradeoffs in performance, isolation, ease of use, and resource overhead.
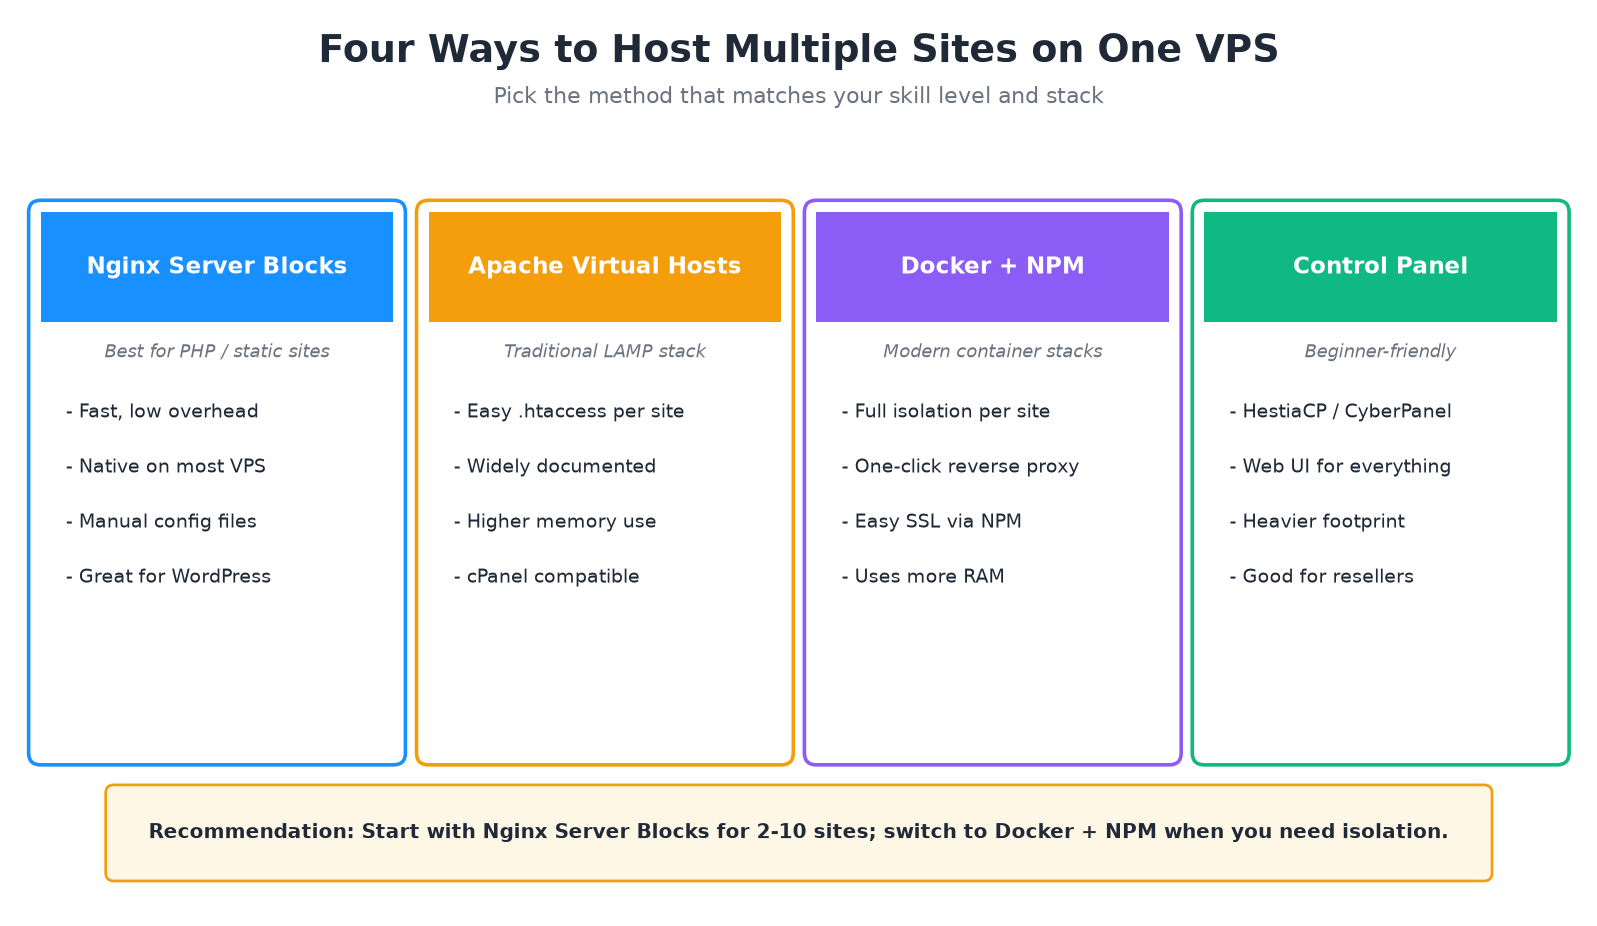
| Method | Best for | Overhead | Isolation | Learning curve |
|---|---|---|---|---|
| Nginx server blocks | PHP / static sites | Very low | Weak (shared Nginx) | Moderate |
| Apache VirtualHosts | Traditional LAMP, .htaccess | Medium | Weak | Low-Moderate |
| Docker + NPM | Mixed stacks, isolation | Medium-High | Strong (per-container) | Moderate-High |
| Control panel | Beginners, resellers | High | Medium | Low |
We recommend starting with Nginx server blocks for 2-10 sites. Move to Docker + Nginx Proxy Manager when you need hard isolation between sites (for example, one client's site must never be able to read another's files). Use a control panel if you strongly prefer a GUI over the command line.
4. Method 1: Nginx Server Blocks (Step-by-Step)
Nginx server blocks (the equivalent of Apache's VirtualHosts) are the lightest and fastest way to run multiple sites. Here's the complete process.
Step 1: Create directories for each site
# Create web root and log directory for each domain
sudo mkdir -p /var/www/blog.com/public
sudo mkdir -p /var/www/shop.io/public
sudo chown -R www-data:www-data /var/www/
sudo chmod -R 755 /var/www/
Drop your site files into each public/ directory. For WordPress, this is where you'd extract the WordPress tarball.
Step 2: Create a server block file for each domain
sudo nano /etc/nginx/sites-available/blog.comPaste this minimal config (adjust for PHP vs static):
server {
    listen 80;
    server_name blog.com www.blog.com;
    root /var/www/blog.com/public;
    index index.html index.htm index.php;

    access_log /var/log/nginx/blog.com.access.log;
    error_log  /var/log/nginx/blog.com.error.log;

    location / {
        try_files $uri $uri/ /index.php?$args;
    }

    location ~ \.php$ {
        include snippets/fastcgi-php.conf;
        fastcgi_pass unix:/run/php/php8.3-fpm.sock;
    }

    location ~ /\.ht {
        deny all;
    }

    # Static caching
    location ~* \.(jpg|jpeg|png|gif|ico|css|js|woff2)$ {
        expires 30d;
        add_header Cache-Control "public, immutable";
    }
}
Step 3: Enable the site and test
# Symlink to sites-enabled
sudo ln -s /etc/nginx/sites-available/blog.com /etc/nginx/sites-enabled/

# Test config for syntax errors - ALWAYS do this before reloading
sudo nginx -t

# If test passes, reload Nginx
sudo systemctl reload nginxnginx -t. If you reload Nginx with a broken config, Nginx will shut down and all your sites will go offline until you fix it. The test command catches syntax errors before they cause an outage.Repeat steps 2-3 for every domain you want to host. Each domain gets its own file in /etc/nginx/sites-available/, its own web root, and its own log files.
Step 4: Point DNS to your VPS
At your domain registrar (Cloudflare, Namecheap, GoDaddy, etc.), create an A record pointing to your VPS IP:
Type  Name     Value              TTL
A     @        192.0.2.10         300
A     www      192.0.2.10         300
Once DNS propagates (usually 1-5 minutes with a 300-second TTL), Nginx will serve the correct site based on the domain name.
5. Method 2: Apache Virtual Hosts
If you prefer Apache (common on cPanel-style setups or when you need .htaccess per-site overrides), the process is similar but uses VirtualHost files.
# Create the config
sudo nano /etc/apache2/sites-available/blog.com.conf
    ServerName blog.com
    ServerAlias www.blog.com
    DocumentRoot /var/www/blog.com/public

    ErrorLog ${APACHE_LOG_DIR}/blog.com.error.log
    CustomLog ${APACHE_LOG_DIR}/blog.com.access.log combined


        AllowOverride All
        Require all granted
# Enable and reload
sudo a2ensite blog.com.conf
sudo apache2ctl configtest
sudo systemctl reload apache2
Apache's main advantage is .htaccess support - each site can have its own rewrite rules without touching the global config. The downside is higher memory usage per request compared to Nginx.
6. Method 3: Docker + Nginx Proxy Manager
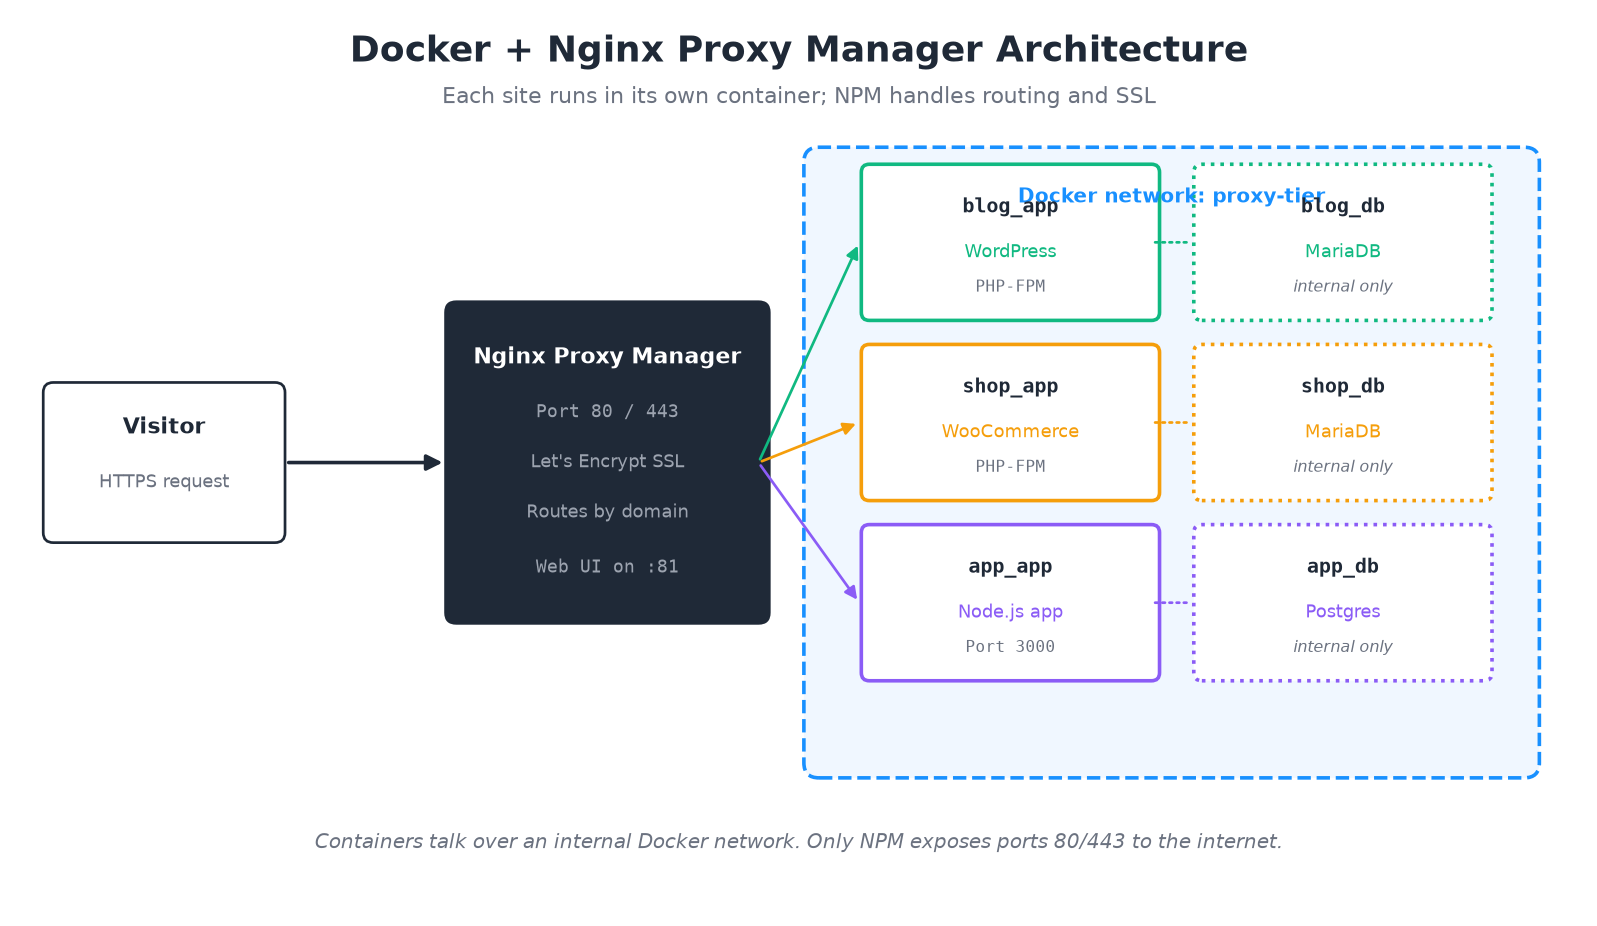
For maximum isolation (one compromised site can't touch another), run each site in its own Docker container and use Nginx Proxy Manager (NPM) as a single reverse proxy that routes traffic by domain. This is the modern approach and works great when you mix WordPress, Node.js, Ghost, Discourse, and other stacks.
Step 1: Create a Docker network
docker network create proxy-tierStep 2: Deploy Nginx Proxy Manager
mkdir -p ~/npm && cd ~/npm
nano docker-compose.yml
services:
npm:
image: jc21/nginx-proxy-manager:latest
container_name: npm
restart: unless-stopped
ports:
- "80:80"
- "443:443"
- "81:81" # Admin UI
volumes:
- ./data:/data
- ./letsencrypt:/etc/letsencrypt
networks:
- proxy-tier
networks:
proxy-tier:
external: truedocker compose up -d
# Admin UI at http://YOUR_IP:81
# Default login: admin@example.com / changemeStep 3: Deploy a site (example: WordPress)
mkdir -p ~/blog && cd ~/blog
nano docker-compose.yml
services:
blog_db:
image: mariadb:11
restart: unless-stopped
environment:
MYSQL_ROOT_PASSWORD: $(openssl rand -hex 16)
MYSQL_DATABASE: wordpress
MYSQL_USER: wp
MYSQL_PASSWORD: $(openssl rand -hex 16)
volumes:
- ./db:/var/lib/mysql
networks:
- proxy-tier
blog_app:
image: wordpress:php8.3-apache
restart: unless-stopped
environment:
WORDPRESS_DB_HOST: blog_db
WORDPRESS_DB_USER: wp
WORDPRESS_DB_PASSWORD: same_as_above
WORDPRESS_DB_NAME: wordpress
volumes:
- ./wp:/var/www/html
networks:
- proxy-tier
networks:
proxy-tier:
external: truedocker compose up -dStep 4: Add the proxy host in NPM
Open the NPM admin UI at http://YOUR_IP:81, go to Proxy Hosts > Add Proxy Host:
- Domain Names:
blog.com,www.blog.com - Forward Hostname / IP:
blog_app(the container name - Docker DNS resolves it) - Forward Port:
80 - Websockets Support: On (needed for some apps)
- SSL tab: Request a new SSL cert, enable Force SSL, HTTP/2
NPM automatically obtains a Let's Encrypt certificate and keeps it renewed. Repeat step 3-4 for every additional site. Each site is fully isolated in its own containers.
7. Method 4: Control Panels (HestiaCP, CloudPanel, CyberPanel)
If editing config files sounds miserable, a hosting control panel gives you a web UI to add domains, create databases, install SSL, and manage email with point-and-click. Here are the three best open-source options in 2026:
| Panel | Web server | Best for | Resource use |
|---|---|---|---|
| HestiaCP | Nginx + Apache or Nginx-only | General multi-site, resellers | ~500 MB base |
| CloudPanel | Nginx | WordPress / PHP performance | ~300 MB base |
| CyberPanel | OpenLiteSpeed | WordPress with LSCache | ~400 MB base |
CloudPanel is our pick for WordPress-focused servers. Install it with one command:
curl -sS https://installer.cloudpanel.io/ce/v2/install.sh -o install.sh && \
sudo bash install.sh
After installation, you access the panel at https://YOUR_IP:8443, and adding a new site is literally: click Add Site → enter domain → select application (WordPress, Static, Laravel, etc.) → click Create. SSL is provisioned automatically.
8. Free SSL with Let's Encrypt for All Domains
There is zero reason to pay for SSL certificates in 2026. Let's Encrypt issues free, browser-trusted certificates that work everywhere, and Certbot automates both issuance and renewal.
Install Certbot and the Nginx plugin:
sudo apt update
sudo apt install certbot python3-certbot-nginx -y
Issue certificates for all domains at once:
# Single domain with www
sudo certbot --nginx -d blog.com -d www.blog.com

# Or do all domains in one command
sudo certbot --nginx -d blog.com -d www.blog.com \
                       -d shop.io -d www.shop.io \
                       -d app.dev
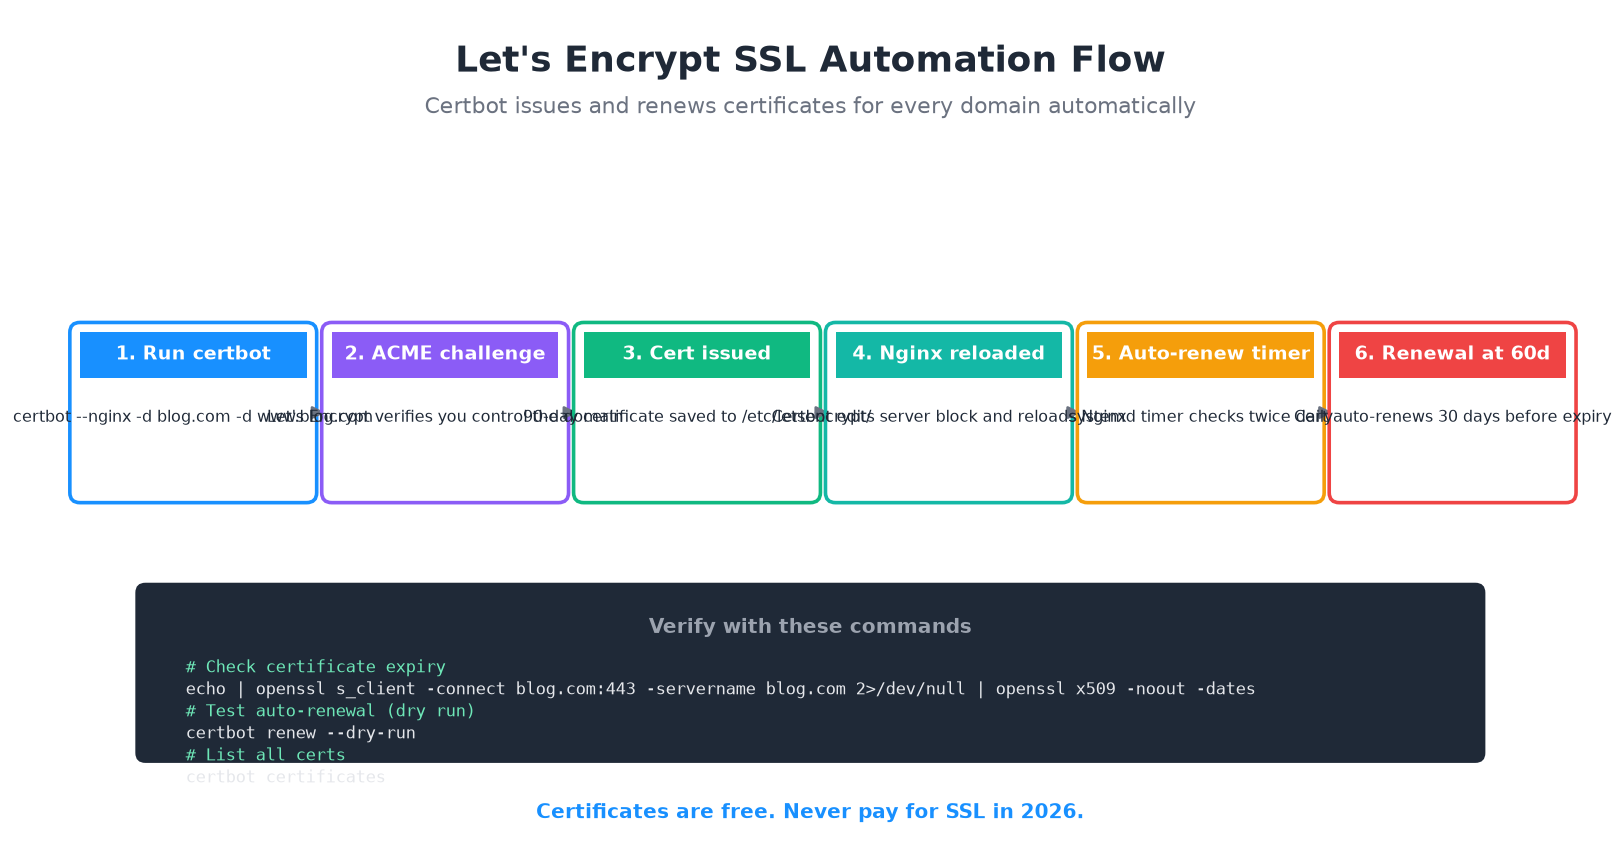
Certbot will:
- Verify you control each domain via the HTTP-01 challenge
- Obtain a certificate (valid for 90 days)
- Edit your Nginx config to use the certificate and redirect HTTP to HTTPS
- Reload Nginx
- Install a systemd timer that auto-renews the cert when it's 30 days from expiry
Verify auto-renewal is set up:
sudo systemctl list-timers | grep certbot
# You should see a certbot.timer scheduled twice daily

# Test renewal (dry run - doesn't actually renew)
sudo certbot renew --dry-run
9. Per-Site Isolation and Resource Limits
When you host multiple sites on one VPS, one misbehaving site can consume all CPU, RAM, or disk I/O and take down everything else. Here's how to prevent that.
PHP-FPM pool per site
For Nginx + PHP setups, create a separate PHP-FPM pool for each site with its own Linux user and resource limits:
# Create a user per site (no login shell)
sudo useradd -r -s /usr/sbin/nologin blog-user
sudo chown -R blog-user:blog-user /var/www/blog.com

# Create a pool config
sudo nano /etc/php/8.3/fpm/pool.d/blog.conf
[blog]
user = blog-user
group = blog-user
listen = /run/php/blog.sock
pm = dynamic
pm.max_children = 5 ; Max concurrent PHP processes
pm.start_servers = 2
pm.min_spare_servers = 1
pm.max_spare_servers = 3
php_admin_value[memory_limit] = 256M
php_admin_value[max_execution_time] = 60sudo systemctl restart php8.3-fpmUpdate the Nginx server block to point to this pool's socket:
fastcgi_pass unix:/run/php/blog.sock;CPU limits with systemd
For particularly heavy processes, cap their CPU usage:
# Limit a service to 50% of one CPU core
sudo systemctl set-property myapp.service CPUQuota=50%
Monitor with real tools
# Install htop and iotop for live monitoring
sudo apt install htop iotop -y

# For long-term metrics, install Netdata (one-liner)
wget -O /tmp/netdata-kickstart.sh https://get.netdata.cloud/kickstart.sh
sudo sh /tmp/netdata-kickstart.sh --dont-wait
Netdata gives you a beautiful dashboard at http://YOUR_IP:19999 showing per-process CPU, RAM, disk I/O, and network. You'll immediately see if one site is hogging resources.
10. Common Mistakes to Avoid
Mistake 1: Forgetting to test config before reloading
Always run sudo nginx -t or sudo apache2ctl configtest before reloading. A missing semicolon in a config file will take down every site on the server.
Mistake 2: Pointing DNS before the site is ready
If you point blog.com to the VPS before creating the server block, visitors will hit the default Nginx page or, worse, another site on the server. Test with your /etc/hosts file first:
# On your local machine (not the VPS), add:
# 192.0.2.10 blog.com www.blog.com
# This lets you test the site before changing real DNS.
Mistake 3: Using the default Nginx site catch-all
The default /etc/nginx/sites-available/default acts as a catch-all for any domain that doesn't match a server block. Remove or disable it to prevent random domains (or someone else's typo domains pointing to your IP) from serving your content:
sudo rm /etc/nginx/sites-enabled/default
sudo nginx -t && sudo systemctl reload nginx
Mistake 4: Oversubscribing RAM
Five WordPress sites each with memory_limit = 512M and pm.max_children = 10 can theoretically consume 25 GB of RAM. Set realistic per-pool limits based on actual traffic. Start small and scale up.
Mistake 5: Hosting email on the same VPS
It's tempting to run Postfix/Dovecot on the same server, but IP reputation for email is fragile. If any site on your VPS gets compromised and sends spam, your IP gets blacklisted and all email from all your domains goes to spam. Use a dedicated email service like MXRoute, Migadu, or transactional providers like Postmark/Resend.
Mistake 6: Not setting up backups
Multiple sites on one server means one server failure takes everything down. At minimum:
- Enable automated VPS snapshots (LuckVM provides this in the control panel)
- Run daily off-server backups to a different location (S3, Backblaze B2, or another VPS)
- Test restores quarterly - a backup you can't restore is not a backup
Mistake 7: Using the same database user for all sites
Create a separate database and database user for each site. If one site's credentials are compromised (e.g., a vulnerable WordPress plugin), the attacker can't access or drop other sites' databases.
11. Frequently Asked Questions
How many websites can I host on one VPS?
A 1 vCPU / 1 GB VPS can host 5-10 static sites or 2-3 WordPress sites. A 2 vCPU / 2 GB VPS handles 15-25 static or 5-10 WordPress sites. Leave 20-30% headroom for traffic spikes, backups, and updates. A busy WooCommerce store or Node.js app needs closer to 1-2 GB of RAM dedicated to it.
Do I need a separate IP address for each website?
No. The HTTP Host header (for HTTP) and SNI (for HTTPS) let hundreds of domains share a single IP address. This has been standard practice for over 20 years. You only need multiple IPs if you're hosting legacy clients that don't support SNI (extremely rare in 2026) or if you need per-domain IP reputation for email.
Can I mix WordPress, static sites, and Node.js on the same VPS?
Yes. Use Nginx as the front-end reverse proxy. It can serve static files directly, proxy PHP requests to php-fpm, and proxy Node.js apps to their local ports (e.g., http://127.0.0.1:3000). With Docker + NPM, each app runs in its own container and NPM routes traffic to the right container by domain.
Do I need to pay for SSL certificates?
No. Let's Encrypt issues free 90-day certificates trusted by all major browsers. Certbot installs them with one command and auto-renews them. The only reason to pay for an SSL certificate in 2026 is if you need an EV (Extended Validation) certificate for a bank or medical site, which requires business identity verification.
Will one site crashing take down all the others?
With Nginx server blocks or Apache VirtualHosts, a PHP crash in one site typically won't affect others because each request is isolated at the process level. However, a site that consumes all RAM or CPU will degrade everything. Docker provides hard isolation - a container can crash without affecting other containers. For critical sites, Docker is the safer choice.
Which method is best for beginners?
A control panel like CloudPanel or HestiaCP gives you a web UI to add domains, create databases, install WordPress, and provision SSL with a few clicks. It uses more RAM but eliminates the need to edit config files manually. Start there if the command line feels intimidating.
How do I prevent one WordPress site from consuming all resources?
Create a separate Linux user and PHP-FPM pool for each site with explicit pm.max_children and memory_limit values. For Docker deployments, set mem_limit and cpus in the compose file. Monitor with Netdata to see which sites are actually using resources.
Can I host email on the same VPS as my websites?
Technically yes, but we strongly recommend against it. Email deliverability depends on IP reputation, which is easily damaged by any site on the server getting compromised or sending form spam. Use a dedicated mail service like MXRoute, Migadu, or transactional providers like Postmark, Resend, or Brevo instead.
Ready to host multiple sites?
LuckVM VPS plans start at $8.80/month with NVMe SSD, CN2 GIA network (Hong Kong / LA), 5-10 minute provisioning, and 24/7 support. The Standard plan ($26.40/mo) comfortably runs 5-10 WordPress sites.
View VPS Plans →