TL;DR — The Short Answer
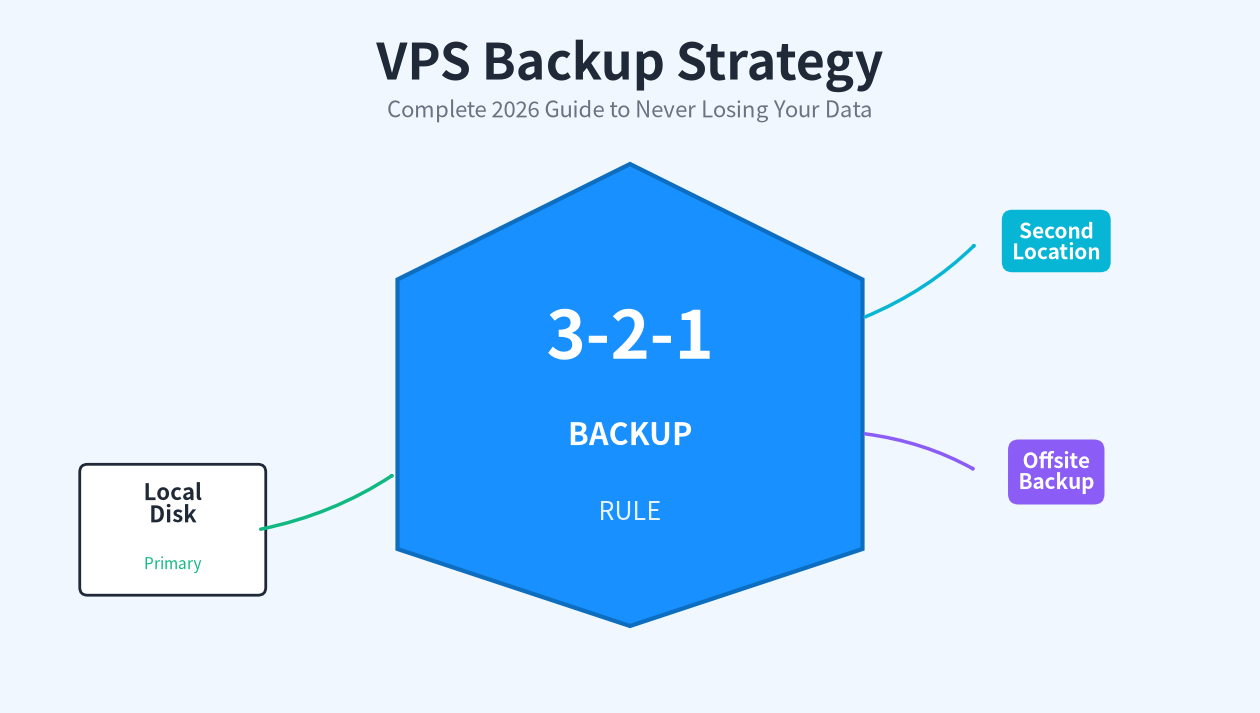
Every VPS needs at least a 3-2-1 backup strategy: 3 copies of your data, on 2 different media types, with 1 copy stored offsite. For most small-to-medium VPS users, Restic or BorgBackup with automated daily backups to a second provider (like Backblaze B2 or another VPS) plus weekly test restores is the practical sweet spot. This guide walks you through the entire setup with copy-paste commands.
1. Why Your VPS Will Eventually Lose Data
If you run a VPS long enough, something will go wrong. It is not a matter of if, but when. Data loss incidents are common enough that any administrator without backups is gambling with their business, their clients, or their personal projects.
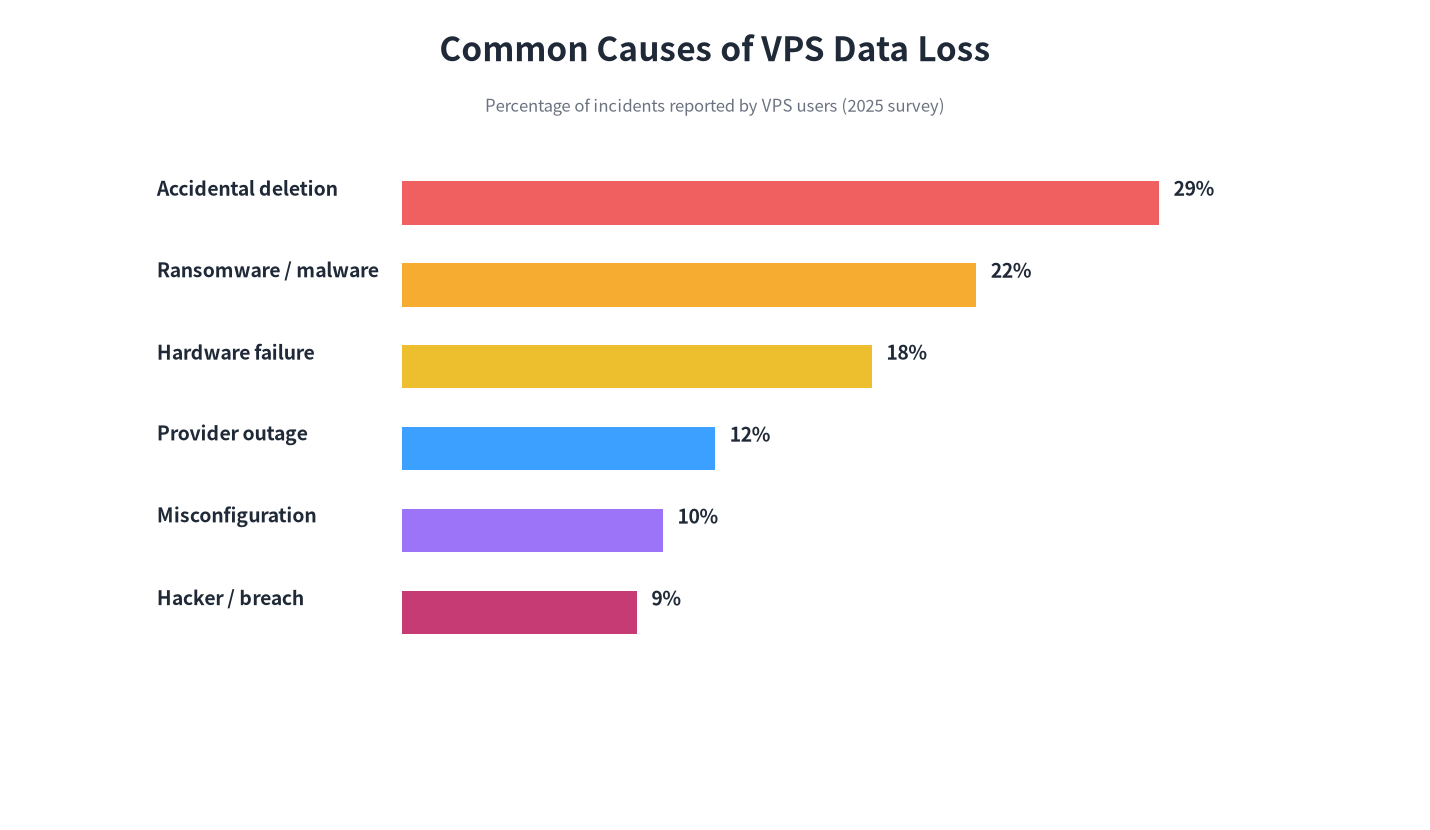
Figure 1: Most common causes of VPS data loss incidents (2025 hosting industry survey)
Here are the scenarios we see most often:
- Accidental deletion (29%): You type
rm -rf /var/wwwinstead ofrm -rf /var/www/old-site. It happens to everyone. - Ransomware and malware (22%): A vulnerable WordPress plugin gets exploited, your files get encrypted, and attackers demand payment.
- Hardware failure (18%): NVMe SSDs can and do die. RAID helps with uptime but it is not a backup (it protects against hardware failure, not deletion or corruption).
- Provider outages (12%): Even major providers have had incidents where customer data was permanently lost.
- Misconfiguration (10%): A failed migration script, a botched OS upgrade, or an incorrectly formatted volume.
- Hackers and breaches (9%): After gaining access, attackers often wipe logs and data to cover their tracks.
2. The 3-2-1 Backup Rule Explained
The 3-2-1 rule is the industry-standard backup strategy recommended by the US-CERT (United States Computer Emergency Readiness Team) and nearly every IT professional. It is simple but remarkably effective.
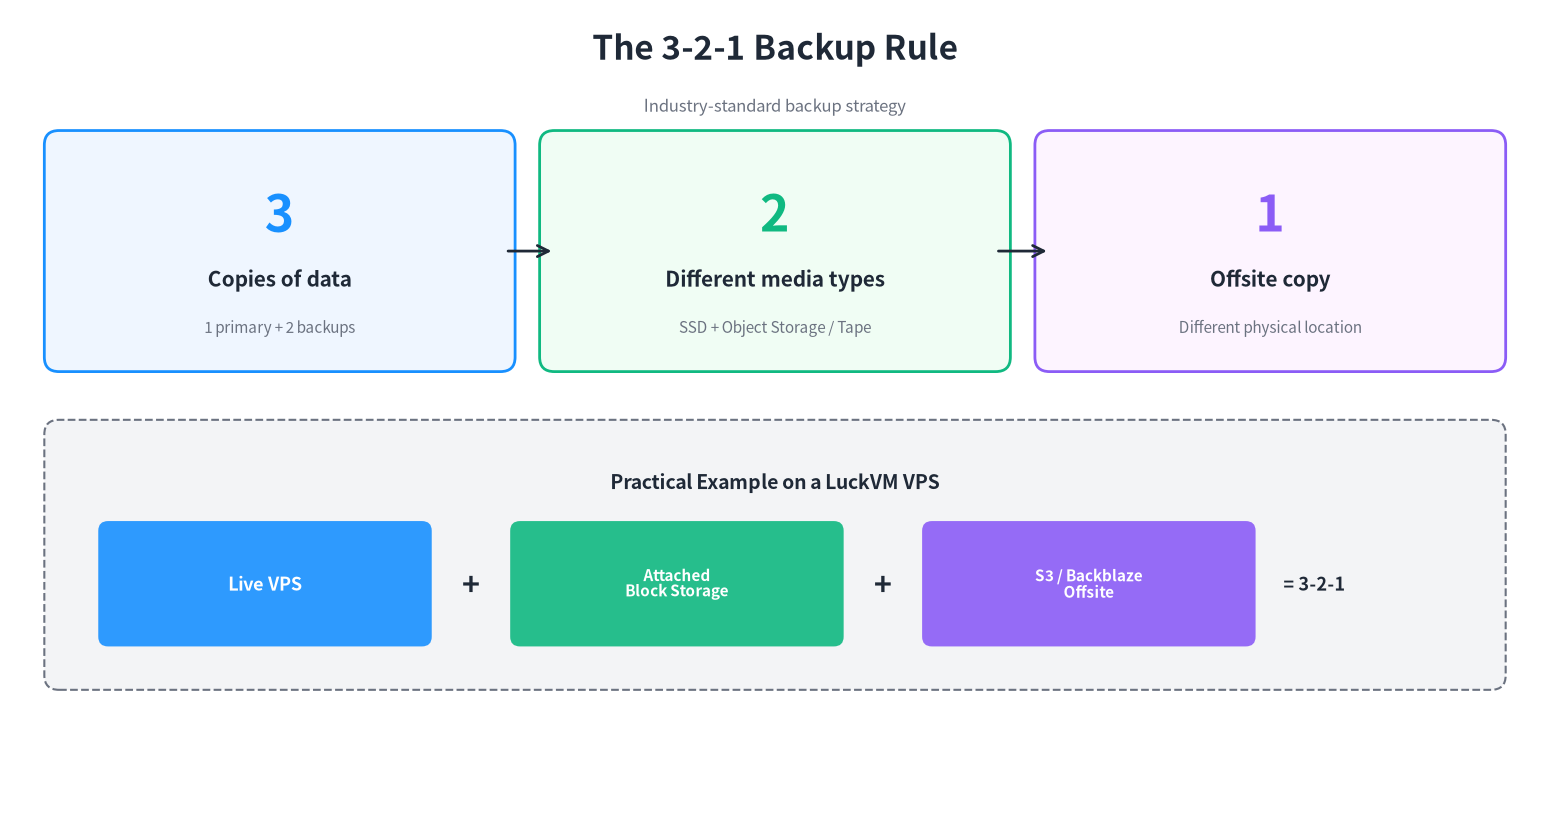
Figure 2: The 3-2-1 backup rule applied to a typical VPS setup
The rule means you should have:
- 3 copies of your data total — the original production data plus two backups
- 2 different media types — for example, NVMe SSD (your live VPS) plus object storage or external disk
- 1 offsite copy — stored at a different physical location, ideally with a completely different provider
For a VPS, a practical 3-2-1 setup looks like this:
- Primary: Your live VPS (NVMe SSD at your provider, e.g., LuckVM)
- Backup #1: Daily incremental backups to attached block storage or a cheap secondary VPS at the same provider (for fast restores)
- Backup #2 (offsite): Daily or weekly sync to an external object storage service like Backblaze B2, AWS S3, or a VPS at a completely different provider
3. Open-Source Backup Tools Compared
There is no single "best" backup tool — it depends on your technical comfort, your backup destinations, and your data size. Here is a comparison of the tools we recommend for VPS users in 2026:
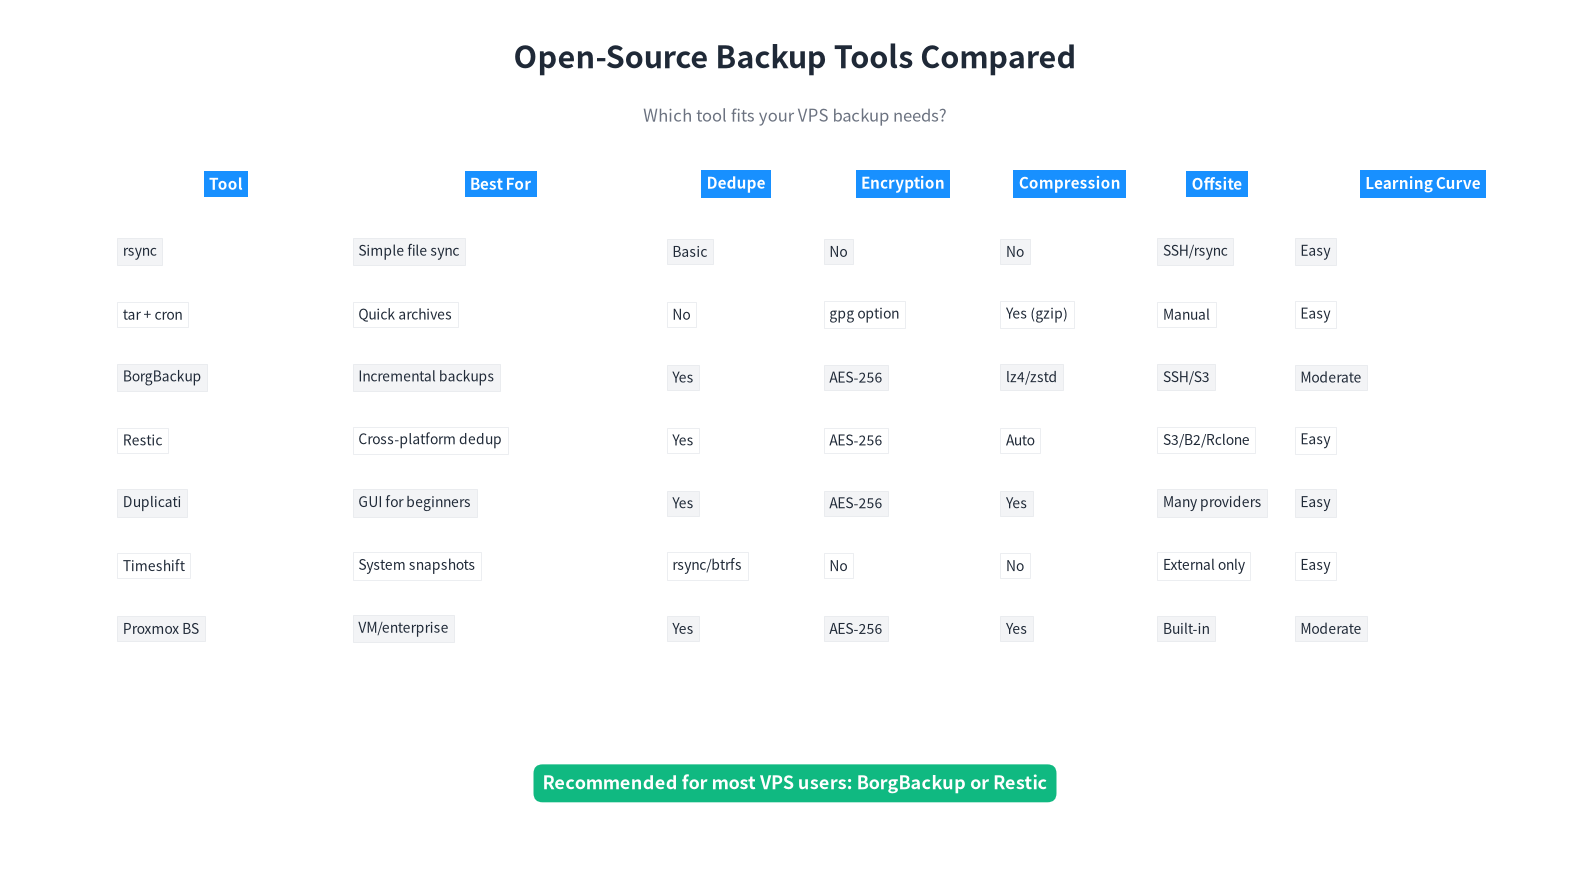
Figure 3: Comparison of popular open-source VPS backup tools (2026)
| Tool | Strengths | Weaknesses | Best For |
|---|---|---|---|
| rsync | Universal, simple, fast incremental file sync | No encryption, no deduplication, no versioning built-in | Quick server-to-server sync, simple mirroring |
| tar + cron | No extra software needed, everyone understands it | No incremental backups without scripting, slow for large data | Tiny VPS, quick config backups, beginners |
| BorgBackup | Excellent deduplication, compression, encryption, fast | Written in Python, BorgBase hosting recommended | Linux VPS file-level backups, servers with lots of repeated data |
| Restic | Cross-platform, easy to use, many backend support, fast | Slightly higher memory usage than Borg | Most VPS users, mixed environments, S3/B2 backends |
| Duplicati | Web GUI, great for beginners, many cloud backends | .NET/Mono runtime, resource-heavy for large datasets | Beginners who want a GUI interface |
| resticprofile | YAML profiles over Restic, scheduling built-in | Another layer to learn | Users who want to manage multiple Restic repos cleanly |
| Kopia | Very fast, good deduplication, GUI available | Newer and less battle-tested than Borg/Restic | Power users who want speed and modern features |
For this guide, we will walk through Restic (easiest to set up with many backends) and BorgBackup (excellent for Linux-only environments with SSH backends). Both are free, open-source, and battle-tested by millions of servers.
4. Tutorial: Set Up Restic Backups in 10 Minutes
Restic is our recommended starting point for most VPS users. It is fast, secure, supports deduplication and encryption out of the box, and can back up to local storage, SFTP servers, Amazon S3, Backblaze B2, Google Cloud Storage, and many more backends.
Step 1: Install Restic
# Ubuntu / Debian
sudo apt update && sudo apt install restic -y

# Verify installation
restic version
# restic 0.17.1 compiled with go1.22 on linux/amd64
Step 2: Initialize a Repository
A repository is where your backups live. It can be a local directory, an SFTP path, or an S3-compatible bucket. Let's set up two repositories: one fast local one and one offsite to Backblaze B2.
Local repository (for fast restores):
# Create backup directory
sudo mkdir -p /backups/restic
sudo restic init --repo /backups/restic
# You'll be prompted to set a password. SAVE THIS PASSWORD.
# Without it, your backups are unrecoverable. Store it in a password manager.
Offsite repository (Backblaze B2):
# Set B2 credentials (get these from Backblaze dashboard)
export B2_ACCOUNT_ID="your_account_id"
export B2_ACCOUNT_KEY="your_application_key"

# Initialize the remote repository
sudo restic -r b2:your-bucket-name:/vps-backups init
Step 3: Run Your First Backup
# Back up critical directories to local repo
sudo restic -r /backups/restic backup \
  --exclude-caches \
  --exclude="/tmp" \
  --exclude="/proc" \
  --exclude="/sys" \
  --exclude="/dev" \
  --exclude="/run" \
  --exclude="/mnt" \
  --exclude="/media" \
  /home /etc /var/www /var/lib/mysql /var/log

# Restic will show a summary:
# Files:        42318 new,     0 changed,     0 unmodified
# Dirs:         3842 new
# Data blobs:   14283
# Tree blobs:   3842
# Added to repo: 2.843 GiB
# snapshot 6a8e2b9f saved
Step 4: List Snapshots and Restore a Test File
# List all snapshots
sudo restic -r /backups/restic snapshots

# Restore a single file (test before you need it!)
sudo restic -r /backups/restic restore latest \
  --target /tmp/restore-test \
  --include="/var/www/html/wp-config.php"

# Check the restored file
ls -la /tmp/restore-test/var/www/html/wp-config.php
Step 5: Automate with a Script
sudo nano /usr/local/bin/restic-backup.shPaste this script (adjust paths and password to match yours):
#!/bin/bash
set -euo pipefail
export RESTIC_REPOSITORY="/backups/restic"
export RESTIC_PASSWORD="your-repository-password"
# For B2:
# export B2_ACCOUNT_ID="xxx"
# export B2_ACCOUNT_KEY="xxx"
# export RESTIC_REPOSITORY="b2:your-bucket:/vps"

LOGFILE="/var/log/restic-backup.log"
echo "=== Backup started $(date) ===" >> $LOGFILE

restic backup \
  --exclude-caches \
  --one-file-system \
  --exclude="/tmp" --exclude="/proc" --exclude="/sys" \
  --exclude="/dev" --exclude="/run" --exclude="/mnt" \
  /home /etc /var/www /var/lib/mysql \
  >> $LOGFILE 2>&1

# Prune old snapshots: keep last 7 daily, 4 weekly, 12 monthly
restic forget --prune \
  --keep-daily 7 --keep-weekly 4 --keep-monthly 12 \
  >> $LOGFILE 2>&1

# Verify repository integrity
restic check >> $LOGFILE 2>&1

echo "=== Backup finished $(date) ===" >> $LOGFILE
sudo chmod +x /usr/local/bin/restic-backup.sh
# Run it once to test
sudo /usr/local/bin/restic-backup.shStep 6: Schedule with Cron
# Edit root's crontab
sudo crontab -e

# Add this line to run daily at 3:00 AM
0 3 * * * /usr/local/bin/restic-backup.sh

# Optional: run offsite sync at 4:00 AM (if using B2)
0 4 * * * /usr/local/bin/restic-offsite.shrestic copy to copy snapshots between repositories (e.g., from local to B2) instead of running two separate backups. This saves bandwidth because only new data needs to be uploaded to the second repository.5. Tutorial: Set Up BorgBackup for Linux Snapshots
BorgBackup (Borg) is a deduplicating backup program popular in the Linux world. It creates space-efficient, encrypted, compressed backups and is especially fast when backing up to SSH-accessible servers.
Step 1: Install Borg
# Ubuntu 22.04/24.04
sudo apt update && sudo apt install borgbackup -y

# Or get the latest version from the official release
pip3 install borgbackup
Step 2: Initialize a Borg Repository
# Local repository
sudo mkdir -p /backups/borg
sudo borg init --encryption=repokey-blake2 /backups/borg

# Remote repository via SSH (on a cheap backup VPS)
sudo borg init --encryption=repokey-blake2 \
  user@backup-server.example.com:/backups/myvps
Step 3: Create a Backup
sudo borg create --stats --progress --compression zstd \
  /backups/borg::$(date +%Y-%m-%d) \
  /home /etc /var/www /var/lib/mysql \
  --exclude-caches \
  --exclude '/tmp' --exclude '/proc' --exclude '/sys'
Borg will output statistics showing how much new data was added vs. deduplicated. After your first full backup, subsequent runs will only transfer changed chunks, making them extremely fast.
Step 4: Automate Pruning and Check
#!/bin/bash
export BORG_REPO=/backups/borg
export BORG_PASSPHRASE='your-passphrase'

borg create --stats --compression zstd \
  $BORG_REPO::$(date +%Y-%m-%d_%H%M) \
  /home /etc /var/www /var/lib/mysql \
  --exclude-caches --exclude '/tmp'

borg prune -v --list \
  --keep-daily=7 --keep-weekly=4 --keep-monthly=12 \
  $BORG_REPO

borg compact $BORG_REPO
borg check $BORG_REPO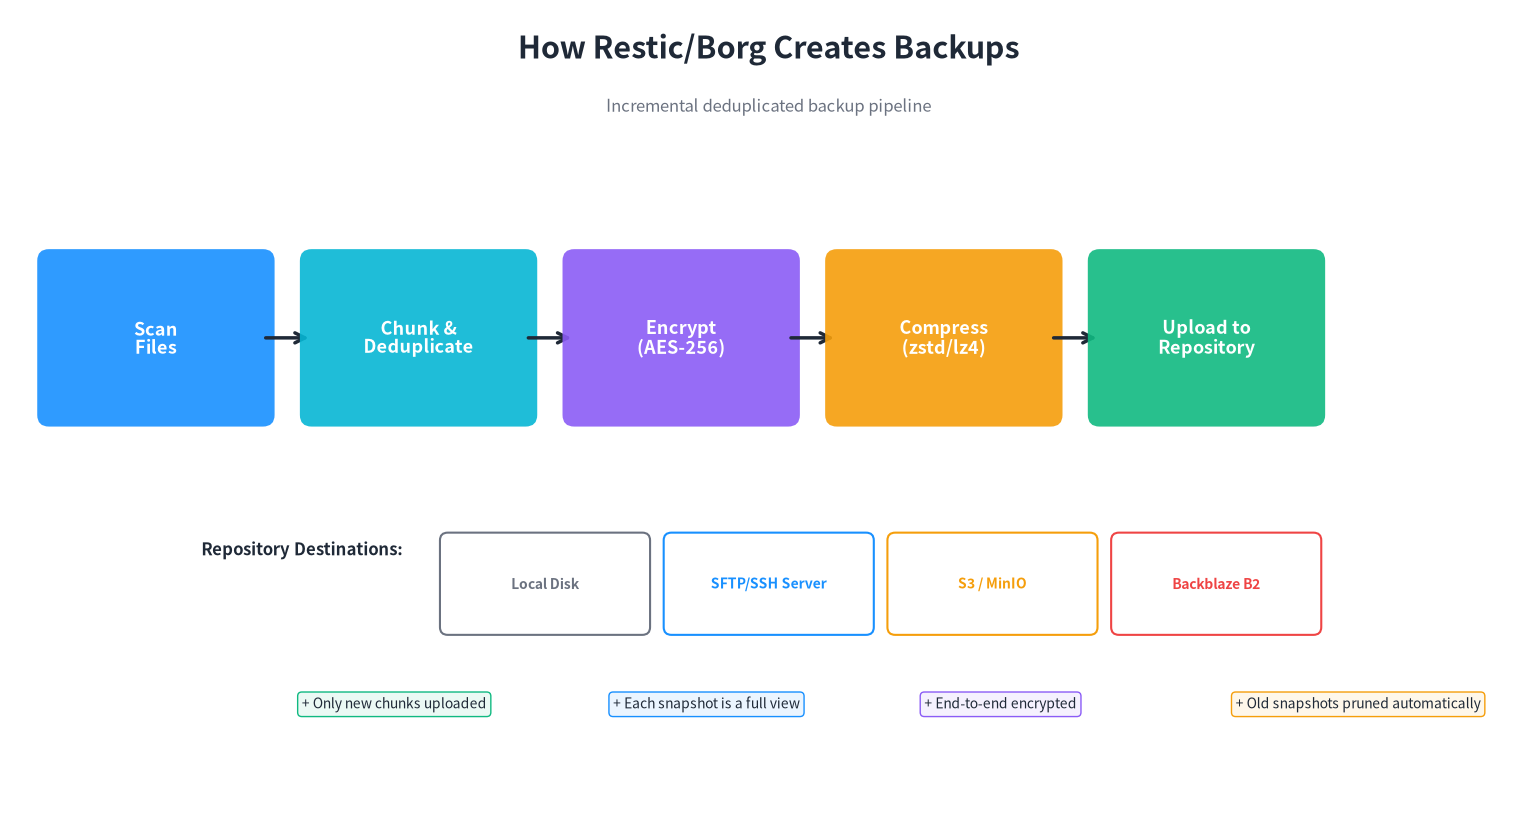
Figure 4: The deduplicated backup pipeline used by Restic and BorgBackup
6. Automated Backup Schedule & Retention Policy
A backup that runs only when you remember it is not a backup. You need an automated schedule with a sensible retention policy that balances storage costs against restore point granularity.
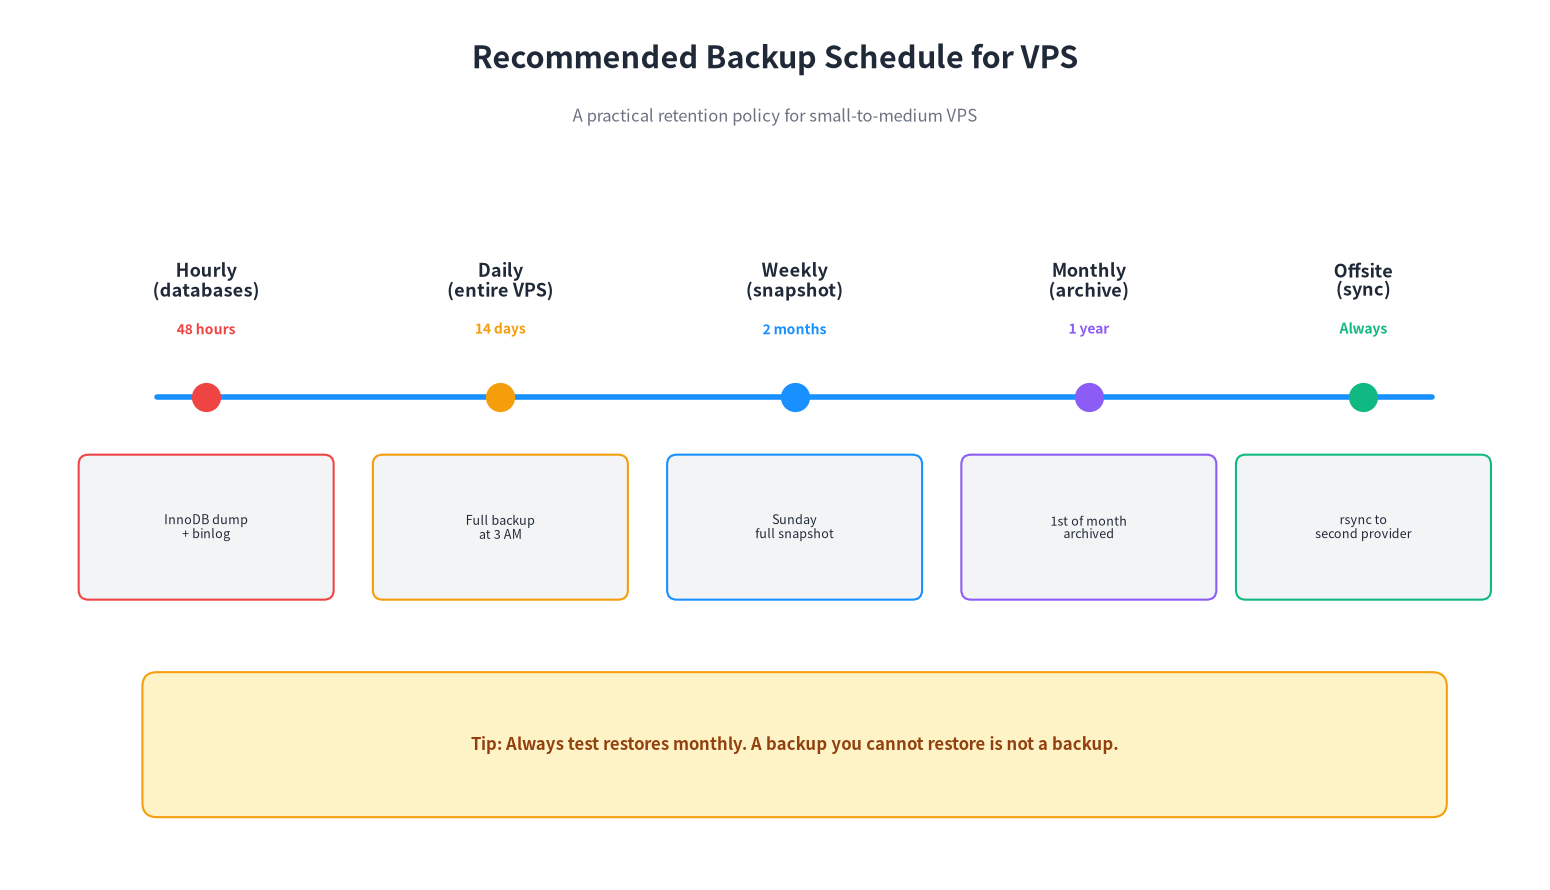
Figure 5: Recommended backup schedule and retention policy for small-to-medium VPS
Here is the schedule we recommend for most production VPS:
| Frequency | What to Back Up | Retention | Destination |
|---|---|---|---|
| Hourly | Database dumps (MySQL/PostgreSQL) | 48 hours | Local disk |
| Daily (3 AM) | Full incremental backup of entire server | 14 days | Local repo + Offsite |
| Weekly (Sunday) | Full snapshot verified with check | 2 months | Offsite |
| Monthly (1st) | Archive copy for long-term retention | 12 months | Cold storage / B2 |
| Continuous | Binary log (MySQL) or WAL (PostgreSQL) | 7 days | Local disk |
Database-Specific Backups
Backing up database files directly while the database is running can lead to corrupted backups. Always use the database's native dump tool:
# MySQL / MariaDB hourly dump script
#!/bin/bash
BACKUP_DIR=/backups/mysql
mkdir -p $BACKUP_DIR
mysqldump --single-transaction --quick --lock-tables=false \
  --all-databases -u root | gzip > $BACKUP_DIR/all-$(date +%H).sql.gz
# Keep last 48 hourly dumps
find $BACKUP_DIR -name "*.sql.gz" -mtime +2 -delete
# PostgreSQL hourly dump
#!/bin/bash
BACKUP_DIR=/backups/postgres
mkdir -p $BACKUP_DIR
pg_dumpall -U postres | gzip > $BACKUP_DIR/all-$(date +%H).sql.gz
find $BACKUP_DIR -name "*.sql.gz" -mtime +2 -delete7. Offsite Backup: Sync to a Second Provider
Local backups protect you from accidental deletion and quick restores, but they do not protect you from provider-wide outages, data center fires, ransomware that encrypts attached storage, or account compromise. You must have at least one backup at a different provider.
Here are the most cost-effective offsite options in 2026:
| Provider | Storage Cost | Egress Cost | Best For |
|---|---|---|---|
| Backblaze B2 | $6/TB/month | 1 GB free, then $0.01/GB | Restic/Kopia repos, general purpose |
| Wasabi | $7/TB/month | Free (with conditions) | Large backups, frequent restores |
| AWS S3 Glacier | $1/TB/month | Expensive, slow retrieval | Long-term archives |
| Cloudflare R2 | $0.015/GB/month | Free | S3-compatible, zero egress fees |
| Second VPS (rsync.net / Hetzner Storage Box) | $3-5/TB/month | Usually free between providers | BorgBase, SSH-based Borg repos |
Ransomware Protection: Immutable Backups
One increasingly important feature for 2026 is immutable (WORM) backups. Object locking (S3 Object Lock, Backblaze B2 Object Lock) prevents anyone — including you or an attacker who gained root access — from deleting or modifying existing backup snapshots for a set retention period. If ransomware encrypts your server, your offsite immutable backups remain untouched.
Both Restic and Kopia support S3 Object Lock. Enable it when creating your bucket if your provider supports it.
8. How to Actually Restore (The Most Important Step)
A backup you have never tested restoring is not a backup. It is a hope. Every administrator has horror stories of "backed up" data that turned out to be corrupted, incomplete, or missing critical files. You must practice restores regularly.
Full Server Restore Workflow
# 1. Spin up a fresh VPS (same OS, same disk size or larger)
# 2. Install the same backup tool
sudo apt install restic -y

# 3. Restore the latest snapshot from offsite backup
sudo restic -r b2:your-bucket:/vps-backups restore latest \
  --target / \
  --exclude="/etc/network/*" \
  --exclude="/etc/fstab" \
  --exclude="/etc/hostname"
# (Exclude network/fstab because the new VPS will have different network config)

# 4. Fix permissions if needed
sudo chown -R www-data:www-data /var/www/

# 5. Reinstall bootloader if restoring to different hardware
# 6. Reboot and verify services are running
sudo systemctl restart nginx mysql php-fpm
curl -I http://your-server-ip
Restore a Single File or Directory
# Restore a single file to /tmp
sudo restic -r /backups/restic restore latest \
  --target /tmp/restore \
  --include="/var/www/html/wp-config.php"

# Restore entire directory from 3 days ago
sudo restic -r /backups/restic restore abc123def \
  --target /tmp/restore \
  --include="/var/www/html/"
Monthly Restore Test Checklist
- Create a small test VPS and do a full restore from offsite backup
- Verify databases start and can be queried (check table counts, recent records)
- Verify websites load and assets are present
- Verify SSL certificates are available (or can be reissued quickly)
- Time how long the full restore takes (this sets your RTO — Recovery Time Objective)
9. Disaster Recovery Plan
A backup is one piece of a larger disaster recovery (DR) plan. Document the following so you are not scrambling during an outage:
Key Documentation to Keep Offline (Not Just on Your Server)
- Provider credentials: VPS provider login, backup provider login, DNS provider login (stored in a password manager, not on the server)
- Repository password: The encryption password for your Restic/Borg repos — if you lose this, your backups are worthless
- Server inventory: List of services running on each VPS (Nginx, MySQL, Redis, Docker containers, cron jobs, firewall rules)
- Software licenses: Any paid software keys, SSL certificate details
- Contact list: Who to notify if your sites are down (team members, clients, DNS support)
Recovery Time Objective (RTO) and Recovery Point Objective (RPO)
Define these metrics based on your needs:
- RPO (Recovery Point Objective): How much data can you afford to lose? If you back up databases hourly, your RPO is about 1 hour. If you do daily full backups, your RPO is 24 hours.
- RTO (Recovery Time Objective): How quickly must you be back online? If you test restores and know a full restore takes 2 hours, your RTO is 2-4 hours.
10. Common Backup Mistakes to Avoid
Mistake #1: Only Backing Up to the Same Server
Local backups on the same VPS protect you from accidental deletion but not from disk failure, provider outages, or ransomware. Always have an offsite copy.
Mistake #2: Not Encrypting Offsite Backups
If you back up to a third-party provider, always encrypt client-side before data leaves your server. Restic and Borg do this by default. Do not rely on server-side encryption alone.
Mistake #3: Forgetting to Back Up the Database Properly
Never copy raw MySQL data files while MySQL is running. Use mysqldump --single-transaction for InnoDB or stop MySQL before copying files. Otherwise you may end up with a corrupted database in your backup.
Mistake #4: Not Testing Restores
We said it already but it bears repeating: the #1 backup mistake is never testing whether restores actually work. Set a recurring reminder.
Mistake #5: Using Scary Long Retention Policies Without Checking Storage
Keeping 12 monthly backups is good, but verify you have enough storage. A general rule: expect deduplicated backups to be roughly 1.5-2x your used disk space over time, depending on data churn.
Mistake #6: Storing the Backup Password Only on the Server
If your server is completely lost and your backup password is only in /root/backup-pass.txt on that server, you cannot restore. Store passwords in a password manager (Bitwarden, 1Password) or write them down physically.
Mistake #7: Relying Solely on Provider Snapshots
Provider snapshots are useful for quick rollbacks (e.g., before a risky upgrade), but they are tied to your account with that provider. If your account gets locked, the provider has a major outage, or you accidentally delete the snapshot, you lose everything.
Start Backing Up Your LuckVM VPS Today
Every LuckVM VPS runs on NVMe SSD storage with generous bandwidth, making it easy to run Restic or BorgBackup locally and sync offsite. Hong Kong and US plans start at just $8.80/month, with 70 GB NVMe — plenty of space for both your live data and local backups.
Explore LuckVM VPS PlansFrequently Asked Questions
docker exec db-container mysqldump ... rather than copying raw volume files.