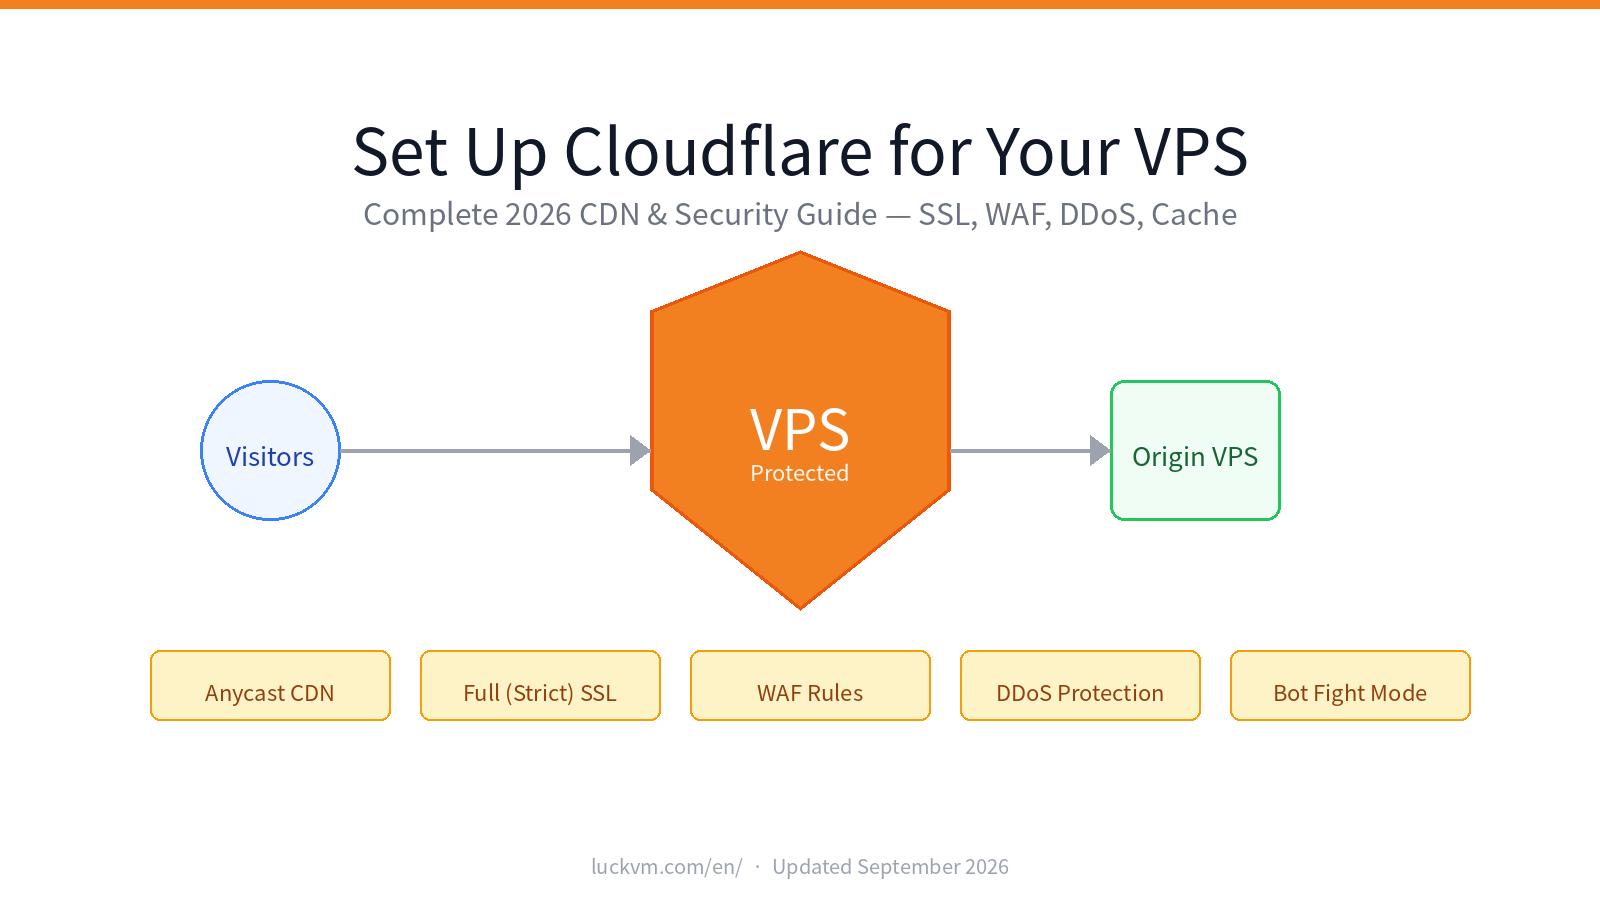
 Cloudflare protects and accelerates VPS-hosted websites in 8 simple steps.
1. Why Add Cloudflare to Your VPS
If you host a site on a VPS, your origin IP is public knowledge the moment you point an A record at it. Any attacker who finds that IP can:
- Launch Layer 3/4 DDoS attacks directly at your server, bypassing any CDN.
- Crawl your site from thousands of IPs and exhaust your CPU.
- See the real geographic location of your server from any IP lookup tool.
Cloudflare's free plan solves all of that and more. In front of your VPS, you get a 300+ city Anycast network, free SSL termination, a managed web application firewall, bot management, DDoS mitigation, automatic static caching, HTTP/3 (QUIC), Brotli compression, and a global DNS that typically answers in under 20 ms. Nothing else at that price point comes close.
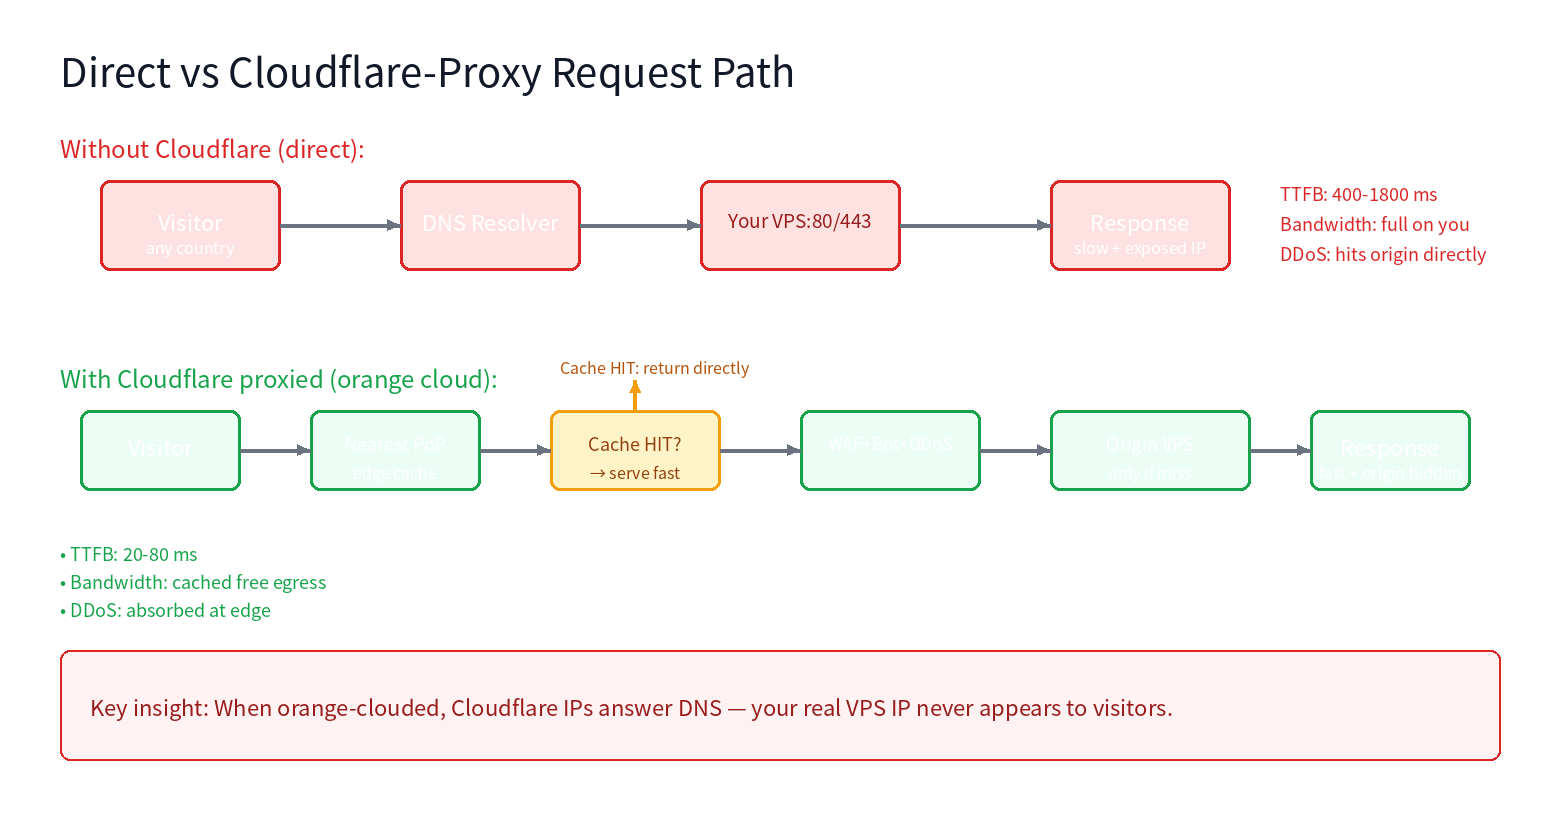 Figure 1. Without Cloudflare every visitor hits your VPS directly (TTFB 400–1800 ms, origin exposed). With Cloudflare proxied, cached assets are served from the nearest edge PoP (TTFB 20–80 ms), and only cache misses reach the origin.
2. What Cloudflare Can and Cannot Do
Before jumping in, it is important to set expectations.
| Cloudflare does | Cloudflare does NOT |
|---|---|
| Proxy HTTP/HTTPS on ports 80/443 (plus 8080/8443/2052/2082/2086/2095) | Proxy SSH (22), FTP (21), SMTP (25/465/587), MySQL (3306) or any custom TCP port |
| Absorb Layer 3/4 and most Layer 7 DDoS at the edge | Protect your origin if attackers already know your real IP and hit it directly |
| Terminate TLS and issue free Universal SSL certs | Replace a valid certificate on your origin (you still need one) |
| Cache static assets at the edge | Magically speed up uncached dynamic PHP/Node responses |
3. Step 1 — Add Your Site to Cloudflare
- Sign up at
dash.cloudflare.com/sign-upwith email and password. - Click Add Site and enter your root domain (e.g.
example.com, notwww.example.com). - Choose the Free plan ($0/month). It includes everything in this guide. Upgrade to Pro ($20/month) only if you need the WAF ML model or image resizing.
- Cloudflare will scan your existing DNS records automatically. Review them but do not trust the scan blindly — any missing A/AAAA/MX/TXT record will cause mail or subdomains to break.
4. Step 2 — Change Nameservers at Your Registrar
Cloudflare will give you two nameservers that look like something.ns.cloudflare.com and something-else.ns.cloudflare.com. Log in to the registrar where you bought the domain (Namecheap, Cloudflare Registrar, Porkbun, Name.com, GoDaddy, etc.) and replace the existing nameservers with Cloudflare's.
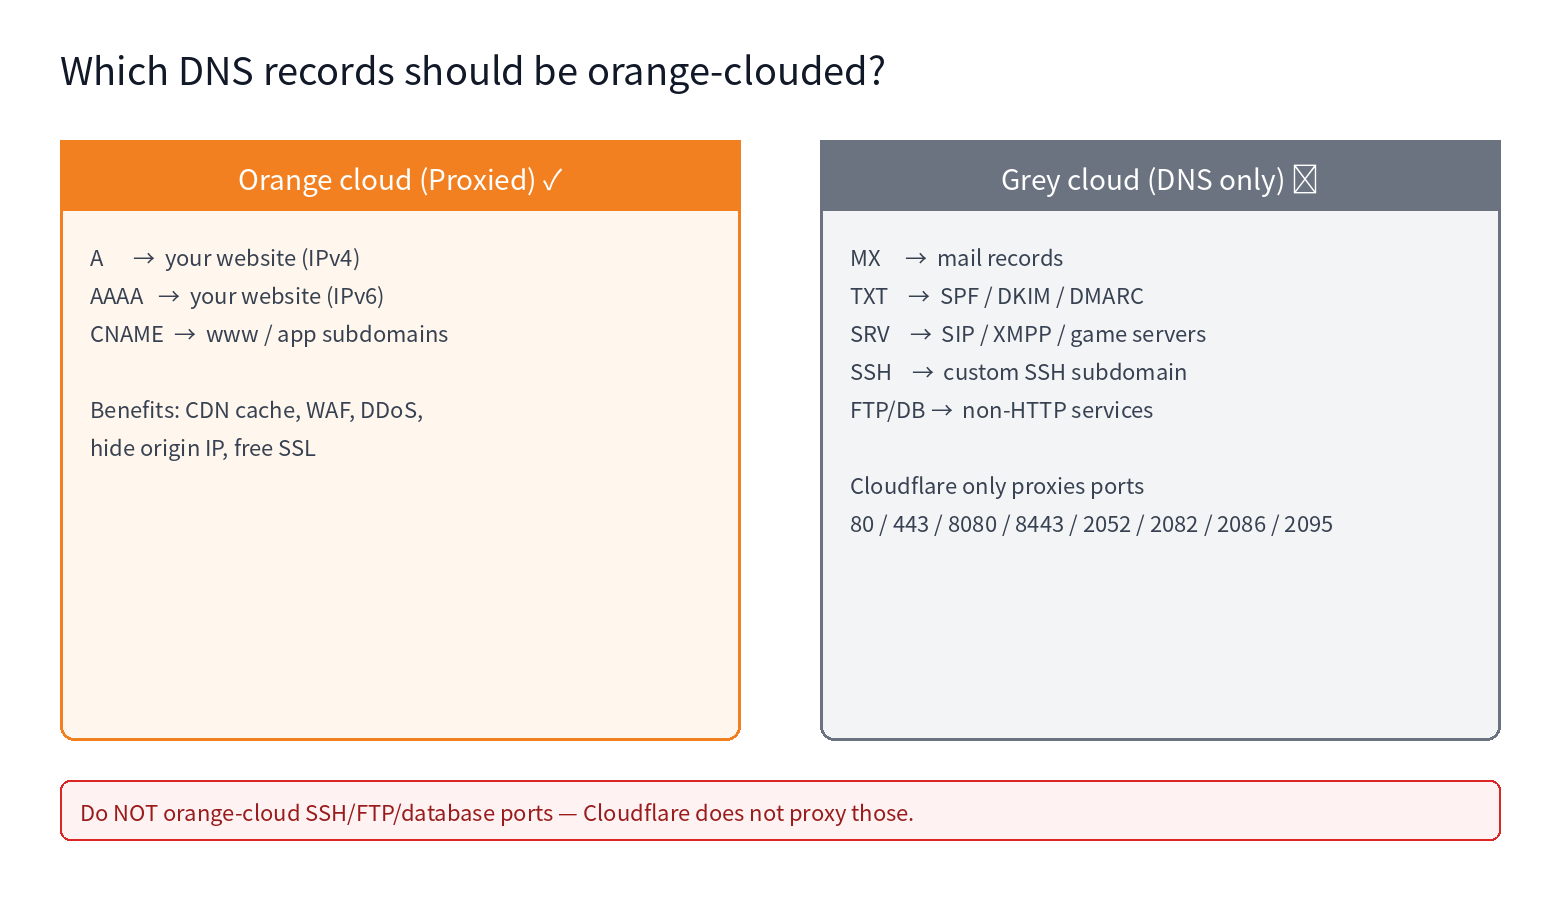 Figure 3. Only A, AAAA and CNAME records pointing to HTTP(S) websites get the orange cloud. MX, TXT (SPF/DKIM/DMARC), SRV and any non-HTTP service must stay grey (DNS only).
5. Step 3 — Set SSL/TLS to Full (Strict)
Go to SSL/TLS in the Cloudflare dashboard. You will see four options.
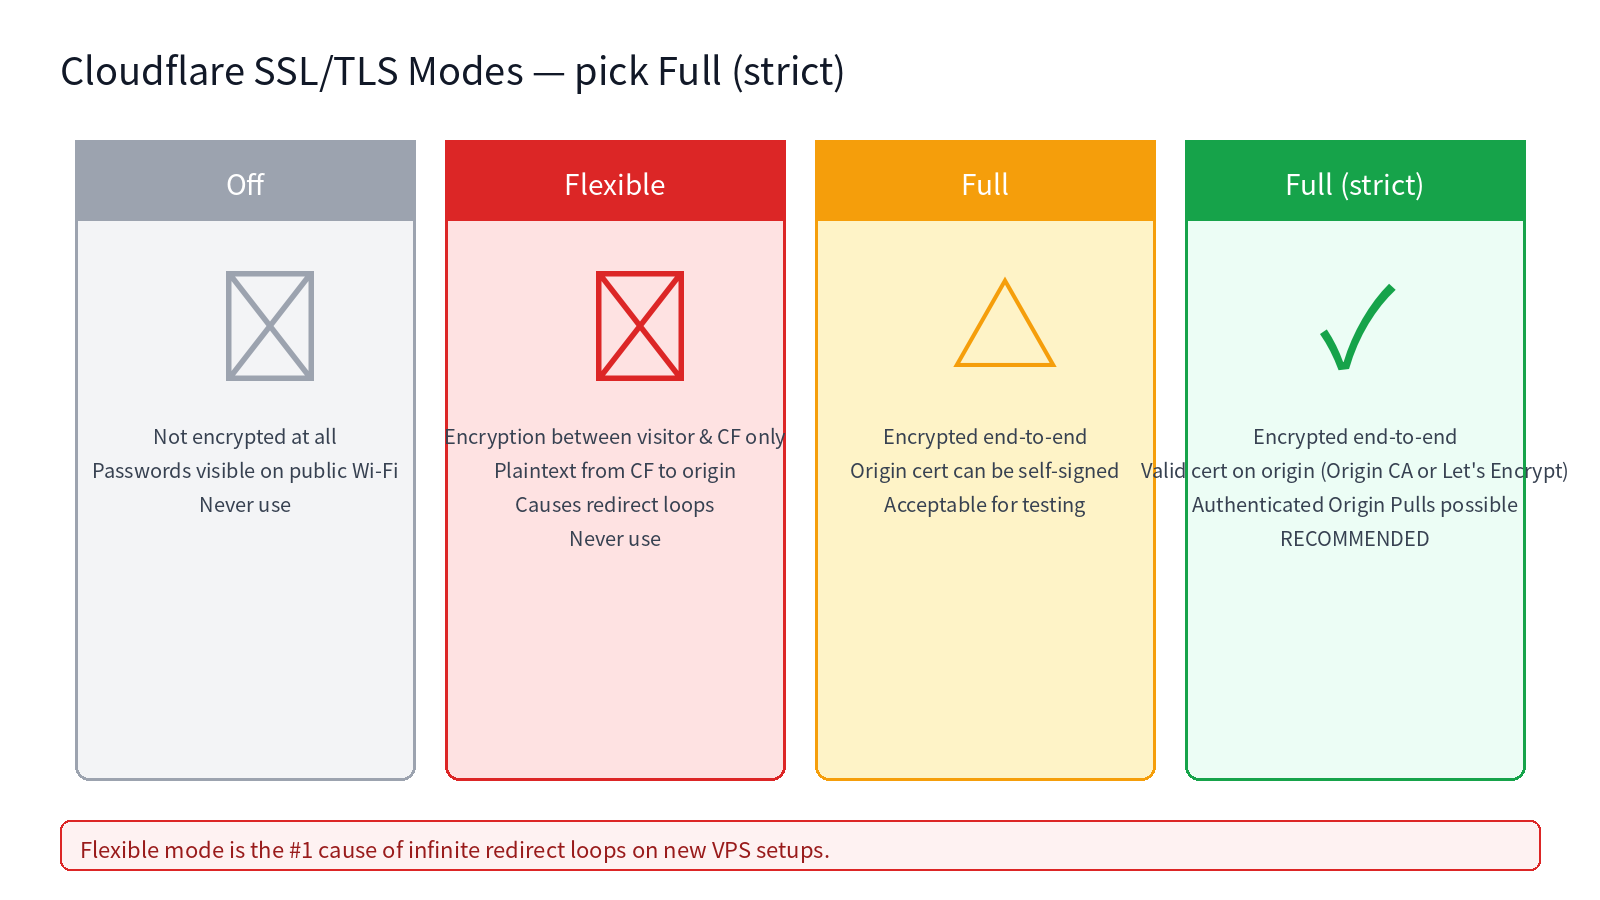 Figure 2. The four SSL/TLS modes. "Full (strict)" is the only mode that gives real end-to-end encryption without redirect loops.
Set the mode to Full for now. We will upgrade to Full (strict) once the origin certificate is installed in Step 4. Never choose Flexible — it creates an infinite HTTP→HTTPS→HTTP loop when your origin already redirects to HTTPS, and it sends plaintext traffic from Cloudflare to your VPS.
6. Step 4 — Install a Cloudflare Origin Certificate on Your VPS
"Full (strict)" mode requires that the certificate your VPS presents to Cloudflare is either (a) a valid public certificate from Let's Encrypt, or (b) a Cloudflare-issued Origin CA certificate. The Origin CA option is easier because it lasts 15 years and auto-renewal is not required.
- In Cloudflare, go to SSL/TLS → Origin Server → Create Certificate.
- Let Cloudflare generate a private key and CSR, keep default hostnames, set validity to 15 years.
- Copy the "Origin Certificate" (PEM block) and save it on your VPS as
/etc/ssl/certs/cloudflare.pem. - Copy the "Private key" and save it as
/etc/ssl/private/cloudflare.key(chmod 600).
Then configure Nginx on your VPS to use this certificate for traffic coming from Cloudflare, alongside your Let's Encrypt certificate (which is still used for direct visitors and for health checks):
# /etc/nginx/sites-available/example.com
server {
    listen 443 ssl http2;
    server_name example.com www.example.com;

    ssl_certificate     /etc/ssl/certs/cloudflare.pem;
    ssl_certificate_key /etc/ssl/private/cloudflare.key;

    # Optional: Authenticated Origin Pulls (recommended for production)
    # ssl_client_certificate /etc/ssl/certs/cloudflare-origin-pull-ca.pem;
    # ssl_verify_client on;

    root /var/www/example.com;
    index index.html index.php;

    location / { try_files $uri $uri/ /index.php?$args; }
    location ~ \.php$ { include snippets/fastcgi-php.conf; fastcgi_pass unix:/run/php/php8.2-fpm.sock; }
}
Then reload Nginx: sudo nginx -t && sudo systemctl reload nginx.
Now return to Cloudflare and switch SSL to Full (strict). Your site should continue to load, but this time with genuine end-to-end encryption.
7. Step 5 — Enable WAF and Security Rules
Navigate to Security → WAF. Under "Managed rules", enable:
- Cloudflare Free Managed Ruleset (blocks known CVEs, SQLi, XSS)
Under "Custom rules", create these five free rules:
- Block high-risk countries (if you do not serve them):
(ip.geoip.country in {"RU" "CN" "KP"})→ Block - Challenge suspicious user-agents:
(http.user_agent contains "curl" or http.user_agent contains "python-requests")→ Managed Challenge - Protect wp-admin:
(http.request.uri.path contains "/wp-admin") and not (ip.src in $my_home_ip)→ Block - Rate limit login:
(http.request.uri.path eq "/wp-login.php")→ Rate limit to 5 req/min per IP - Block XML-RPC:
(http.request.uri.path eq "/xmlrpc.php")→ Block
Then go to Security → DDoS and set all rules to "High". Under Security → Bots, enable Bot Fight Mode (free).
8. Step 6 — Cache & Performance Tuning
Go to Caching → Configuration and set Cache Level to "Standard" (default). Under Rules → Page Rules add one rule that caches static assets aggressively:
URL: *example.com/wp-content/uploads/**
Setting: Cache Level → Cache Everything
Setting: Edge Cache TTL → 1 month
Setting: Browser Cache TTL → 1 month
Under Speed → Optimization, enable:
- Auto Minify (JS, CSS, HTML)
- Brotli compression
- Early Hints
- HTTP/3 (under Network)
- 0-RTT Connection Resumption
Leave Rocket Loader, Mirage and Polish off initially — they can break some themes; enable them one by one and test.
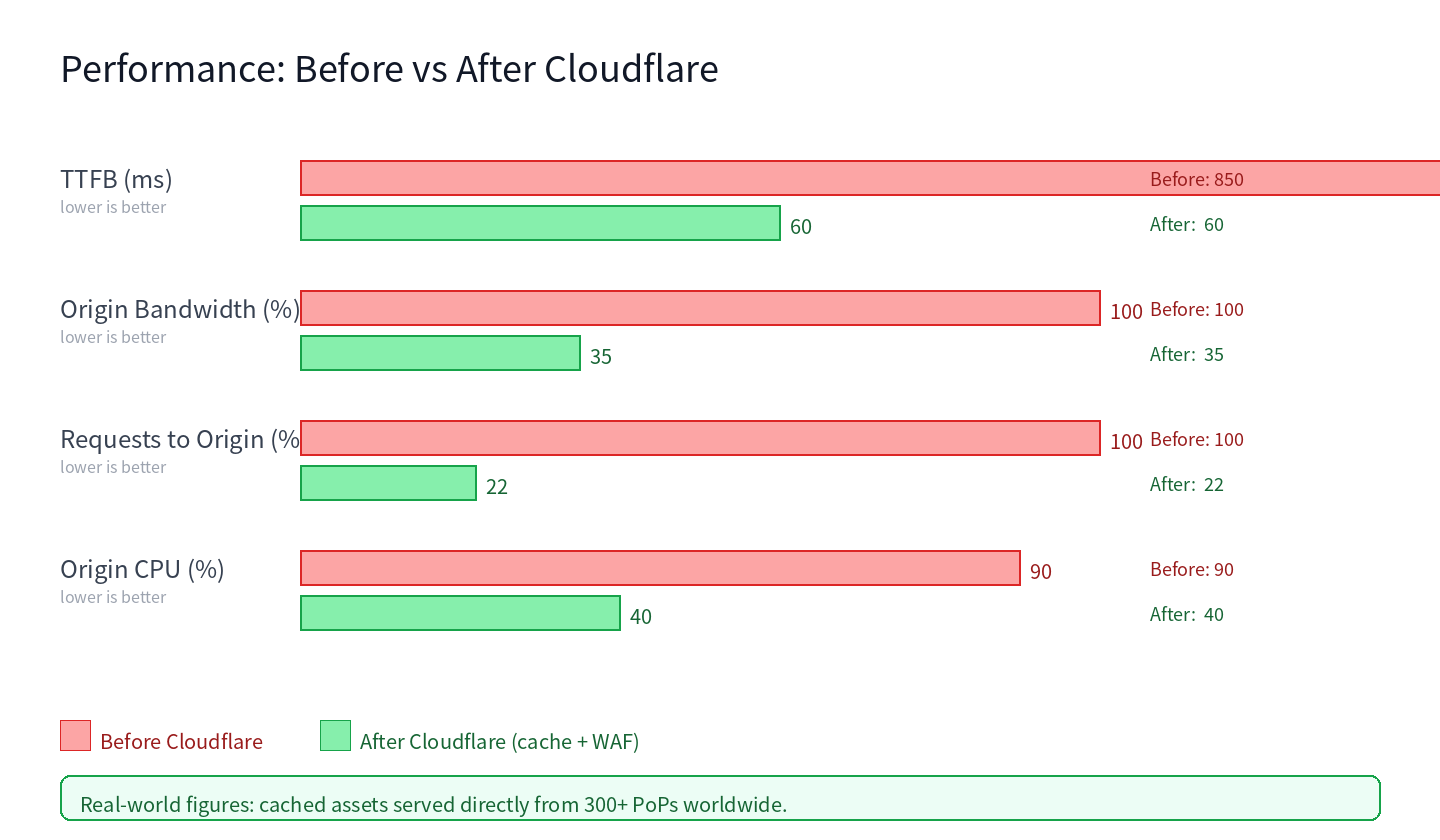 Figure 4. Typical performance impact after Cloudflare is enabled: TTFB drops ~10x for cached assets, origin bandwidth falls by ~65%, and your VPS CPU usage decreases substantially.
9. Step 7 — Enable the Orange Cloud (Carefully)
Go back to DNS → Records. Toggle the orange cloud on for:
- The root
Arecord (example.com) - The
wwwCNAME or A record - Any other HTTP(S) subdomains (
app,blog,shop)
Leave MX, TXT, DKIM, DMARC, SRV, PTR, SSH CNAMEs, and any database/FTP/gaming records as grey cloud (DNS only). Cloudflare does not proxy those protocols, and orange-clouding them will break those services.
10. Step 8 — Verify It Actually Works
After flipping the cloud, verify from a terminal:
# Check that DNS now returns Cloudflare IPs
dig +short example.com
# Should return two IPs from Cloudflare ranges, NOT your VPS IP

# Verify response headers include Cloudflare
curl -I https://example.com
# Expect to see:
#   server: cloudflare
#   cf-ray: 89ab12cd...
#   cf-cache-status: DYNAMIC (or HIT for cached assets)
Finally, open your site in a browser, check that the padlock is present, and visit example.com/cdn-cgi/trace — you should see a page showing Cloudflare PoP, IP, TLS version and your visitor country. If that page loads, Cloudflare is definitely in front.
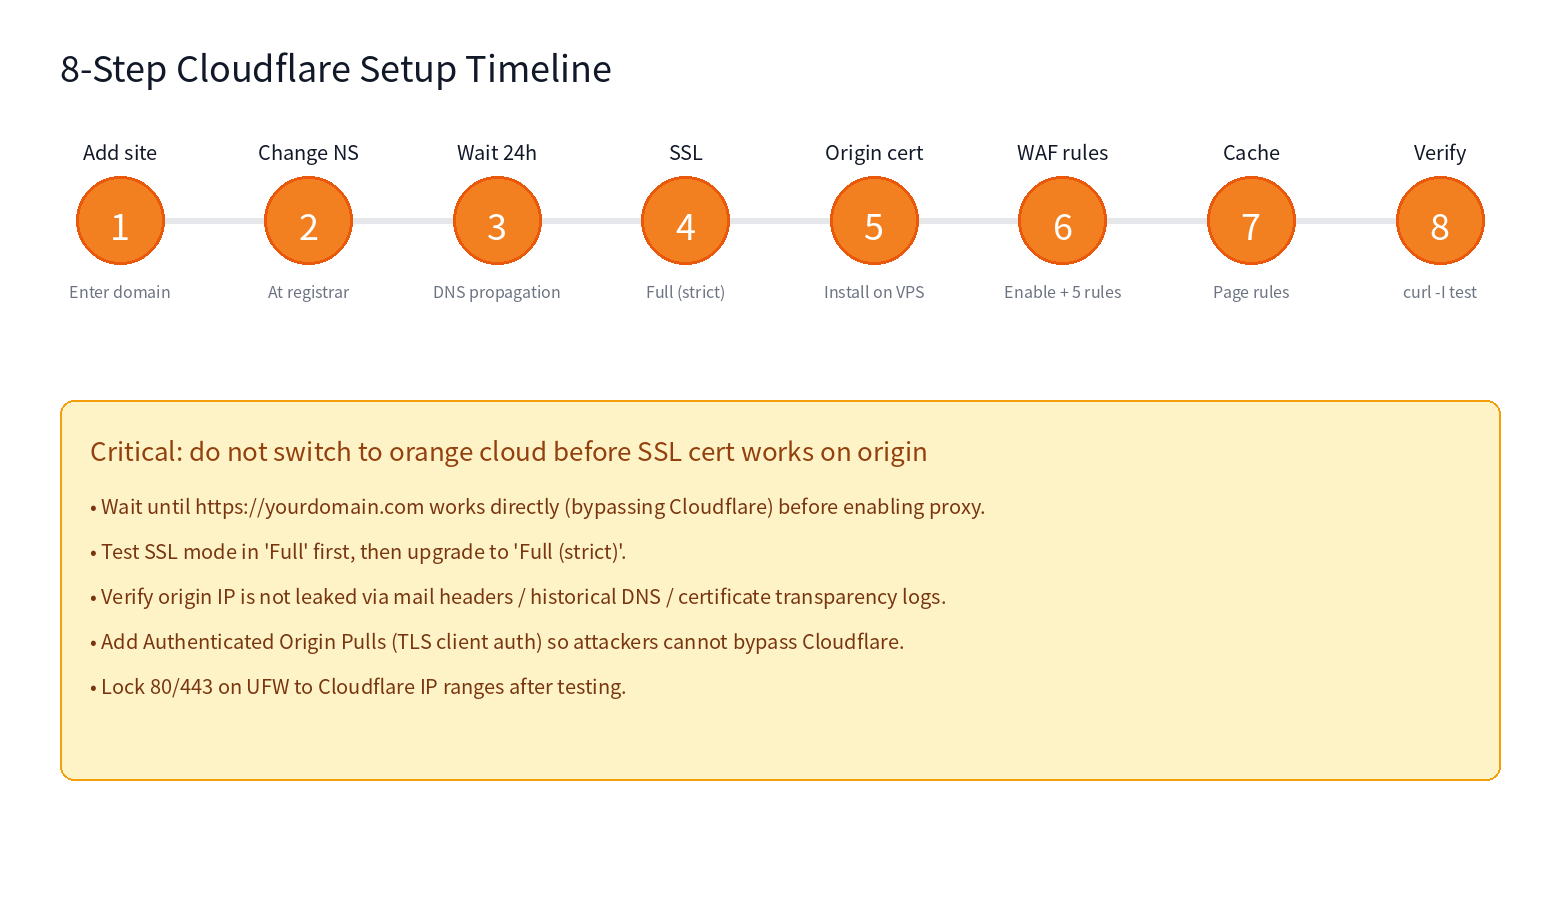 Figure 5. The eight-step rollout. Do not skip ahead: propagation, SSL and origin cert must be in place before orange-clouding.
Optional hardening: lock your VPS to Cloudflare only
Once everything works, the best way to prevent anyone from bypassing Cloudflare is to add a UFW rule that only allows Cloudflare IP ranges on ports 80/443:
# Allow Cloudflare IPv4 ranges on 80/443
for ip in $(curl -s https://www.cloudflare.com/ips-v4); do
  sudo ufw allow proto tcp from $ip to any port 80,443
done
# Allow Cloudflare IPv6 ranges
for ip in $(curl -s https://www.cloudflare.com/ips-v6); do
  sudo ufw allow proto tcp from $ip to any port 80,443
done
# Block direct access to 80/443 from any other source
sudo ufw deny 80/tcp
sudo ufw deny 443/tcp
sudo ufw reload
If you do this, also enable Authenticated Origin Pulls (Step 4 Nginx snippet) so only Cloudflare's valid client certificate can connect — blocking anyone who spoofs the Host header to hit your IP.
Run your first Cloudflare-protected site on LuckVM
LuckVM VPS plans start at $8.80/month with NVMe SSD, 1 Gbps uplink and native support for Cloudflare Origin CA. Hong Kong, Los Angeles, Singapore, Tokyo and Frankfurt locations.
See LuckVM VPS Plans →Frequently Asked Questions
mail A record (grey) that points directly to your mail server.