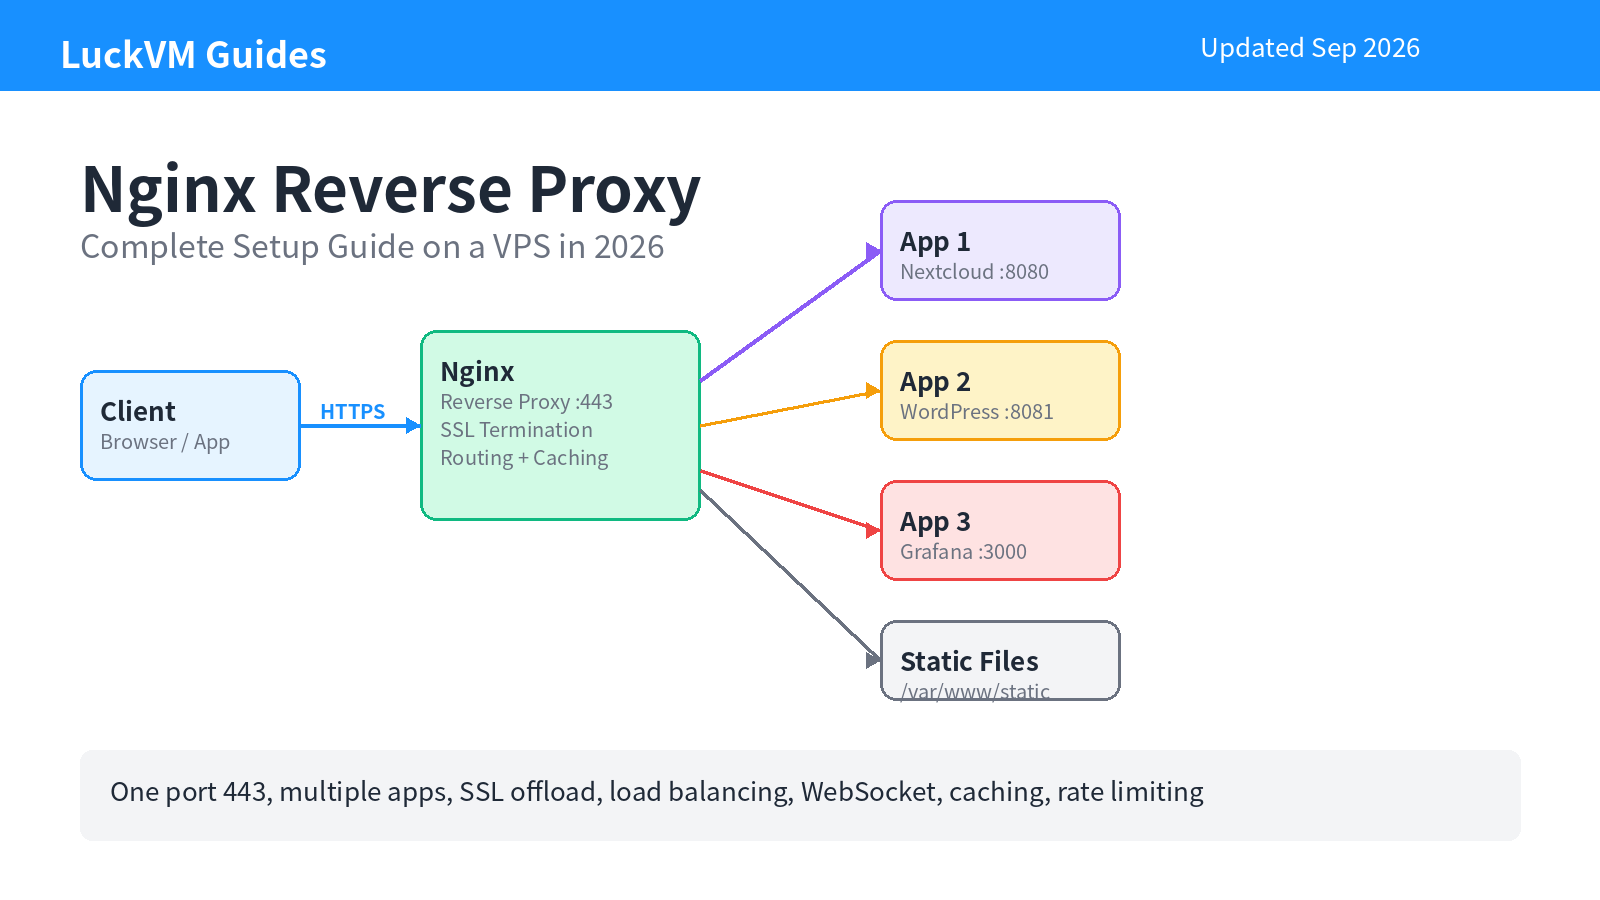
TL;DR (Quick Answer)
A reverse proxy sits in front of your backend apps, accepts traffic on ports 80/443, terminates TLS, routes by domain or path, and forwards to the right backend. Setting up Nginx as a reverse proxy on a VPS takes 15-30 minutes: install Nginx, create an upstream {} block for your backend, write a server {} block with proxy_pass, issue a Let's Encrypt certificate with Certbot, run nginx -t, and reload. Once the basics work, add caching, gzip/brotli, rate limiting, WebSocket upgrades, and load balancing as needed.
1. What Is a Reverse Proxy (and Why You Need One)
If you have been running Docker apps or multiple websites on a VPS for any length of time, you have probably hit this wall: each app wants its own port (:8080, :3000, :9000, :5000), you cannot just open dozens of ports to the internet, and every app would then need its own TLS certificate, its own access logs, its own rate limiting. A reverse proxy solves exactly this.
A reverse proxy is a server that accepts incoming HTTP/HTTPS requests from clients and forwards them to one or more backend services. The clients never talk directly to your apps; they talk to Nginx on port 443, and Nginx decides which backend should handle each request based on domain name (cloud.example.com vs blog.example.com) or path (/api/ vs /).
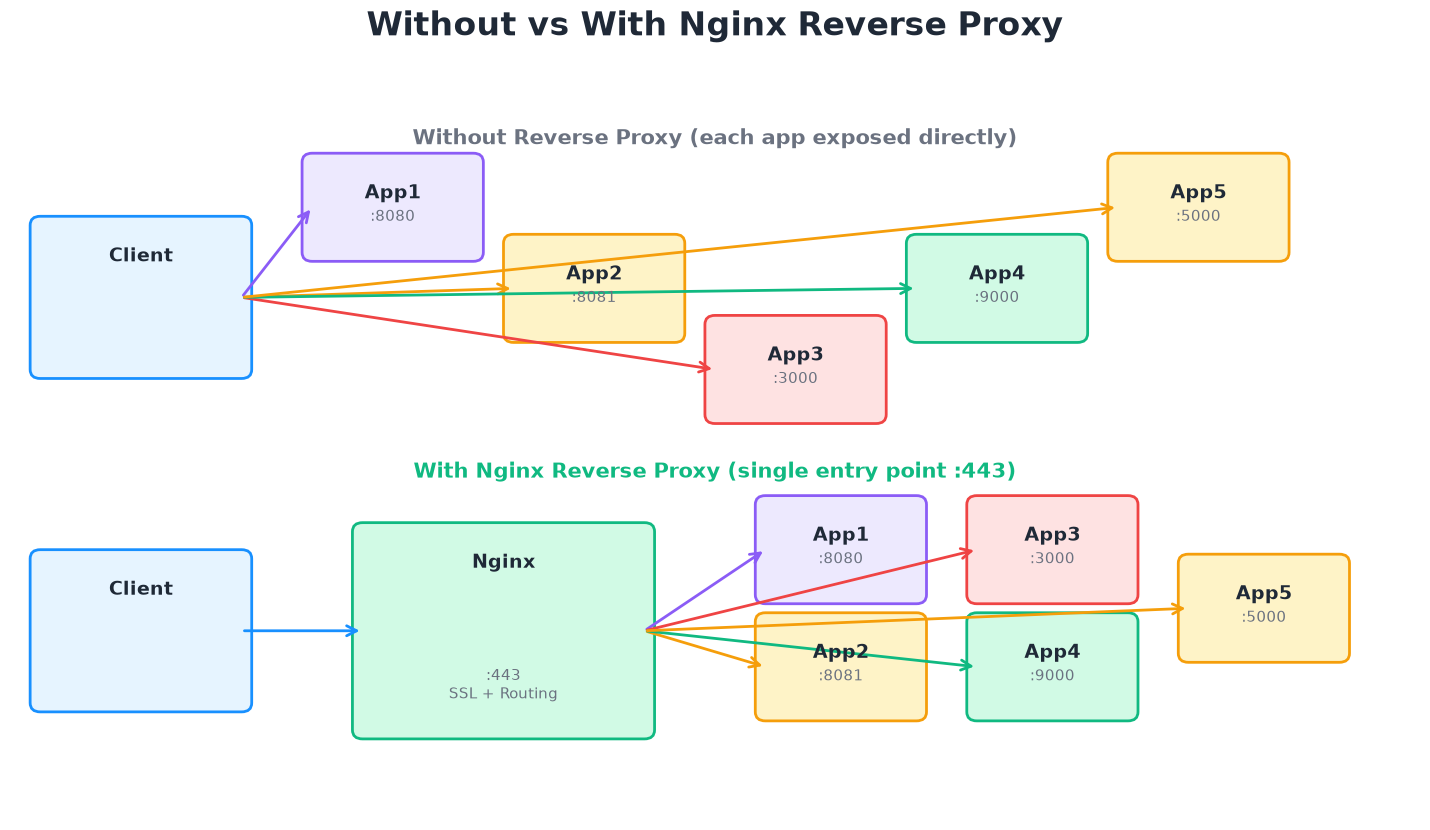
Figure 1. Without a reverse proxy you expose every app directly; with Nginx you get a single TLS endpoint and clean routing.
The benefits of using Nginx as a reverse proxy on your VPS are concrete:
- Single TLS endpoint. One place to manage certificates (with Certbot), one set of cipher suites, one HTTPS redirect. No more managing certs in Node/Python/Java app servers.
- Multiple domains, one IP. Host Nextcloud, WordPress, Grafana, a Node API, and a static site all behind one VPS IP. Nginx picks the right backend using the
Hostheader (called Server Name Indication, or SNI). - Performance. Nginx handles TLS handshakes, gzip/brotli compression, static file serving, and HTTP keepalive far more efficiently than application servers. You can also cache responses at the proxy layer.
- Security. Backends can bind to
127.0.0.1only (never exposed to the internet). Nginx adds rate limiting, request size limits, security headers, and can absorb slowloris-style attacks before they reach your app. - Load balancing. When you outgrow one backend, add a second server to the upstream block and Nginx will distribute traffic.
- Clean URLs. No more
example.com:3000. Every app lives on a clean subdomain or path with standard HTTPS.
2. Prerequisites & VPS Sizing
Before you start, make sure you have:
- A VPS running a recent Linux distro. We will use Ubuntu 24.04 LTS in examples; Debian 12 works identically.
- Root or sudo access.
- A domain name with DNS A/AAAA records pointed at your VPS IP.
- Ports 80 and 443 open in your firewall (if you followed our VPS security checklist, you may need to
ufw allow 80/tcpandufw allow 443/tcp).
Nginx itself is extremely lightweight. Expect around 50-150 MB of RAM for Nginx itself plus a few MB per active connection. The resource question is really about your backends. Here is a rough guide:
| VPS Plan (LuckVM) | Specs | Nginx + Backends It Can Comfortably Run |
|---|---|---|
| Starter ($8.80/mo) | 1 vCPU, 1 GB RAM, 70 GB NVMe | Nginx + 2-3 small apps (static site + small Node API + personal Nextcloud) |
| Standard ($26.40/mo) | 2 vCPU, 2 GB RAM, 70 GB NVMe | Nginx + 5-10 apps (WordPress + Nextcloud + Grafana + Uptime Kuma + a few APIs) |
| Professional ($48.40/mo) | 4 vCPU, 4 GB RAM, 70 GB NVMe | Nginx + 10-20 apps + small database + Redis, including light load balancing |
| Enterprise ($81.40/mo) | 8 vCPU, 8 GB RAM, 70 GB NVMe | Nginx as dedicated edge proxy / load balancer in front of multiple backend servers |
(Prices shown as listed on luckvm.com as of September 2026; always verify current pricing on the product page.)
3. Step-by-Step: Basic Reverse Proxy Setup
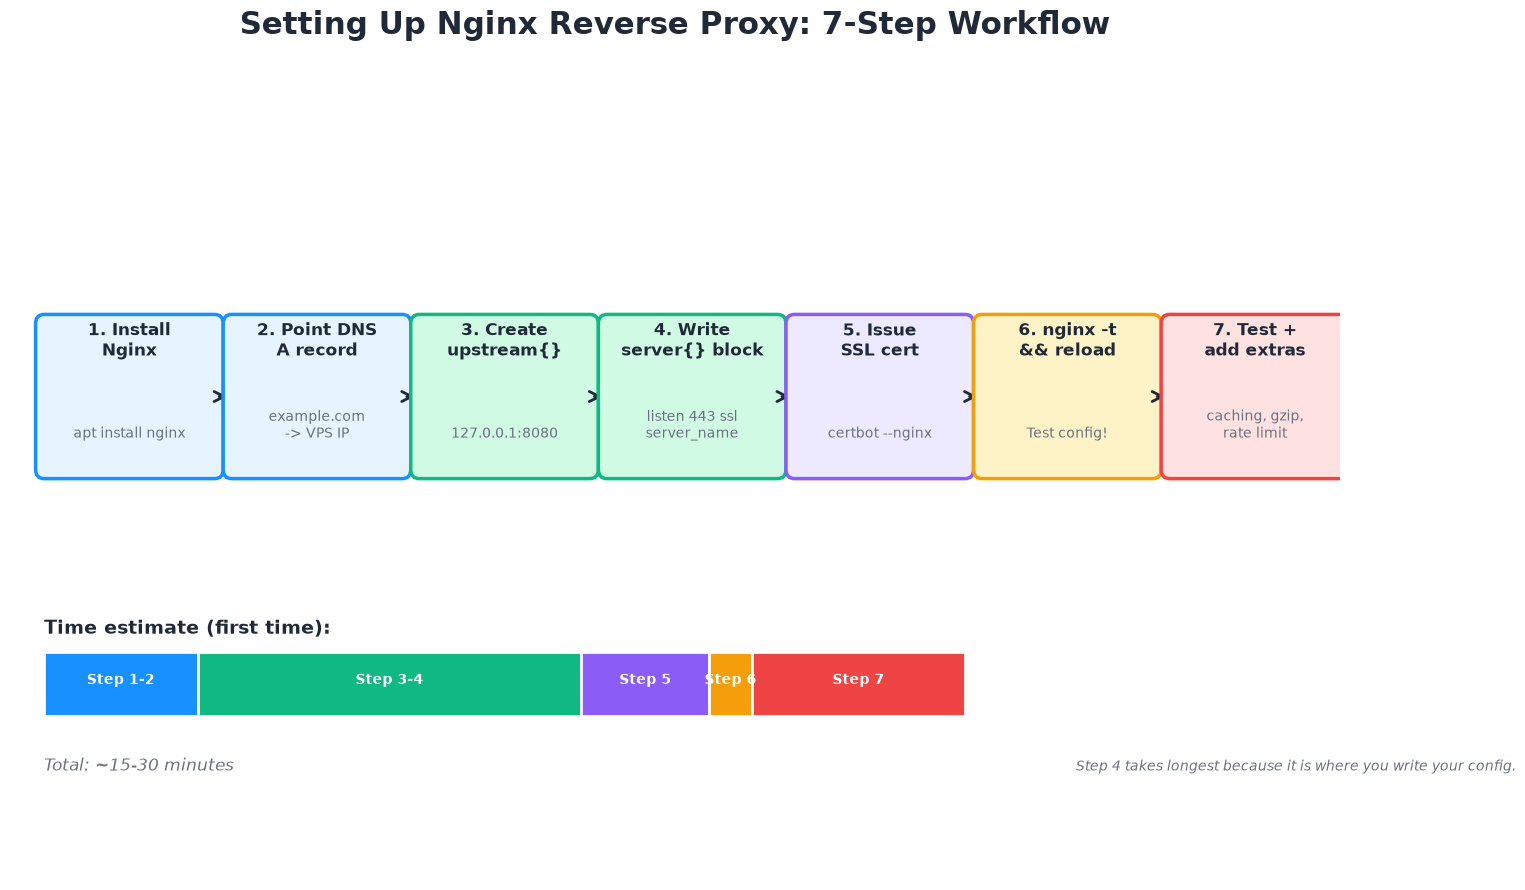
Figure 5. Seven steps to a working reverse proxy, roughly 15-30 minutes your first time.
Step 1: Install Nginx
sudo apt update
sudo apt install -y nginx
sudo systemctl enable --now nginx
Verify Nginx is running with curl -I http://your-server-ip; you should see HTTP/1.1 200 OK and Server: nginx.
Step 2: Make sure your backend is running
For this tutorial we assume you already have an app listening on 127.0.0.1:8080 (a Node app, a Docker container, a Java service, whatever). Critical: bind backends to 127.0.0.1 (localhost) so they are not directly reachable from the internet. Verify with:
curl -I http://127.0.0.1:8080
# Should return HTTP 200, 301, 302, or whatever your app responds with.
Step 3: Create an Nginx server block
On Debian/Ubuntu the convention is one file per site under /etc/nginx/sites-available/, symlinked into /etc/nginx/sites-enabled/. Create a file for your app:
sudo nano /etc/nginx/sites-available/myapp.example.comPaste this minimal reverse proxy config:
# /etc/nginx/sites-available/myapp.example.com
server {
    listen 80;
    server_name myapp.example.com;

    location / {
        proxy_pass http://127.0.0.1:8080;
        proxy_set_header Host              $host;
        proxy_set_header X-Real-IP         $remote_addr;
        proxy_set_header X-Forwarded-For   $proxy_add_x_forwarded_for;
        proxy_set_header X-Forwarded-Proto $scheme;
        proxy_http_version 1.1;
    }
}
The four proxy_set_header lines are essential. Without Host, your backend might see 127.0.0.1 instead of the real domain (breaking virtual hosts). Without X-Forwarded-Proto, apps behind HTTPS may generate http:// links, causing mixed-content errors.
Step 4: Enable the site and test
sudo ln -s /etc/nginx/sites-available/myapp.example.com /etc/nginx/sites-enabled/
sudo nginx -t
sudo systemctl reload nginxnginx -t before reloading. If you skip this and have a typo, reload will silently fail or Nginx may refuse to restart, taking all your sites down. Get into this habit.Now open http://myapp.example.com in a browser. You should see your app, proxied through Nginx on port 80. (You will get a browser security warning at this stage because we have not set up HTTPS yet, which is the next step.)
Step 5: Add more apps by creating more server blocks
For a second app on a different subdomain (say cloud.example.com pointing to 127.0.0.1:8081), repeat steps 3 and 4 with a new file. Each server {} block with its own server_name is enough; Nginx uses the Host header to route to the right block.
4. SSL Termination & Let's Encrypt
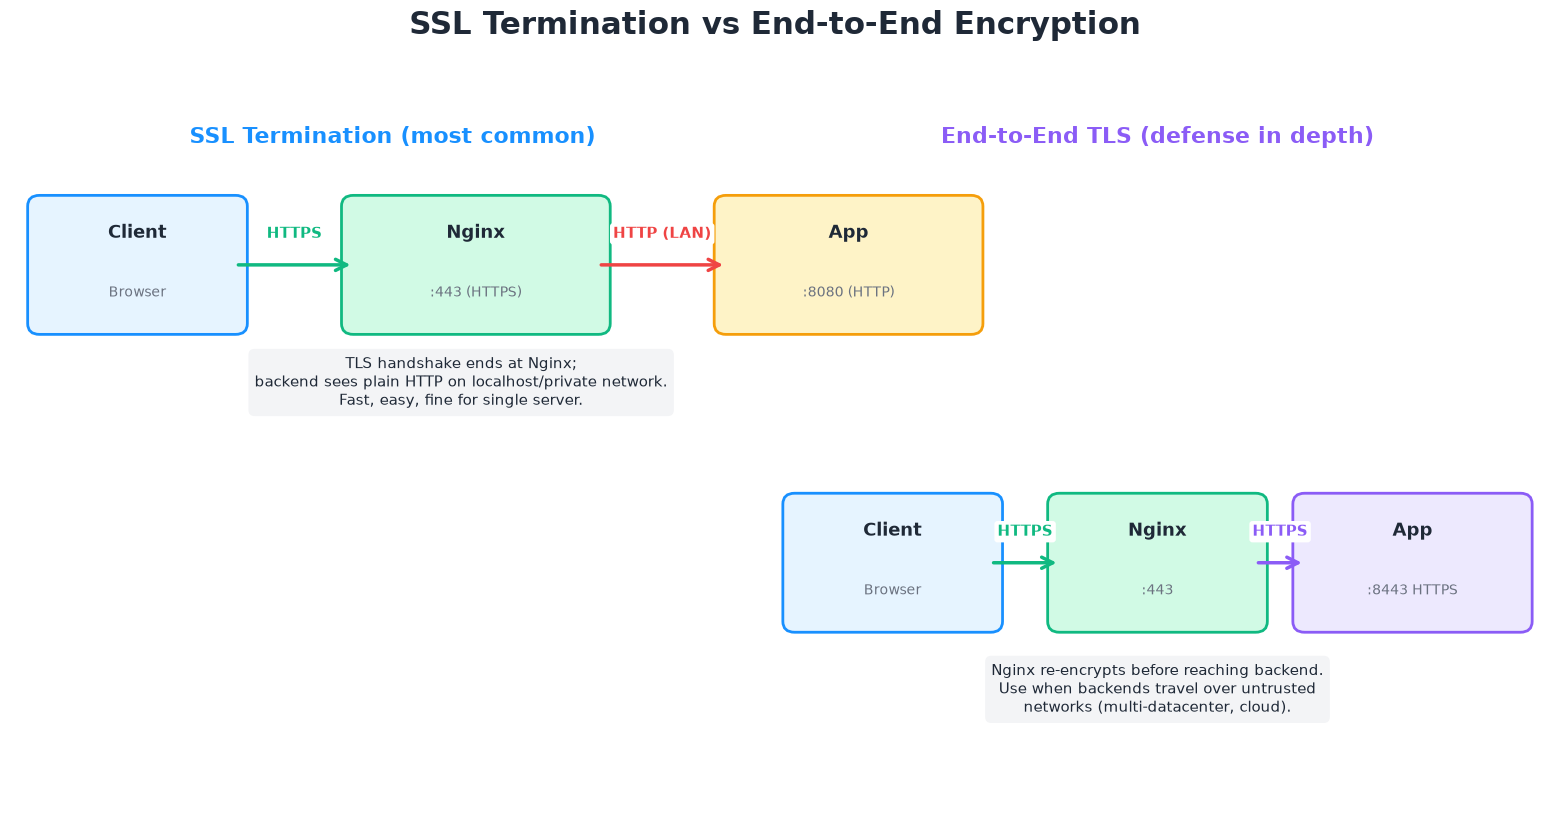
Figure 3. SSL termination at Nginx (left) is standard for single-server setups; use end-to-end TLS (right) when backends travel over untrusted networks.
HTTP in 2026 is unacceptable. The simplest way to get a valid, auto-renewing TLS certificate is Let's Encrypt with Certbot.
sudo apt install -y certbot python3-certbot-nginx
sudo certbot --nginx -d myapp.example.com -d cloud.example.com
Certbot will automatically edit your Nginx config to add the listen 443 ssl block, install the certificate, set up a redirect from HTTP to HTTPS, and add a cron job/systemd timer that renews the certificate before it expires. Once it finishes, reload once more:
sudo nginx -t && sudo systemctl reload nginxVerify by visiting https://myapp.example.com. You should see a padlock in your browser's address bar, and curl -I should follow a 301/302 redirect from HTTP to HTTPS.
Should you use SSL termination or end-to-end TLS?
For a single VPS where Nginx and all backends communicate over 127.0.0.1, SSL termination at Nginx is the standard, correct choice. The backends speak plain HTTP on localhost, which is fast and safe because the traffic never leaves the machine.
Only consider end-to-end TLS (where Nginx re-encrypts traffic to the backend over HTTPS, e.g. proxy_pass https://backend:8443) when Nginx and backends are on different machines communicating over a network you do not fully control, such as cross-datacenter or cross-cloud setups.
5. WebSocket, HTTP/2 & gRPC
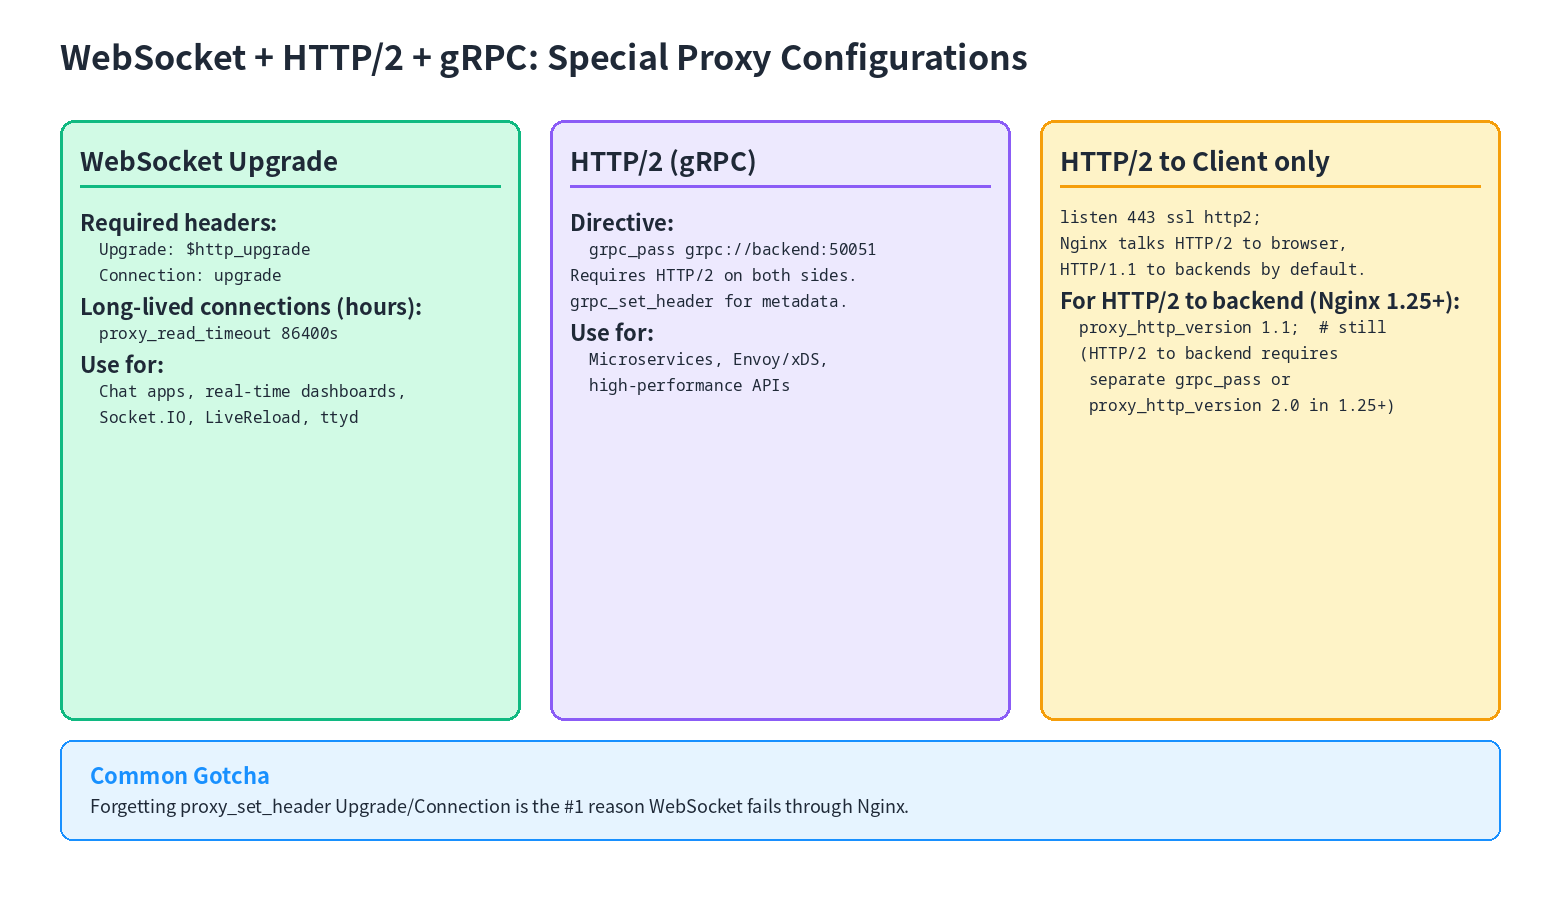
Figure 4. Three special cases: WebSocket upgrades, gRPC over HTTP/2, and HTTP/2 to the client.
Once you have basic HTTPS proxying working, the next thing almost everyone runs into is a WebSocket app (a chat app, a real-time dashboard, ttyd, LiveReload, Socket.IO). WebSocket does not work out of the box with a minimal proxy_pass because the HTTP Upgrade header is hop-by-hop and Nginx strips it by default.
WebSocket: the upgrade block
Add a map directive at the http level (in /etc/nginx/nginx.conf, outside any server block) and then a location for your WebSocket endpoint:
# Add inside http {} block in /etc/nginx/nginx.conf
map $http_upgrade $connection_upgrade {
    default upgrade;
    ''      close;
}

# Inside your server {} block:
location /ws/ {
    proxy_pass http://127.0.0.1:8080;
    proxy_http_version 1.1;
    proxy_set_header Upgrade    $http_upgrade;
    proxy_set_header Connection $connection_upgrade;
    proxy_set_header Host       $host;
    proxy_read_timeout  86400s;   # WebSocket connections are long-lived
    proxy_send_timeout  86400s;
}proxy_read_timeout. The default is 60 seconds, so WebSocket connections will silently close after one minute of inactivity if you do not raise it. 86400 seconds (one day) is the standard recommendation.gRPC / HTTP/2 to the backend
For gRPC services (which require HTTP/2 end-to-end), use the grpc_pass directive instead of proxy_pass:
location /mygrpc/ {
    grpc_pass grpc://127.0.0.1:50051;
    grpc_set_header Host $host;
    grpc_set_header X-Real-IP $remote_addr;
}
For HTTP/2 to clients, add http2 to your listen directive (Certbot does this automatically):
listen 443 ssl http2;This enables HTTP/2 between browser and Nginx. By default Nginx still speaks HTTP/1.1 to backends on proxy_pass, which is what you want unless you specifically need HTTP/2 re-proxying (available in Nginx 1.25+ with proxy_http_version 2.0, but rarely needed for single-VPS setups).
6. Load Balancing Across Multiple Backends
When one backend is not enough, Nginx can distribute traffic across multiple application servers using an upstream {} block.
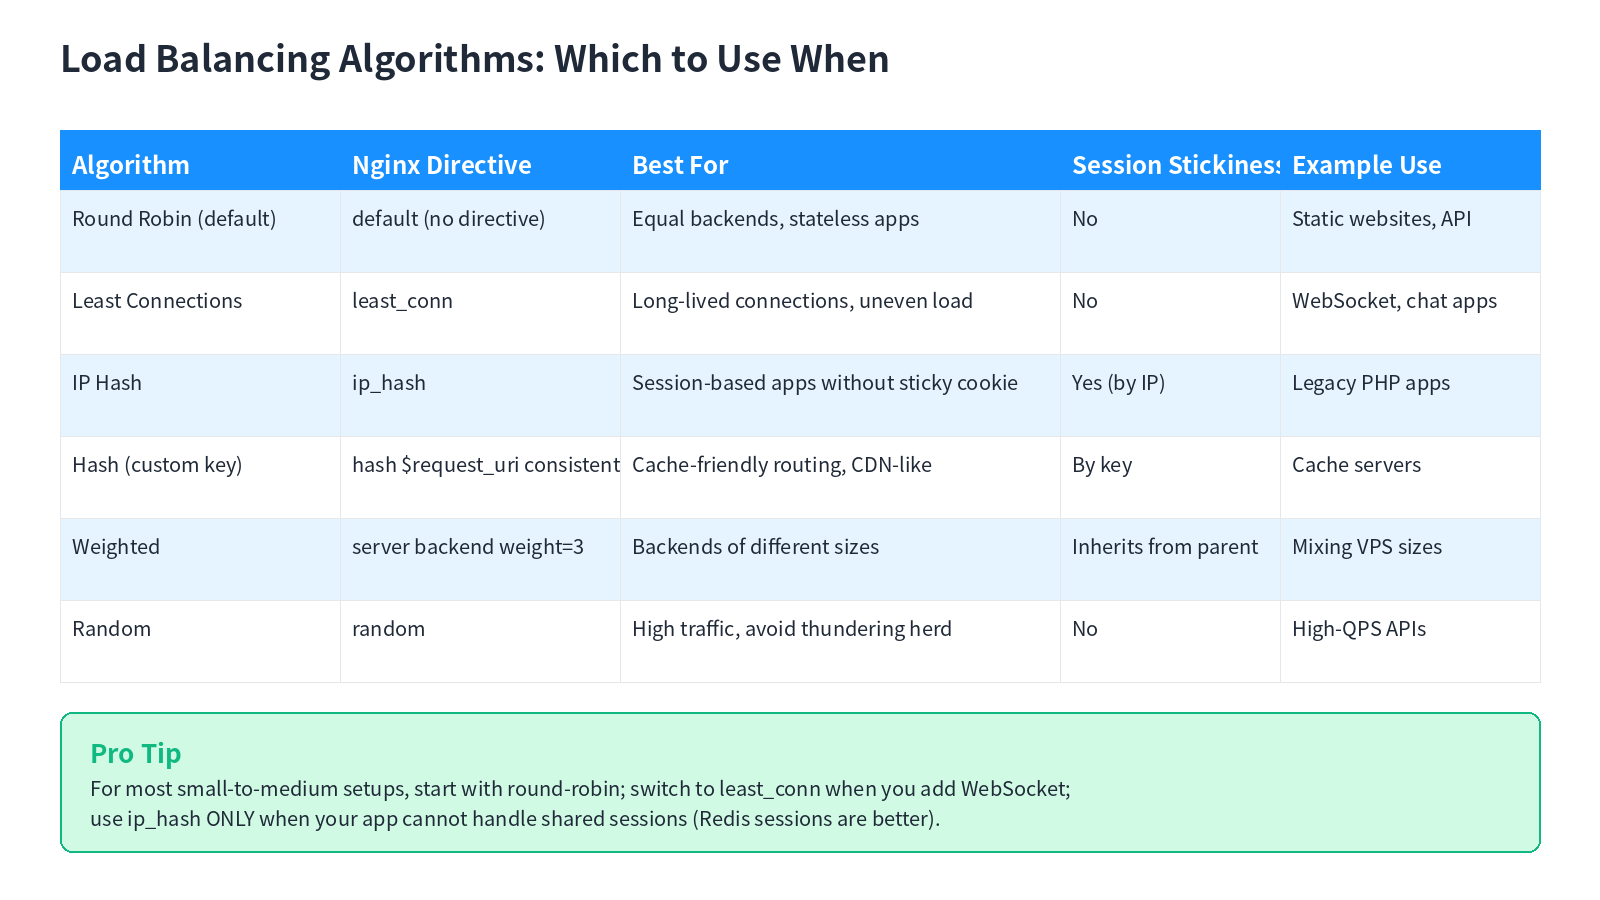
Figure 2. Six load balancing algorithms in open-source Nginx and when to use each.
Here is a minimal load-balanced setup with two backends and passive health checks:
# Place this at the http {} level (outside server {})
upstream myapp_backend {
    least_conn;                     # or ip_hash, or hash $request_uri consistent
    server 127.0.0.1:8080 weight=1 max_fails=3 fail_timeout=30s;
    server 127.0.0.1:8081 weight=1 max_fails=3 fail_timeout=30s;
    # You can also point to other VPS IPs:
    # server 10.0.0.2:8080;
    keepalive 32;                   # reuse connections to backends
}

server {
    listen 443 ssl http2;
    server_name myapp.example.com;
    # ssl_certificate / ssl_certificate_key lines (Certbot manages these)

    location / {
        proxy_pass http://myapp_backend;
        proxy_set_header Host $host;
        proxy_set_header X-Real-IP $remote_addr;
        proxy_set_header X-Forwarded-For $proxy_add_x_forwarded_for;
        proxy_set_header X-Forwarded-Proto $scheme;
        proxy_http_version 1.1;
        proxy_set_header Connection "";   # for keepalive to backends
    }
}least_conn when you have long-lived connections (WebSocket, SSE, file uploads). Use ip_hash only as a last resort for session affinity; the better solution is to move sessions to Redis so any backend can handle any request.7. Caching, Compression & Performance Tuning
Nginx is not just a router; it is also a fast cache and compression layer. Adding caching and gzip/brotli often drops TTFB from 500+ ms to under 100 ms for cached responses.
Enable gzip (and optionally brotli)
# /etc/nginx/nginx.conf inside http {}
gzip on;
gzip_vary on;
gzip_min_length 1024;
gzip_types text/plain text/css text/xml application/json application/javascript
           application/xml+rss application/atom+xml image/svg+xml;
gzip_comp_level 5;
Brotli gives ~15-25% better compression than gzip for text assets. Install it with sudo apt install nginx-plus-module-brotli (or compile the dynamic module) and add brotli on; similarly.
Cache proxied responses
# http {} level
proxy_cache_path /var/cache/nginx levels=1:2 keys_zone=my_cache:10m
                 max_size=1g inactive=60m use_temp_path=off;

# Inside server/location:
location / {
    proxy_pass http://127.0.0.1:8080;
    proxy_cache my_cache;
    proxy_cache_valid 200 302 10m;
    proxy_cache_valid 404 1m;
    proxy_cache_use_stale error timeout updating http_502 http_503 http_504;
    proxy_cache_background_update on;
    proxy_set_header Host $host;
    # ... other proxy_set_headers
}
For static files your app serves, it is usually faster to let Nginx serve them directly with a separate location block rather than proxying them:
location /static/ {
    alias /var/www/myapp/static/;
    expires 30d;
    add_header Cache-Control "public, immutable";
}
Buffer sizes (for larger cookies/headers)
If you see upstream sent too big header in error logs, increase buffer sizes at the server level:
proxy_buffers 8 16k;
proxy_buffer_size 32k;
proxy_busy_buffers_size 64k;
8. Security Hardening: Rate Limiting & Headers
Now that Nginx is the public face of your server, it should also be a shield. We have a full guide on VPS security hardening, but here are the Nginx-specific essentials.
Rate limiting
# http {} level: define a zone (10 MB of state = ~160,000 IPs)
limit_req_zone $binary_remote_addr zone=login:10m rate=10r/m;
limit_req_zone $binary_remote_addr zone=general:10m rate=30r/s;

# Inside server {}:
limit_req zone=general burst=50 nodelay;

# Stricter limit for login endpoints:
location /api/login {
    limit_req zone=login burst=5 nodelay;
    proxy_pass http://127.0.0.1:8080;
}
Security headers
add_header X-Frame-Options           "SAMEORIGIN" always;
add_header X-Content-Type-Options    "nosniff"    always;
add_header Referrer-Policy           "strict-origin-when-cross-origin" always;
add_header Strict-Transport-Security "max-age=31536000; includeSubDomains" always;
add_header Permissions-Policy        "geolocation=(), microphone=(), camera=()" always;
Block obvious abuse
# Block access to hidden files/dotfiles like .env, .git
location ~ /\. {
    deny all;
    access_log off;
    log_not_found off;
}

# Limit request body size (adjust to your needs)
client_max_body_size 64m;
For a deeper look at UFW, fail2ban, SSH hardening, automatic updates and more, see our full 15-step VPS security checklist.
9. Troubleshooting the 8 Most Common Errors
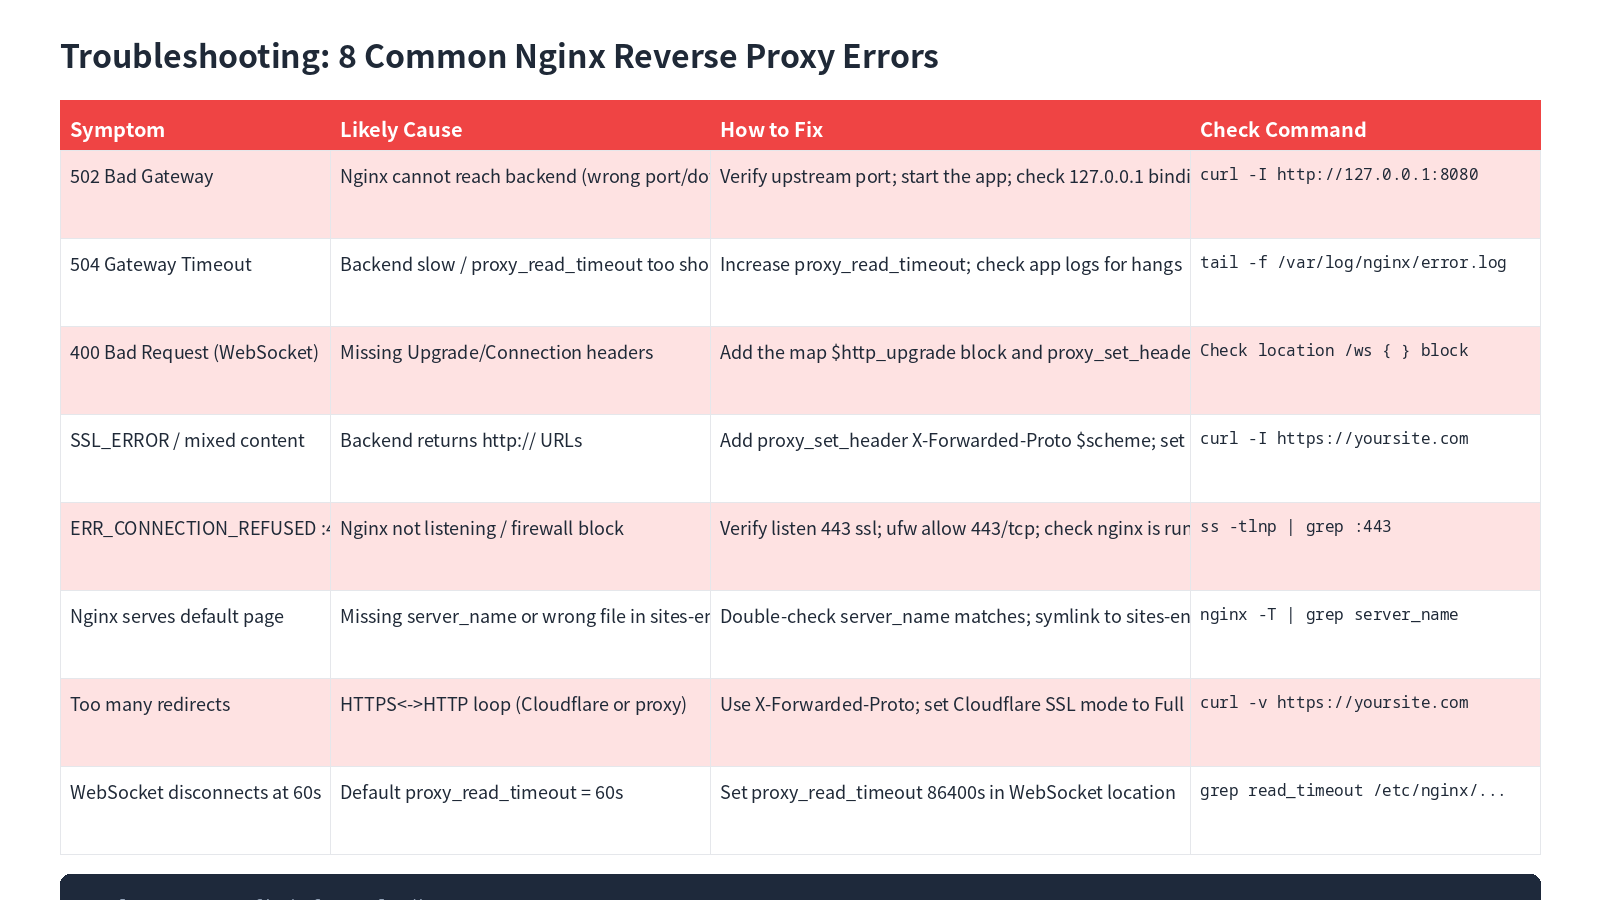
Figure 6. Eight reverse proxy errors you will see at least once; causes and fixes.
Nginx errors are famously terse. Here is a quick decision tree for the ones you will encounter most often:
| Error | What it means | First thing to check |
|---|---|---|
| 502 Bad Gateway | Nginx reached the backend but the connection was refused or reset. | curl -I http://127.0.0.1:8080 — is the app running and listening on that port? |
| 504 Gateway Timeout | Nginx connected but the backend did not respond in time. | tail -f /var/log/nginx/error.log; consider raising proxy_read_timeout for slow endpoints. |
| WebSocket disconnects after 60s | Default proxy_read_timeout is closing idle connections. |
Set proxy_read_timeout 86400s in the WebSocket location block. |
| Too many redirects (loop) | Nginx and the backend (or Cloudflare) are redirecting HTTP/HTTPS at each other. | Make sure X-Forwarded-Proto $scheme is set and your app trusts the proxy; if using Cloudflare, set SSL mode to "Full" not "Flexible". |
| 400 Bad Request on WebSocket | Upgrade/Connection headers are missing. |
Double-check the map $http_upgrade $connection_upgrade block is present and referenced. |
| Nginx shows default page | Your server block is not being matched (wrong server_name or not symlinked). |
nginx -T | grep server_name to see which server blocks are loaded and in what order. |
| Connection refused on :443 | Nginx is not listening on 443 or the firewall blocks it. | ss -tlnp | grep :443 and sudo ufw status. |
| Mixed content / http:// URLs in responses | The backend does not know it is behind HTTPS. | Make sure proxy_set_header X-Forwarded-Proto $scheme is set and your app is configured to trust it (e.g. TRUSTED_PROXIES=* in Node frameworks). |
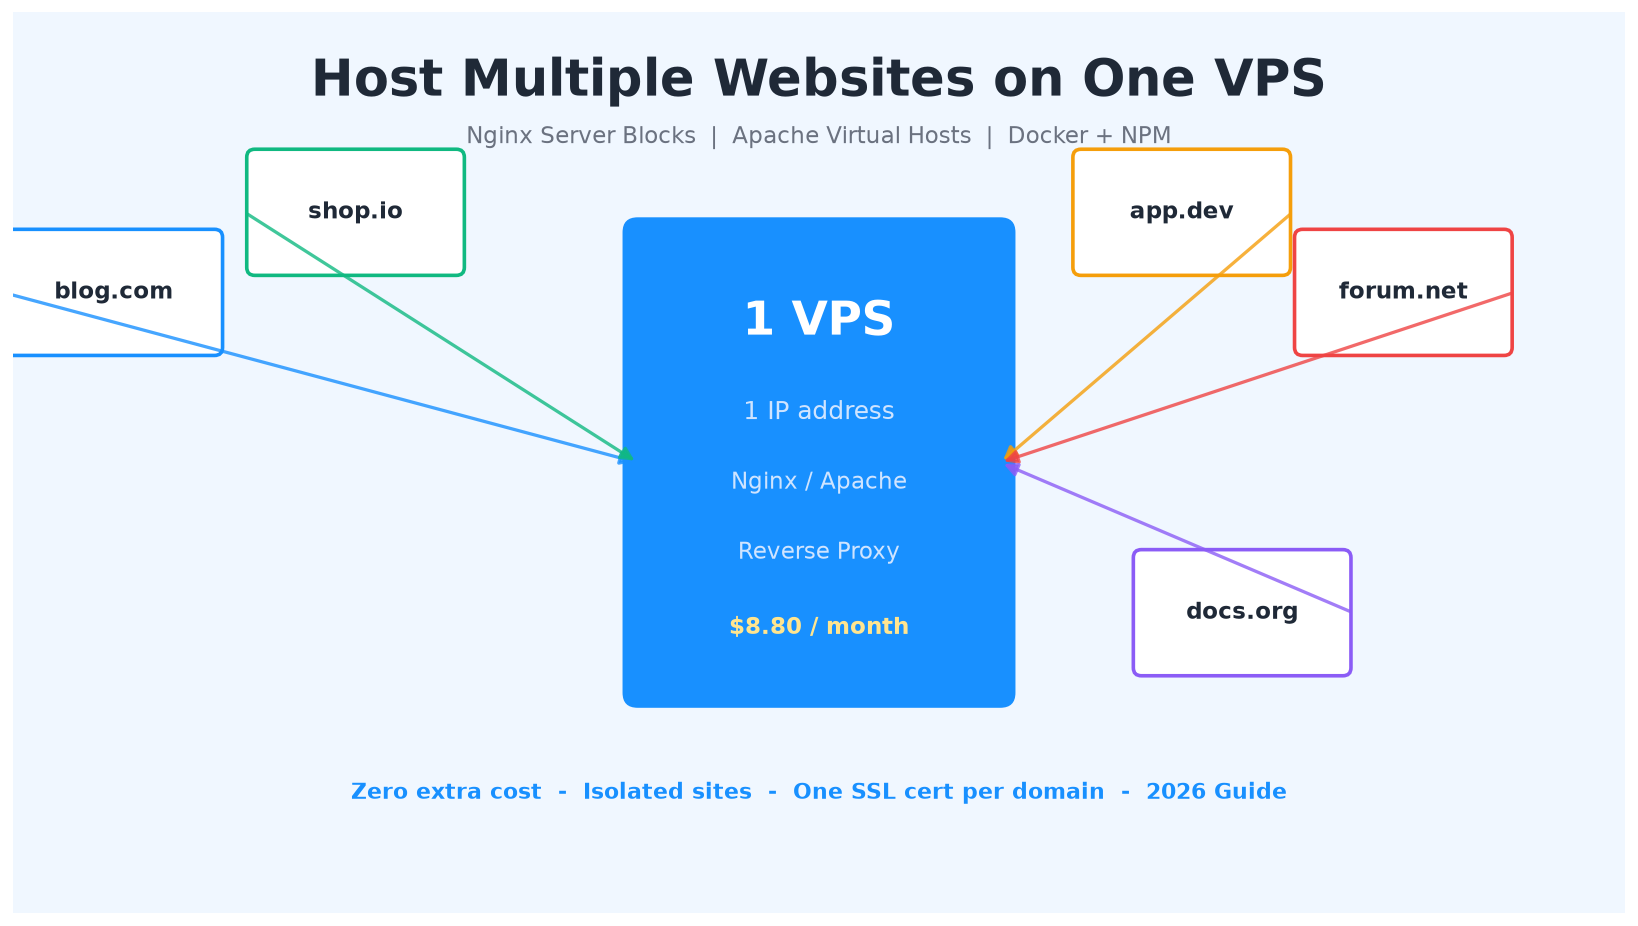
sudo tail -f /var/log/nginx/error.log while reproducing the request. The error log will almost always tell you exactly which upstream failed and why.If you are running Docker apps behind Nginx, our Docker VPS beginner's guide covers how to connect Nginx to Docker containers (either via network or via Nginx Proxy Manager). If you are running multiple websites on one VPS, our multiple websites on one VPS guide walks through Nginx server blocks vs Apache virtual hosts vs Docker-based approaches.
10. FAQ
Why use a reverse proxy instead of exposing apps directly?
A reverse proxy gives you a single TLS endpoint, domain-based routing, SSL termination, caching, compression, rate limiting, and lets you keep backends bound to 127.0.0.1 so they are never directly exposed to the internet.
Do I need Nginx or is Caddy enough?
Caddy is simpler for small/single-app setups and handles HTTPS out of the box. Nginx gives finer-grained control, more mature WebSocket and gRPC modules, advanced caching with proxy_cache, flexible load balancing, and is the default choice for production multi-app VPS deployments.
How many apps can I put behind one Nginx?
There is no hard Nginx-imposed limit. On a 2 vCPU / 2 GB VPS, 10-20 apps is realistic; on a 4 vCPU / 4 GB VPS, 30+ apps. The bottleneck is RAM for the backend apps, not Nginx itself.
Can I load balance across multiple VPS?
Yes. Just add more server IP:port entries to the upstream block. Use max_fails=3 fail_timeout=30s for passive health checks so a dead backend is skipped after 3 failures for 30 seconds.
Why does WebSocket disconnect after 60 seconds?
Because the default proxy_read_timeout is 60 seconds. Set it to a larger value like 86400s (one day) in the WebSocket location block, and do the same for proxy_send_timeout.
SSL termination vs end-to-end TLS — which should I use?
SSL termination at Nginx is the standard for single-server setups where traffic between Nginx and backends travels over localhost. Use end-to-end TLS when Nginx and backends communicate over a network you do not control (multi-datacenter, cross-cloud).
How do I cache static assets?
Use proxy_cache_path plus proxy_cache directives in your location block, or serve static files directly with a location /static/ alias block and add Cache-Control headers for long-term browser caching.
What VPS size do I need to run Nginx as a reverse proxy?
Nginx itself uses 50-150 MB RAM. On a LuckVM Starter VPS ($8.80/mo, 1 vCPU, 1 GB RAM) you can run Nginx plus 2-3 small apps; a Standard plan ($26.40, 2 vCPU, 2 GB) handles 5-10 apps comfortably.
Ready to deploy with a reliable VPS?
LuckVM offers KVM VPS in Hong Kong, Los Angeles, Tokyo, Seoul, Singapore and Frankfurt, starting at $8.80/month with unmetered bandwidth options, 99.9% uptime SLA, and 24/7 English/Chinese support. Nginx runs beautifully on even our smallest plan.
See Plans and PricingFurther reading: Docker on VPS: Complete Beginner's Guide · How to Host Multiple Websites on One VPS · VPS Security Hardening Checklist · VPS Monitoring: Netdata, Uptime Kuma & Prometheus · VPS Backup Strategy: Never Lose Your Data