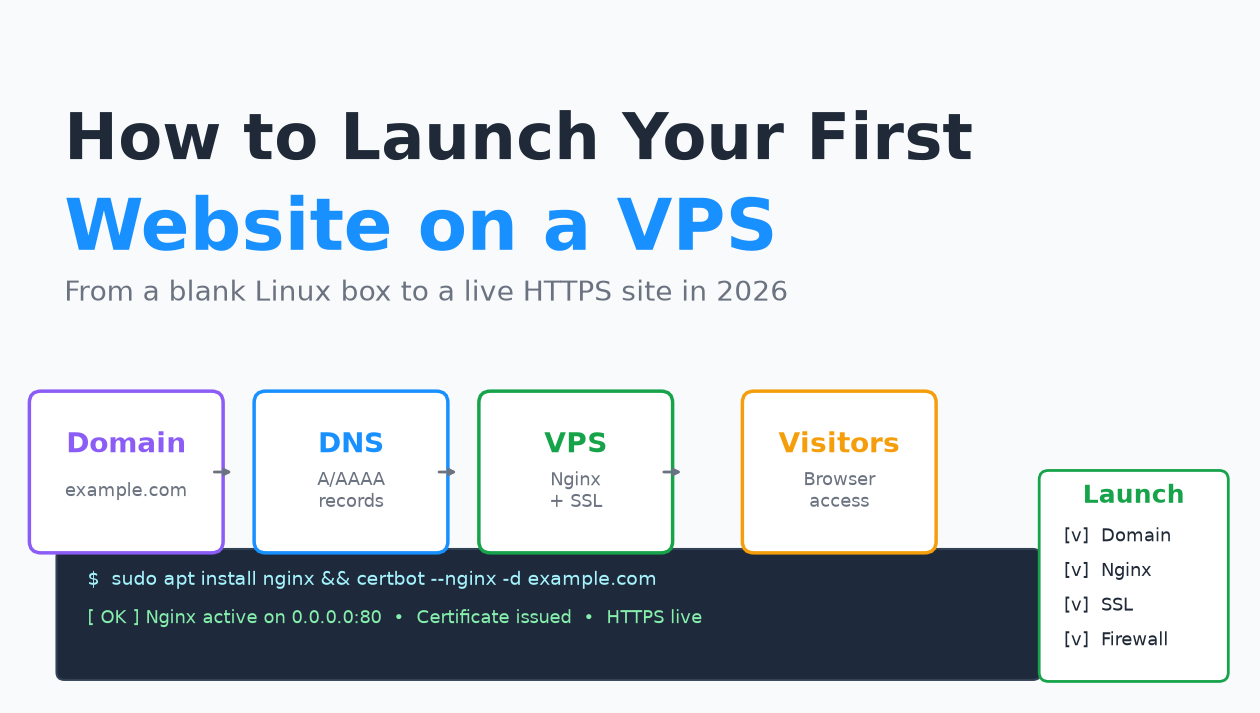
A records pointing the domain at that IP, and a web server (Nginx) with a Let's Encrypt SSL certificate. If you follow every command in this guide you will have a working HTTPS site on a LuckVM Starter VPS ($8.80/month) in under 30 minutes. No prior sysadmin experience required.1. What you will build
When you are done, you will have a real website on the public internet. Visitors typing https://yourdomain.com will be served by your own VPS, over HTTPS, with a valid SSL certificate, protected by a firewall. You will understand every piece in the chain — from the domain registrar to the web server — so when something breaks six months from now you will know where to look.
This guide assumes zero Linux experience. Every command is shown in full. If you are comfortable typing into a terminal you are qualified.
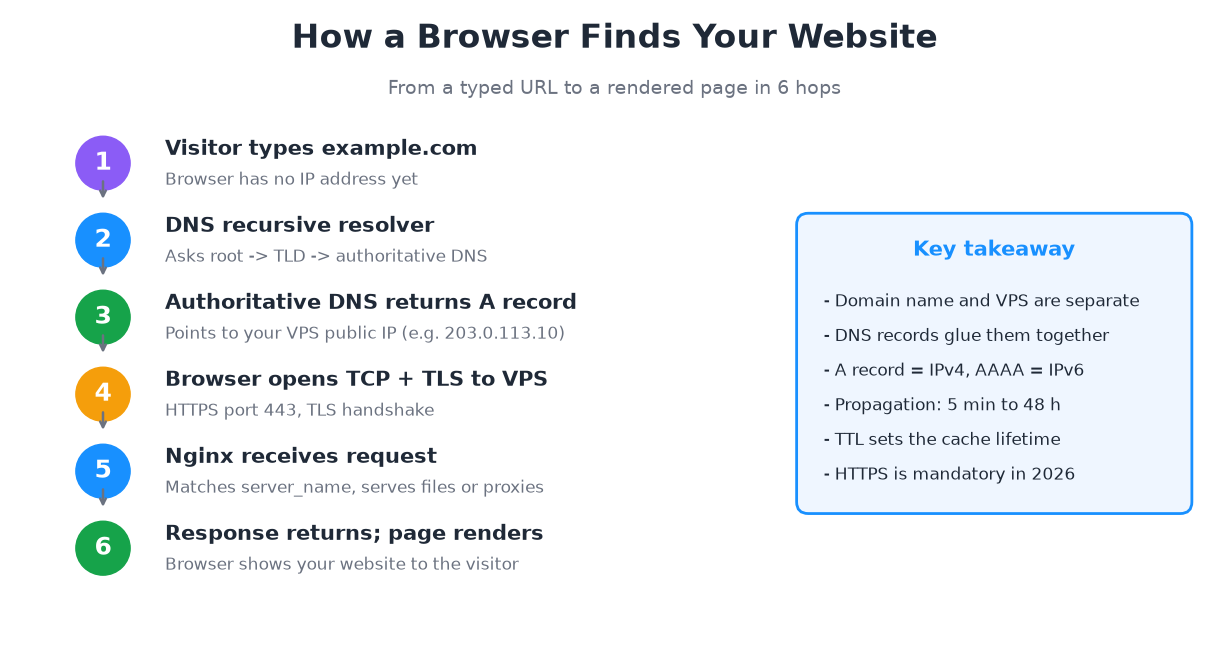
Figure 1: The path a request takes from a visitor's browser to your VPS and back.
If you have only ever used shared hosting (cPanel, Bluehost, HostGator), this will feel different. On shared hosting a company manages the server for you and rents you a slice of someone else's IP. On a VPS you own the box. That means more power, more speed, and more responsibility.
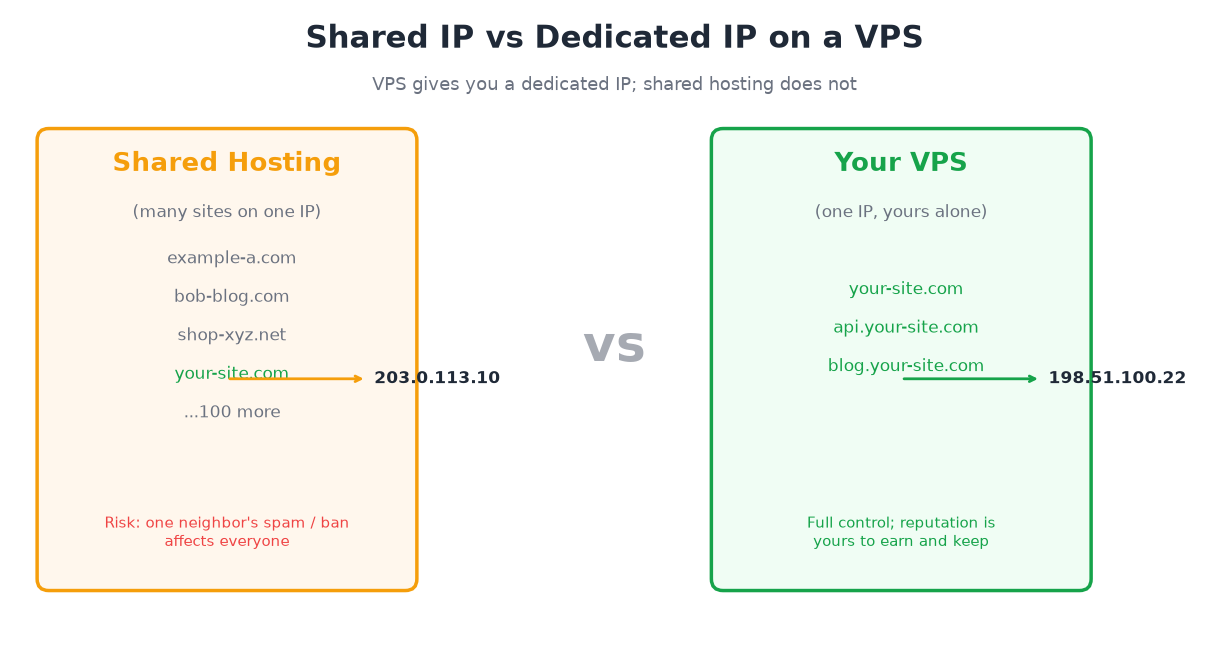
Figure 2: Shared hosting crams hundreds of sites onto one IP; a VPS gives you an IP of your own.
2. Step 0 — Buy a domain and a VPS
Before typing a single command, you need two things.
2.1 A domain name
A domain is the human-readable address people type into their browser. Buy one from any reputable registrar: Namecheap, Cloudflare Registrar, Porkbun, or Google Domains. Expect to pay $8–$15 per year for a .com. Do not buy "privacy protection" or "premium DNS" on day one; Cloudflare offers both for free.
2.2 A VPS
You want a VPS with at least 1 vCPU, 1 GB RAM, and 20 GB NVMe storage. That is enough for one static site or a small WordPress blog. The LuckVM Starter plan ($8.80/month, Hong Kong CN2 GIA or Los Angeles) fits perfectly.
After paying you will receive an email with:
- Your VPS public IPv4 address (e.g.
203.0.113.42) - An IPv6 address (longer, with colons)
- The
rootpassword (or an SSH key if you chose that option) - The SSH port (usually 22)
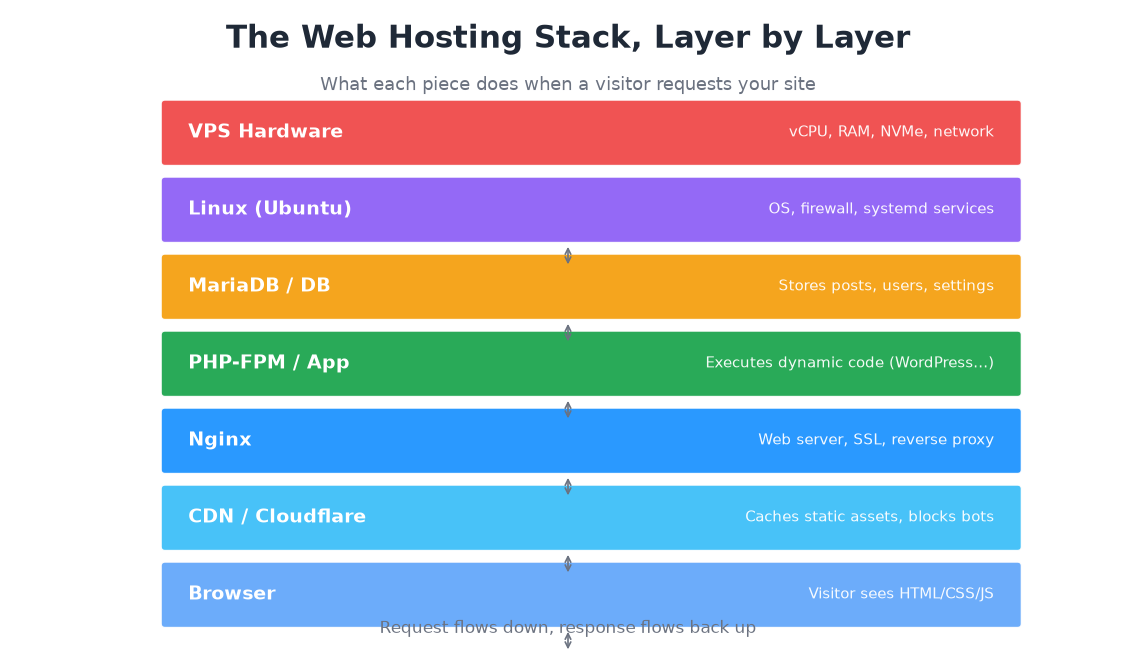
Figure 3: Every layer between the visitor's browser and your VPS hardware, and what each piece does.
3. Step 1 — Point DNS at your VPS
DNS (Domain Name System) is the phone book of the internet. It translates yourdomain.com into an IP address so browsers can find your server. You configure this at your domain registrar (or Cloudflare if you switched nameservers).
Add two records:
| Type | Name | Value | TTL |
|---|---|---|---|
| A | @ | your VPS IPv4 (e.g. 203.0.113.42) | 300 |
| AAAA | @ | your VPS IPv6 | 300 |
| A | www | same IPv4 | 300 |
TTL (Time To Live) of 300 means "tell resolvers to cache this for 5 minutes". Using a short TTL on launch day means if you typed the wrong IP and need to fix it, the fix propagates quickly. You can raise it later.
dig yourdomain.com on your machine, or on dnschecker.org.4. Step 2 — SSH in and update the OS
Now connect to your VPS for the first time. On macOS or Linux open Terminal; on Windows open PowerShell or PuTTY.
ssh root@203.0.113.42Accept the host key fingerprint (type yes) and enter the root password from your welcome email. You are now logged in as root, the superuser.
First command: update every package on the system.
apt update && apt upgrade -yThis pulls the latest package lists and installs security patches. It takes 30–60 seconds. When it finishes, create a non-root user (using root for daily tasks is a bad habit). Replace alice with a name you like.
adduser alice
usermod -aG sudo alice
Set a password when prompted. Now add your SSH public key so you can log in without a password (this is strongly recommended, but optional on day one).
mkdir -p /home/alice/.ssh
nano /home/alice/.ssh/authorized_keys
# Paste your local machine's ~/.ssh/id_rsa.pub contents here, then save (Ctrl-O, Enter, Ctrl-X)
chmod 700 /home/alice/.ssh
chmod 600 /home/alice/.ssh/authorized_keys
chown -R alice:alice /home/alice/.ssh
You can now SSH as your new user:
ssh alice@203.0.113.42alice in a second terminal and verify key-based login works before you disable passwords. Otherwise you can lock yourself out. See our VPS hardening guide for the full lockdown after launch.5. Step 3 — Install Nginx and the firewall
Nginx (pronounced "engine-x") is the web server. It listens on port 80 (HTTP) and 443 (HTTPS) and serves your files to visitors.
sudo apt install -y nginx
sudo systemctl enable --now nginx
Confirm Nginx is running:
sudo systemctl status nginxYou should see active (running) in green. If you visit http://203.0.113.42 in your browser right now (using the actual IP), you will see Nginx's default welcome page.
Now configure the firewall. Ubuntu ships with ufw (Uncomplicated Firewall). Allow SSH (so you don't lock yourself out), then allow HTTP and HTTPS, then turn the firewall on.
sudo ufw allow OpenSSH
sudo ufw allow 'Nginx Full'
sudo ufw --force enable
sudo ufw status
You should see three rules: 22/tcp (SSH), 80/tcp (HTTP), and 443/tcp (HTTPS) all marked ALLOW.
6. Step 4 — Create a server block for your domain
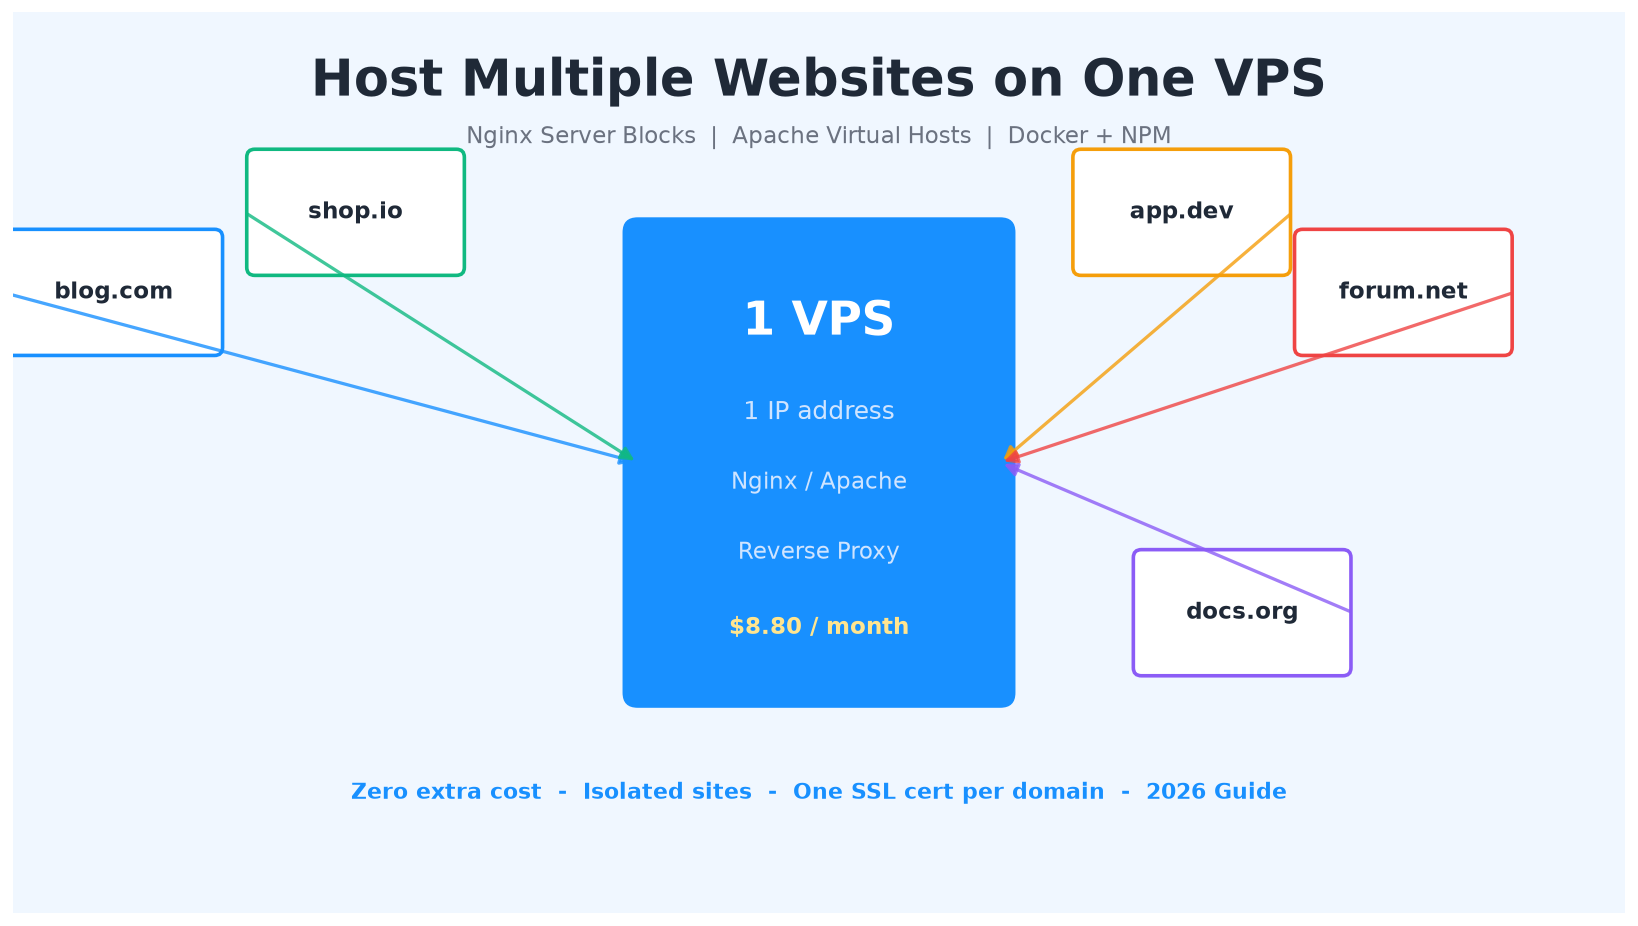
A "server block" is Nginx's term for a site configuration: it tells Nginx "when someone asks for yourdomain.com, serve files from this folder". This is how you can later host multiple sites on the same VPS — see our multi-site guide.
Create a folder for your website and put a simple HTML file in it:
sudo mkdir -p /var/www/yourdomain.com/html
sudo chown -R $USER:$USER /var/www/yourdomain.com/html
echo '
Hello VPS!
My first VPS website is live!
' \
| sudo tee /var/www/yourdomain.com/html/index.html
sudo chmod -R 755 /var/www/yourdomain.comNow create the Nginx server block. We will start with HTTP (port 80); Certbot will upgrade it to HTTPS in the next step.
sudo nano /etc/nginx/sites-available/yourdomain.comPaste this (replace both occurrences of yourdomain.com):
server {
    listen 80;
    server_name yourdomain.com www.yourdomain.com;

    root /var/www/yourdomain.com/html;
    index index.html index.htm;

    location / {
        try_files $uri $uri/ =404;
    }
}
Save and exit (Ctrl-O, Enter, Ctrl-X). Enable the site by symlinking it into sites-enabled, test the config for syntax errors, and reload Nginx:
sudo ln -s /etc/nginx/sites-available/yourdomain.com /etc/nginx/sites-enabled/
sudo nginx -t
sudo systemctl reload nginxnginx -t says "syntax is ok" and "test is successful" you are good to go. If it reports an error, read the message — it tells you the exact line and file. The most common mistake is a missing semicolon.At this point, if DNS has propagated, visiting http://yourdomain.com should show your "Hello VPS!" page. If DNS hasn't propagated yet you can test by editing your local hosts file — but just waiting 5–10 minutes is easier.
7. Step 5 — Issue a free SSL certificate
HTTP sites are marked "Not secure" by every modern browser. Fix that with a free Let's Encrypt certificate, installed and auto-renewed by certbot.
sudo apt install -y certbot python3-certbot-nginx
sudo certbot --nginx -d yourdomain.com -d www.yourdomain.com
Certbot asks a few questions:
- Enter your email (used for expiry warnings)
- Agree to the terms (Y)
- Share email with EFF (your call)
- Choose option 2 — Redirect. This adds a permanent HTTP→HTTPS redirect so all visitors use SSL.
That's it. Visit https://yourdomain.com. You should see your page, with a padlock icon in the address bar. Click the padlock to inspect the certificate — it should show "Issued by Let's Encrypt" and be valid for 90 days. Certbot installs a cron job that auto-renews it, so you never have to think about it again.
ssl_protocols and cipher changes to push it to an A+ in two minutes.8. Step 6 (Optional) — Add PHP and MariaDB for WordPress
If your site is pure HTML you are done — skip this section. If you want WordPress, Laravel, Drupal, or any PHP app, install PHP-FPM and a database.
sudo apt install -y php8.3-fpm php8.3-mysql php8.3-cli php8.3-curl \
  php8.3-gd php8.3-mbstring php8.3-xml php8.3-zip
sudo apt install -y mariadb-server
sudo systemctl enable --now mariadb
sudo mysql_secure_installation
Answer the secure-installation wizard: set a root password, remove anonymous users, disallow remote root login, remove the test database, reload privileges.
Create a database and a user for WordPress (use real passwords):
sudo mysql -u root -p
CREATE DATABASE wordpress DEFAULT CHARACTER SET utf8mb4 COLLATE utf8mb4_unicode_ci;
CREATE USER 'wpuser'@'localhost' IDENTIFIED BY 'pick-a-strong-password';
GRANT ALL ON wordpress.* TO 'wpuser'@'localhost';
FLUSH PRIVILEGES;
EXIT;
Edit your server block to pass .php files to PHP-FPM instead of serving them as plain text. Edit /etc/nginx/sites-available/yourdomain.com and replace the location / block with this, then add the PHP location block:
    index index.php index.html index.htm;

    location / {
        try_files $uri $uri/ /index.php?$args;
    }

    location ~ \.php$ {
        include snippets/fastcgi-php.conf;
        fastcgi_pass unix:/run/php/php8.3-fpm.sock;
    }

    location ~ /\.ht {
        deny all;
    }
Test and reload:
sudo nginx -t && sudo systemctl reload nginxVerify PHP works by creating an info page (delete it after testing!):
echo 'You are now running a fully functional PHP+MariaDB stack on your own VPS. Download WordPress into /var/www/yourdomain.com/html, visit your domain in a browser, and run the famous 5-minute installer.
For deeper WordPress performance tuning (Redis, OPcache, LSCache, image compression), see our WordPress speed guide.
9. The 10-item launch checklist
Before you tell anyone your site is live, walk through this checklist. Print it or keep it on a second monitor.
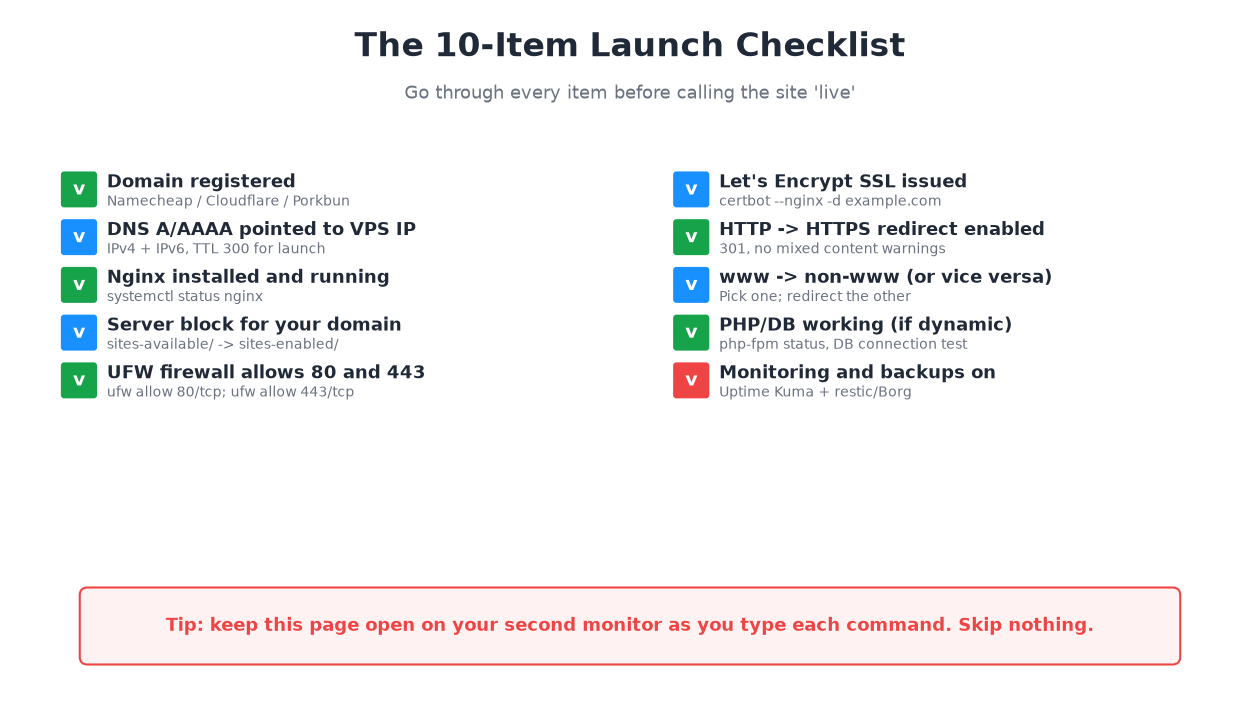
Figure 4: The ten things that must all be true before your site is genuinely "live".
A few items worth elaborating:
- www vs non-www: pick one and redirect the other. Certbot handles this automatically if you included both domains in the certificate command, but double-check by visiting both URLs.
- Mixed content warnings: if you migrated from HTTP, some images or links may still point to
http://. Install the Really Simple SSL plugin or use a search-and-replace in your database to fix them all at once. - Backups: the site is live now. Before the first real visitor arrives, set up automated backups per our VPS backup strategy guide.
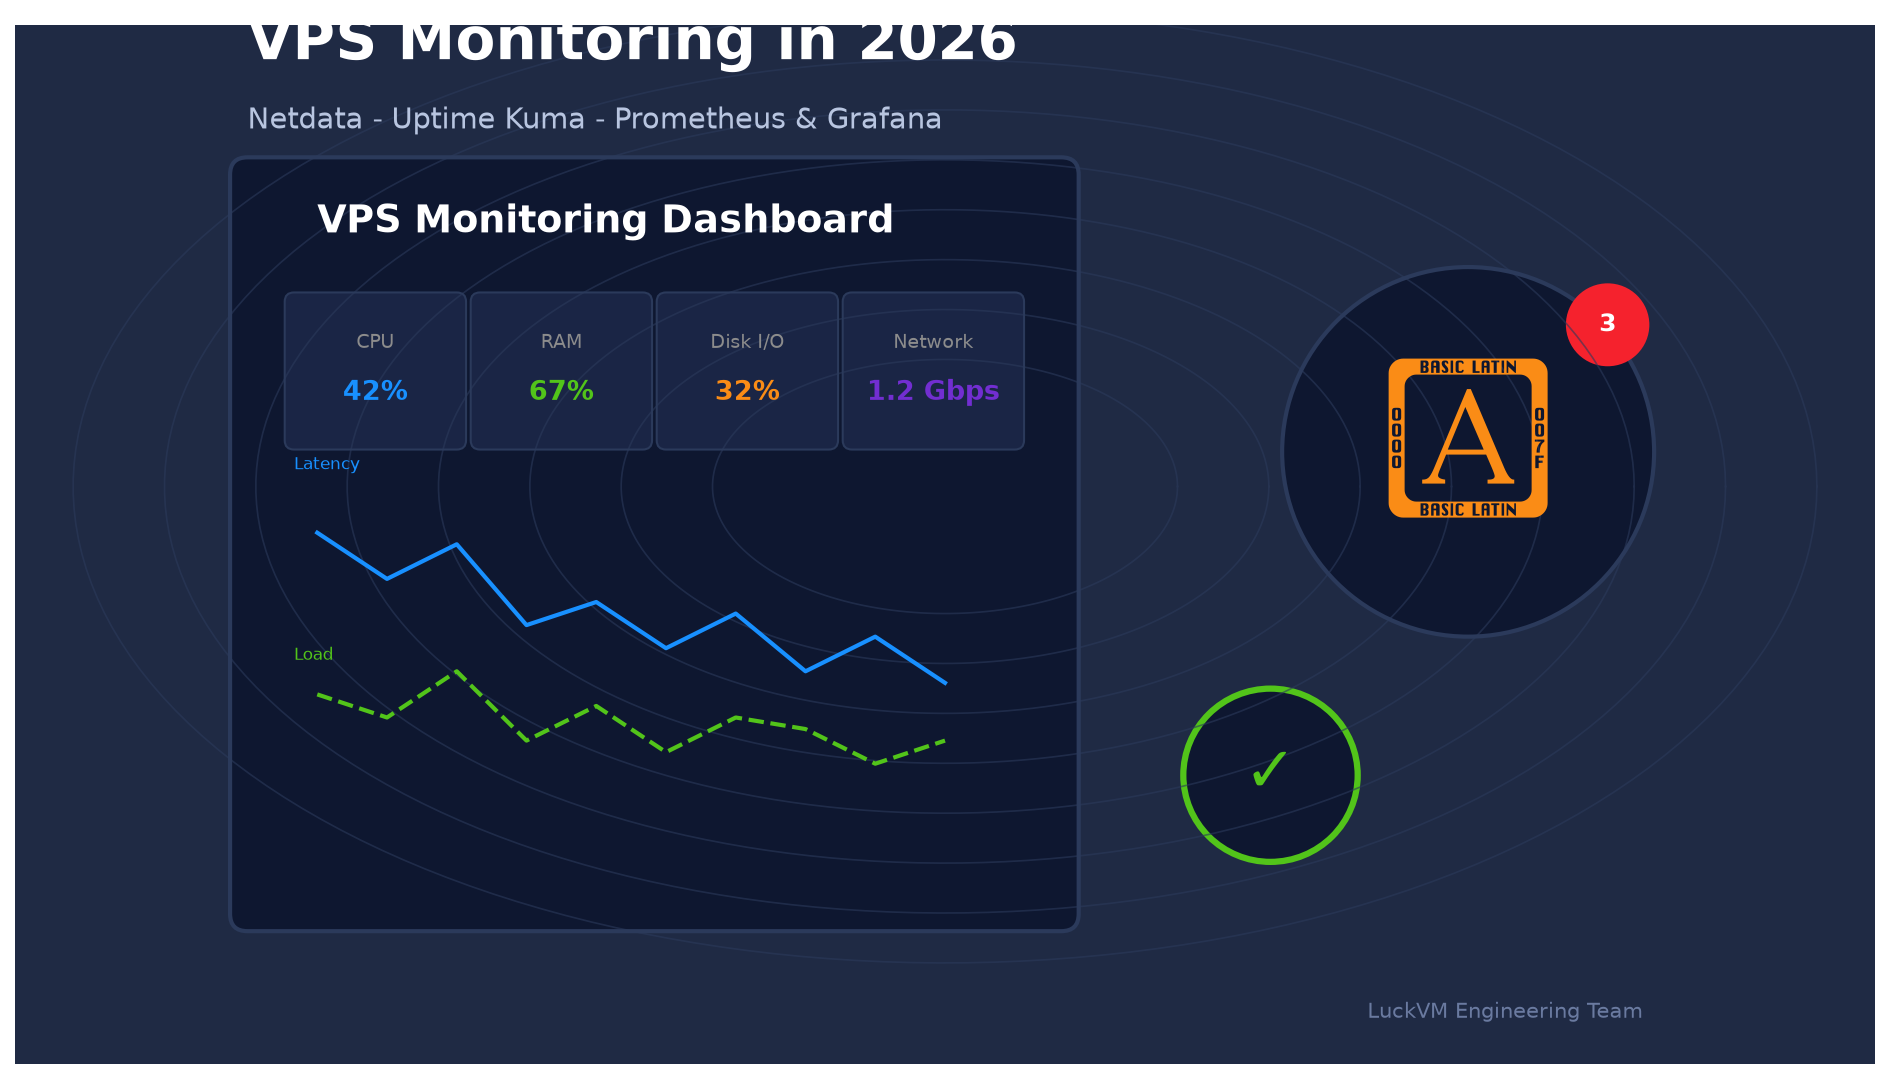
- Monitoring: install Uptime Kuma (see the VPS monitoring guide) so you get a Telegram/Discord message if the site goes down.
10. What to expect in the first 24 hours
If your site feels slow right after launch, don't panic. Three things are still settling:
- DNS propagation is still finishing in far-flung parts of the world. Some visitors will get the new IP immediately; others may take up to 48 hours.
- SSL session resumption hasn't kicked in yet. First visits from each new visitor do a full TLS handshake; subsequent visits reuse cached sessions and are faster.
- OPcache and Nginx buffers are cold. PHP compiles scripts on first load and caches the bytecode thereafter. Expect first-byte times to drop noticeably after the first hour of traffic.
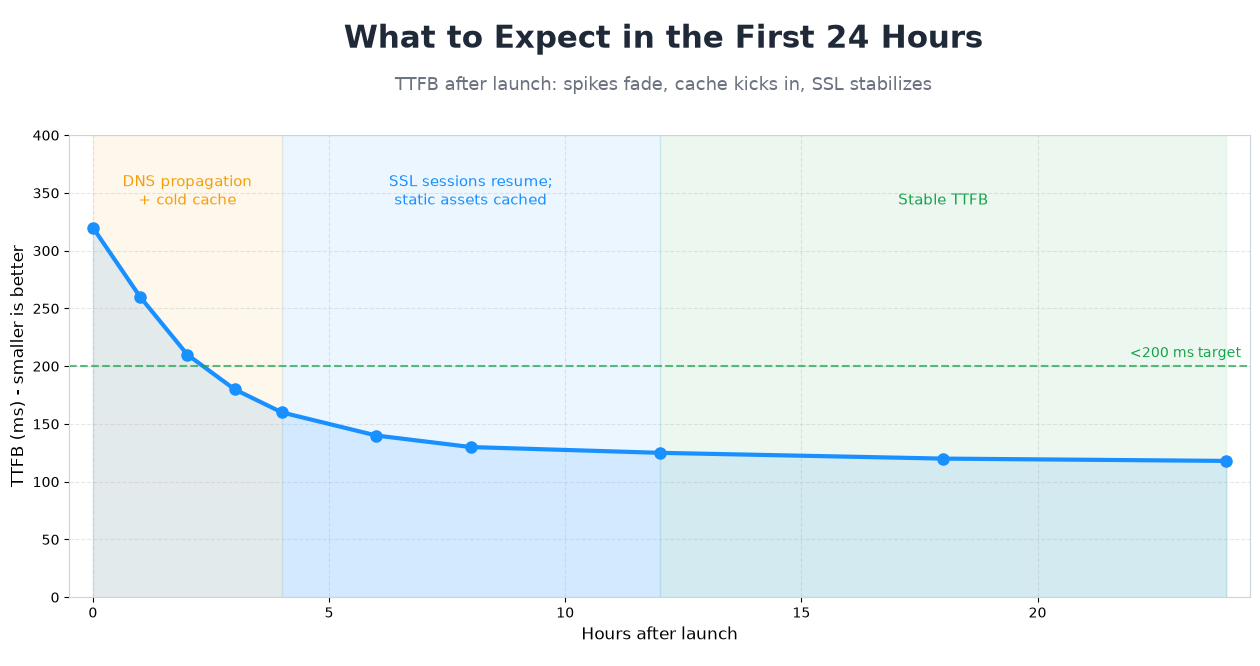
Figure 5: Typical TTFB over the first 24 hours after launch. Expect around 300 ms cold, dropping to under 150 ms stable.
A healthy target for a simple site on a $8.80 VPS is a TTFB under 200 ms and a fully loaded page under 1.5 seconds. If after 24 hours you are not in that range, run through the WordPress optimization guide (even if you are not running WordPress — the Nginx and caching advice applies universally).
What next?
You now have a live HTTPS website running on a server you control. That is the foundation. The next steps, in roughly this order, are:
- Harden the server — disable password SSH, install fail2ban, tighten UFW.
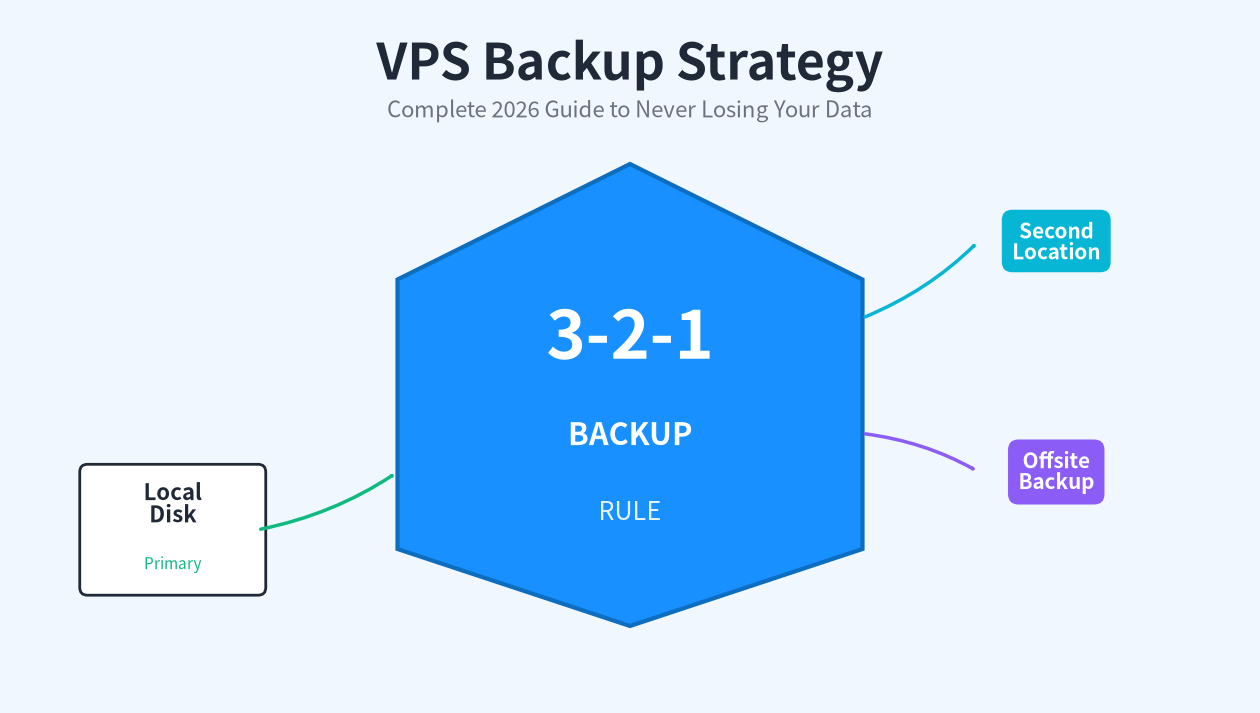
- Set up automated backups to a second location (not just on the same VPS).
- Install monitoring so you know before your visitors do when something breaks.
- Add more sites when you need them — same VPS, more server blocks.
- Learn Docker when you outgrow plain Nginx and want to run apps in containers.
Frequently asked questions
Do I need to know Linux to run a VPS?
You need about 10 commands: ssh, apt, sudo, nano, systemctl, ufw, ls, cd, mkdir, chmod. That is it. You have already used most of them in this guide. Everything else is Google-able.
Can I host more than one website on a $8.80 VPS?
Yes. A 1 vCPU / 1 GB RAM VPS can comfortably serve 5–10 static sites, or 2–3 low-traffic WordPress blogs. For heavier workloads (WooCommerce, multiple high-traffic blogs), step up to the Standard plan (2 vCPU / 2 GB / $26.40/month). See our multi-site guide for resource math.
Do I need Cloudflare?
Not on day one. Cloudflare adds a free CDN, DDoS protection, and DNS management on top — all valuable. Get your site working directly on your VPS first (so you understand what Cloudflare does), then switch nameservers over.
How do I upload files to the VPS?
Use scp from your terminal, or an SFTP client like FileZilla or Cyberduck. Connect with the same alice@203.0.113.42 credentials you use for SSH, and upload to /var/www/yourdomain.com/html/. For Git-based deployments, clone your repo directly onto the server.
Why is my site still showing the Nginx default page?
Most likely causes: (1) DNS hasn't propagated yet — you are hitting the IP but Nginx has no server block match and falls back to the default; (2) you forgot to sudo nginx -t && sudo systemctl reload nginx after creating the server block; (3) the symlink in /etc/nginx/sites-enabled/ is missing or misspelled. Check each.
How do I set up email on my VPS?
We strongly recommend you do not run your own mail server on day one (or year one). Email deliverability is a nightmare of SPF, DKIM, DMARC, IP reputation, and blacklists. Use a transactional service like Resend, Postmark, or Mailgun for sending, and Google Workspace or Fastmail for receiving.
Can I use Apache instead of Nginx?
Yes. Replace apt install nginx with apt install apache2, and server blocks become Virtual Hosts in /etc/apache2/sites-available/. Nginx is faster for static content and more memory-efficient on small VPS, which is why we use it in this guide.
What if I break something?
You will. Everyone does. That is why we set up backups in step 9. If something is truly unrecoverable, LuckVM lets you rebuild the VPS from the dashboard in one click and start over — on a $8.80 box that is not a catastrophic loss.
Ready to launch your first site?
Deploy a LuckVM VPS in Hong Kong, Los Angeles, or five other regions from $8.80/month. NVMe storage, CN2 GIA routes, 24/7 support, and a 24-hour refund window.
Deploy your VPS now →