1. Why VPS Security Matters
Let me be direct: if you spin up a VPS with the default configuration and expose it to the internet, it will be scanned, brute-forced, and likely compromised within 24 to 72 hours. Not "maybe." It will be.
Here's what we see in our network logs every single day at LuckVM:
- A fresh VPS with port 22 open starts receiving SSH brute-force attempts within 90 seconds of coming online
- Average of 5,000-20,000 brute-force attempts per day per IP address (most from botnets in China, Russia, Brazil, and Iran)
- Weak passwords like
root:root,root:password,admin:adminare cracked within minutes - Unpatched servers running known CVEs (like old Log4j, Sudo Baron Samedit, or OpenSSL Heartbleed) are scanned and exploited within hours of a public PoC release
- WordPress sites with unpatched plugins are the #1 source of malware injections on our network
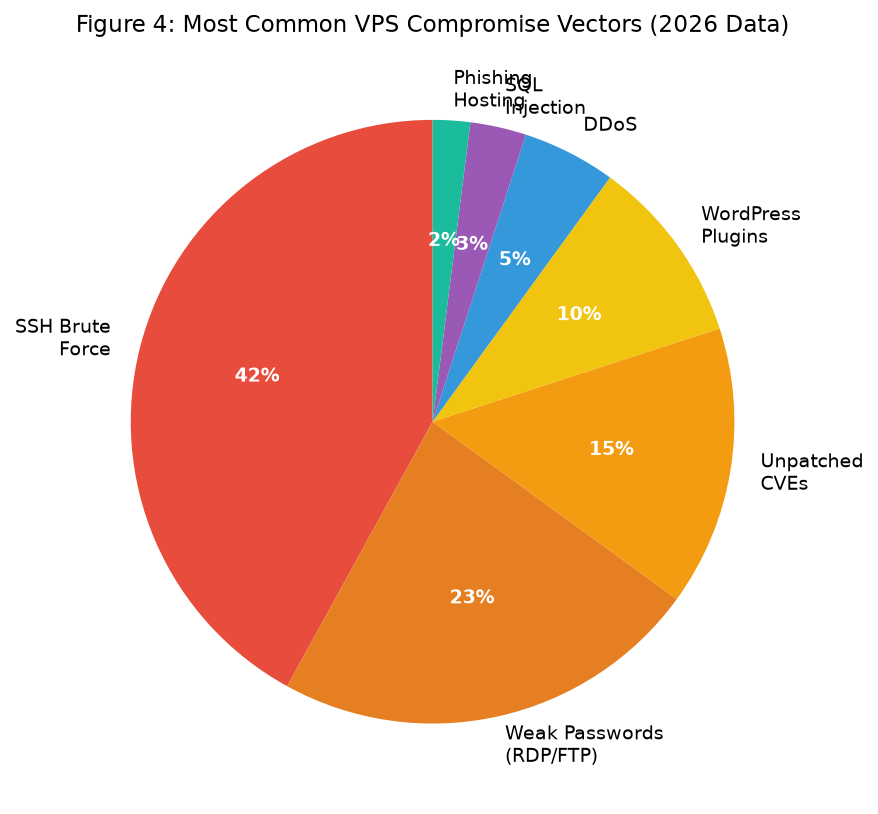 Figure 1: SSH brute force is the #1 way VPS get compromised (42% of incidents), followed by weak passwords and unpatched CVEs. Hardening targets all three.
Disclosure: I work at LuckVM, and we see compromised customer servers every week. Most of them could have been prevented by following the exact steps in this guide. We're not selling any security product here — everything in this guide uses free, open-source tools. This is the exact checklist we use when we set up our own production servers.
One more thing before we start: security is a process, not a one-time setup. Following these steps will harden your server against 99% of automated attacks, but you still need to keep your system updated, monitor logs, and be smart about what you install. This guide gets you from "new VPS that will be hacked in 24 hours" to "production-ready server that will shrug off automated attacks."
2. Before You Start
Assumptions for this guide:
- You're running a modern Linux distribution (we'll use Ubuntu 22.04/24.04 for commands, with notes for Debian and RHEL/CentOS)
- You have root SSH access to your VPS
- You're starting from a fresh install (if not, most steps still apply — just skip anything you've already done)
- You're comfortable with basic Linux commands
Critical warning: Steps 2-4 modify SSH configuration. It is very easy to lock yourself out of your server if you close the SSH connection after changing settings before verifying that the new configuration works.
Golden rule of SSH hardening:
Keep your current SSH session open in one terminal while you test the new configuration in a second terminal. Only close the original session after you've confirmed you can log in with the new setup.
I've seen experienced sysadmins lock themselves out. Don't be that person. Have a recovery console available (LuckVM provides VNC/console access in the client panel for all customers) before making SSH changes.
3. The 15-Step VPS Hardening Checklist
Here's an overview of what we'll cover. The steps are ordered by priority — the first five prevent the vast majority of automated attacks.
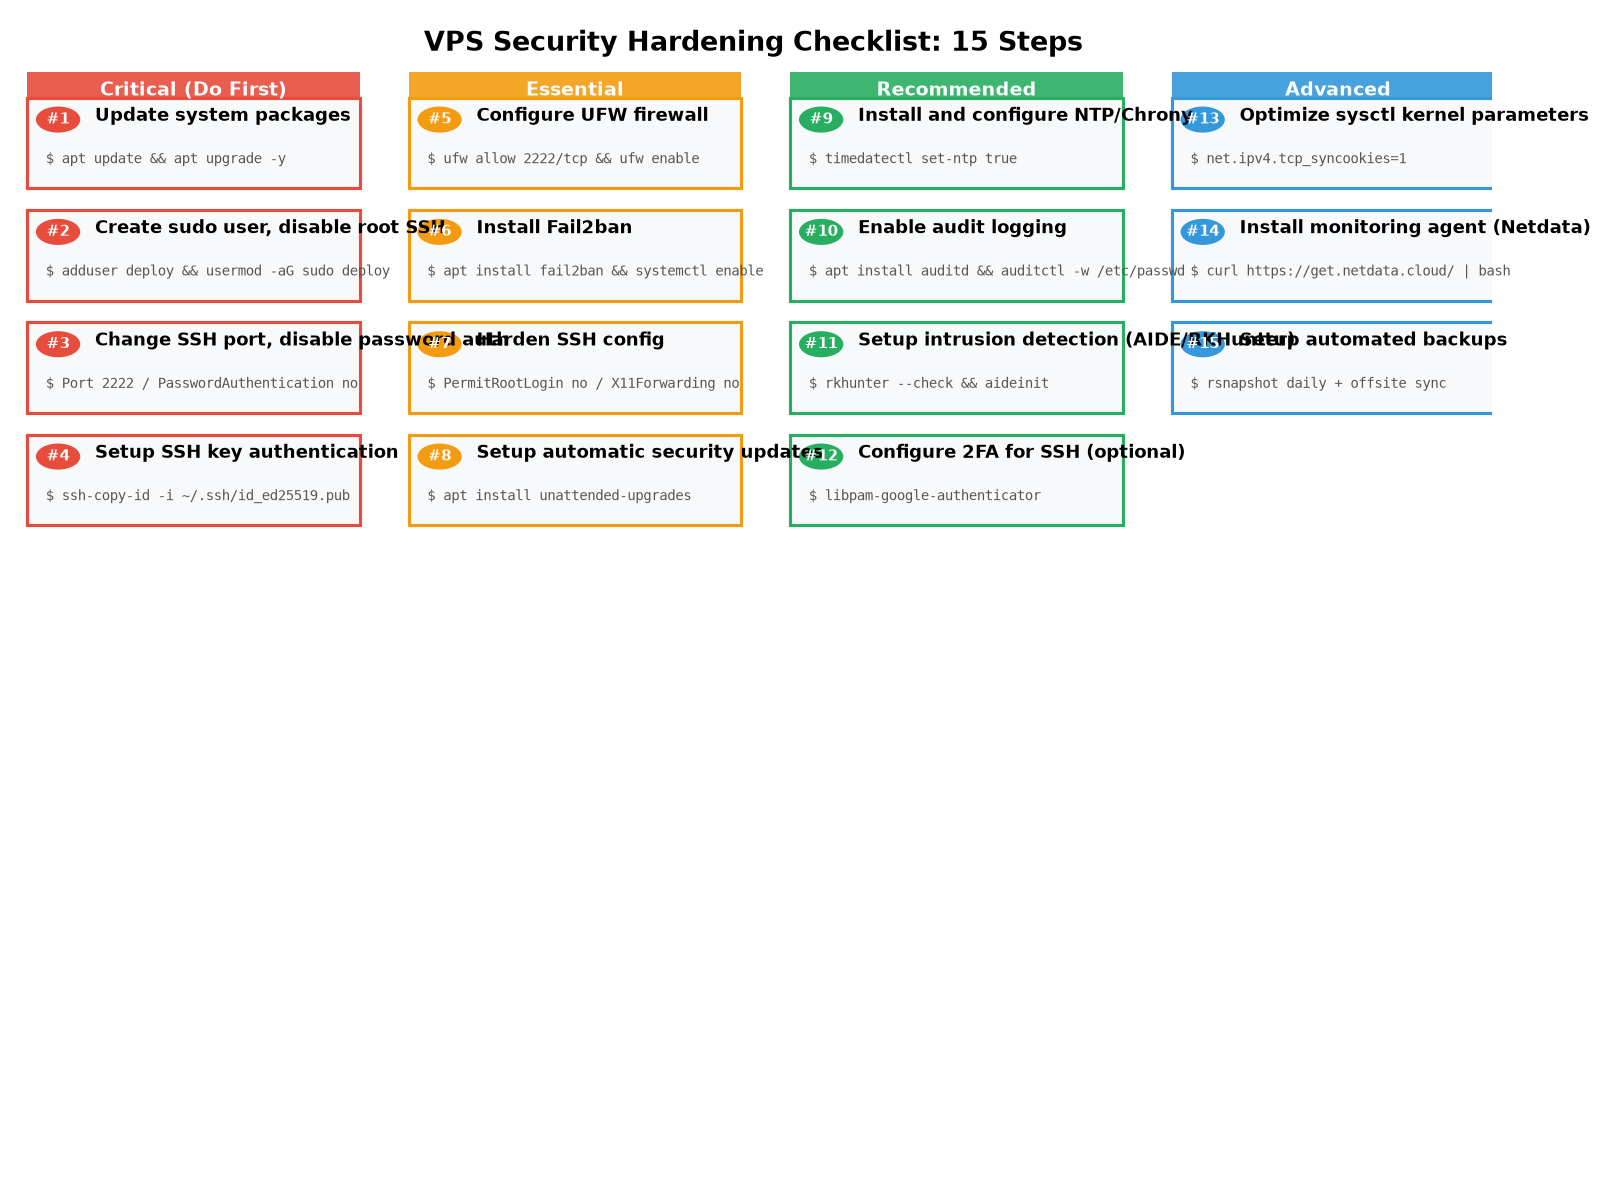 Figure 2: The 15 steps grouped by priority. Do the red "Critical" steps first — they take 10 minutes and block 90% of attacks.
Let's dive in.
Step 1: Update All System Packages
This sounds obvious, but I can't tell you how many servers I've logged into that haven't been updated since they were provisioned six months ago. Unpatched packages are the #2 cause of VPS compromises after weak passwords.
# Ubuntu / Debian
apt update && apt upgrade -y
apt autoremove -y
apt install -y unattended-upgrades apt-listchanges

# RHEL / CentOS / Rocky / AlmaLinux
dnf update -y
dnf install -y dnf-automatic
Reboot if a new kernel was installed:
# Check if a reboot is required
[ -f /var/run/reboot-required ] && echo "Reboot required"
reboot
Why this matters: Known CVEs (publicly disclosed vulnerabilities) are weaponized within days — sometimes hours — of being announced. If you're running a six-month-old kernel, you're likely missing critical security patches.
Step 2: Create a Sudo User and Disable Root SSH Login
You should never log in directly as root over SSH. Create a regular user with sudo privileges, use that for all operations, and disable root login.
# Create a new user (replace 'deploy' with your preferred username)
adduser deploy

# Add the user to the sudo group (Ubuntu/Debian)
usermod -aG sudo deploy

# For RHEL/CentOS:
# usermod -aG wheel deploy
Set a strong password when prompted (we'll disable password login in Step 3, but you need a sudo password).
Test that the new user works BEFORE disabling root:
# Open a NEW terminal window and try to SSH in
ssh deploy@your-server-ip

# Once logged in, test sudo
sudo whoami
# Should output 'root'
If that works, you can safely disable root SSH login later (Step 7).
Step 3: Set Up SSH Key Authentication and Disable Password Login
SSH keys are cryptographically secure — they cannot be brute-forced, unlike passwords. A typical RSA/Ed25519 key is equivalent to a 3072-bit or 256-bit secret, compared to even strong passwords which max out around 80-100 bits of entropy.
On your local machine (not the server), generate an SSH key pair:
# Generate an Ed25519 key (modern, recommended)
ssh-keygen -t ed25519 -C "you@your-email.com"

# Or if you need RSA for legacy compatibility:
# ssh-keygen -t rsa -b 4096 -C "you@your-email.com"
When prompted for a passphrase, set one — this encrypts your private key on disk so that if your laptop is stolen, your key is not usable without the passphrase.
Copy your public key to the server:
ssh-copy-id deploy@your-server-ip
Or manually:
# On the server, as the deploy user
mkdir -p ~/.ssh
chmod 700 ~/.ssh
nano ~/.ssh/authorized_keys
# Paste your PUBLIC key (~/.ssh/id_ed25519.pub from local machine) into this file
chmod 600 ~/.ssh/authorized_keys
VERIFY KEY-BASED LOGIN WORKS before proceeding (open a new terminal and ssh deploy@your-server-ip — it should log you in without asking for a password, or ask for your key passphrase).
We'll disable password authentication in Step 7 after changing the SSH port.
Step 4: Change the Default SSH Port
Changing the SSH port from 22 to something else doesn't make you immune to attacks, but it immediately reduces the noise in your logs by 95%+ because most botnets only scan port 22. It's a low-effort, high-reward step.
Pick a random port between 1024 and 65535. I'll use 2222 as an example.
# First, make sure the port isn't used by anything else
ss -tulpn | grep 2222
# If no output, the port is available
Edit the SSH config:
sudo nano /etc/ssh/sshd_config
Find (or add) the Port line and change it:
Port 2222
IMPORTANT: Before you restart SSH, open the new port in your firewall (Step 5 next). If you restart SSH now and your firewall is still blocking port 2222, you'll lock yourself out. The safest order is:
- Open the new port in the firewall (Step 5 below)
- Restart SSH
- Test login on the new port from a new terminal
- Close port 22 in the firewall
- Verify everything works
Step 5: Configure a Firewall (UFW)
A firewall closes all ports by default and only allows traffic on the ports you explicitly open. If you skip this, every service running on your server is exposed to the internet.
UFW (Uncomplicated Firewall) is the easiest firewall for Ubuntu/Debian:
# Install UFW if not present
sudo apt install ufw -y

# Set default policies
sudo ufw default deny incoming
sudo ufw default allow outgoing

# Allow SSH on your NEW custom port (critical!)
sudo ufw allow 2222/tcp

# Allow HTTP and HTTPS if you're running a web server
sudo ufw allow 80/tcp
sudo ufw allow 443/tcp

# If you need mail ports (only if running a mail server!)
# sudo ufw allow 25/tcp
# sudo ufw allow 143/tcp
# sudo ufw allow 993/tcp

# Double-check your rules BEFORE enabling
sudo ufw show added
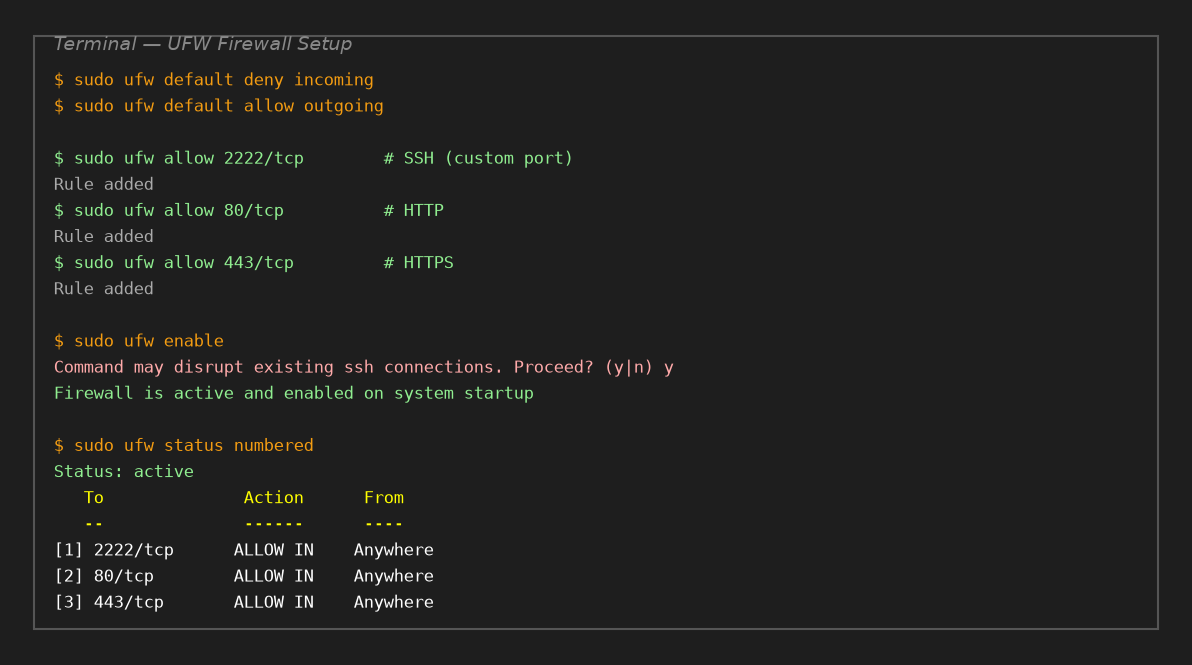 Figure 3: UFW configured to deny all incoming by default, with only SSH (custom port), HTTP, and HTTPS allowed. This is a typical web server configuration.
Enable the firewall:
sudo ufw enable

# Verify status
sudo ufw status numbered
At this point, restart SSH and test the new port:
sudo systemctl restart sshd
# IMPORTANT: Leave your current session open!
# Open a NEW terminal and test:
ssh -p 2222 deploy@your-server-ip
If that works, you can close port 22 (it should already be blocked by default since we didn't allow it). If something goes wrong, your original session is still open to fix it.
Step 6: Install and Configure Fail2ban
Fail2ban monitors your logs for repeated failed login attempts and automatically blocks the offending IP addresses at the firewall level. It's like a bouncer who kicks people out after they try the wrong key too many times.
sudo apt install fail2ban -y
Create a local configuration file (never edit the default jail.conf directly — it gets overwritten on updates):
sudo nano /etc/fail2ban/jail.local
Add this basic configuration:
[DEFAULT]
# Ban for 1 hour after 5 failed attempts in 10 minutes
bantime = 3600
findtime = 600
maxretry = 5

# Ignore localhost and your home/office IP (so you don't ban yourself!)
ignoreip = 127.0.0.1/8 ::1 YOUR_HOME_IP/32

[sshd]
enabled = true
port = 2222
filter = sshd
logpath = /var/log/auth.log
maxretry = 3
bantime = 86400   # Ban SSH brute forcers for 24 hours
Replace YOUR_HOME_IP with your actual IP address (find it at https://ifconfig.me).
Enable and start Fail2ban:
sudo systemctl enable fail2ban
sudo systemctl start fail2ban

# Check status
sudo fail2ban-client status
sudo fail2ban-client status sshd
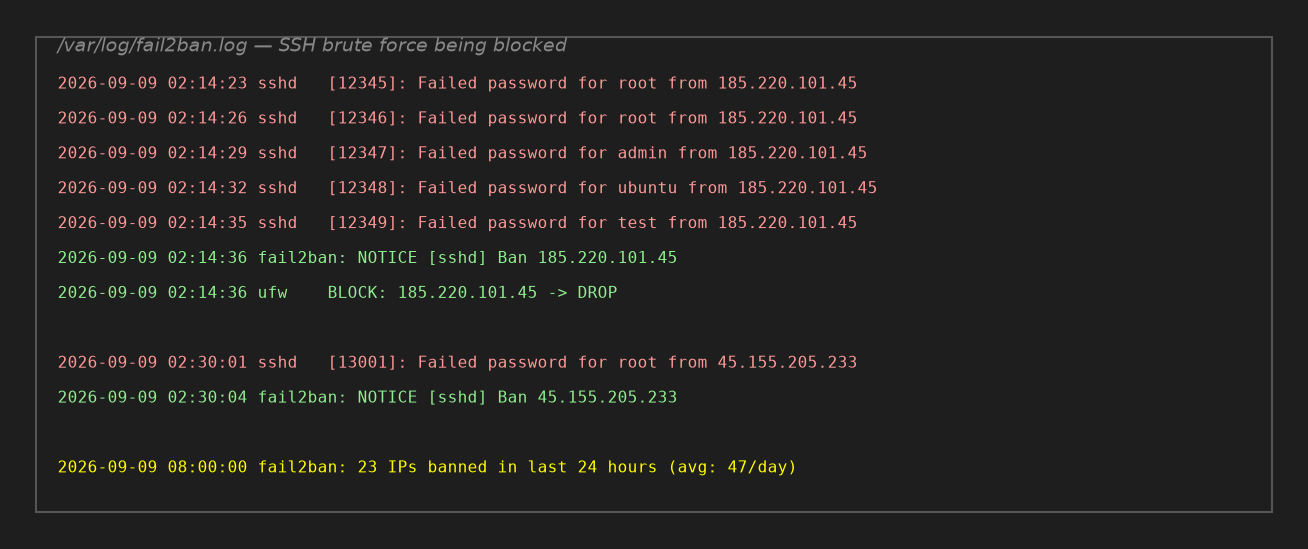 Figure 4: Fail2ban in action — after 5 failed password attempts, the attacking IP is automatically banned for 24 hours. This is what you want to see in your logs.
For extra protection, you can add jails for other services (nginx, postfix, etc.) if you run them, but SSH is the critical one.
Step 7: Harden SSH Configuration
Now let's lock down SSH further. Edit the SSH daemon config:
sudo nano /etc/ssh/sshd_config
Set or verify these settings:
# We already set port in Step 4
Port 2222

# Disable root login (we have a sudo user now)
PermitRootLogin no

# Disable password authentication (we're using SSH keys now)
PasswordAuthentication no

# Disable empty passwords
PermitEmptyPasswords no

# Don't allow keyboard-interactive challenge/response (another auth bypass)
ChallengeResponseAuthentication no

# Use SSH protocol 2 only (modern default)
Protocol 2

# Limit to specific users (only allow our deploy user)
AllowUsers deploy

# Disable X11 forwarding (unless you actually need it)
X11Forwarding no

# Disable TCP forwarding if you don't use SSH tunnels
AllowTcpForwarding no

# Set login grace time (disconnect faster after failed attempts)
LoginGraceTime 30

# Limit max authentication attempts
MaxAuthTries 3

# Limit max concurrent sessions
MaxSessions 2

# Disable .rhosts and host-based authentication
IgnoreRhosts yes
HostbasedAuthentication no

# Log more verbosely (useful for Fail2ban and forensics)
LogLevel VERBOSE
Test the config before restarting (catches syntax errors):
sudo sshd -t
# If no output, the config is valid
Restart SSH:
sudo systemctl restart sshd
TEST LOGIN FROM A NEW TERMINAL BEFORE CLOSING YOUR EXISTING SESSION!
ssh -p 2222 deploy@your-server-ip
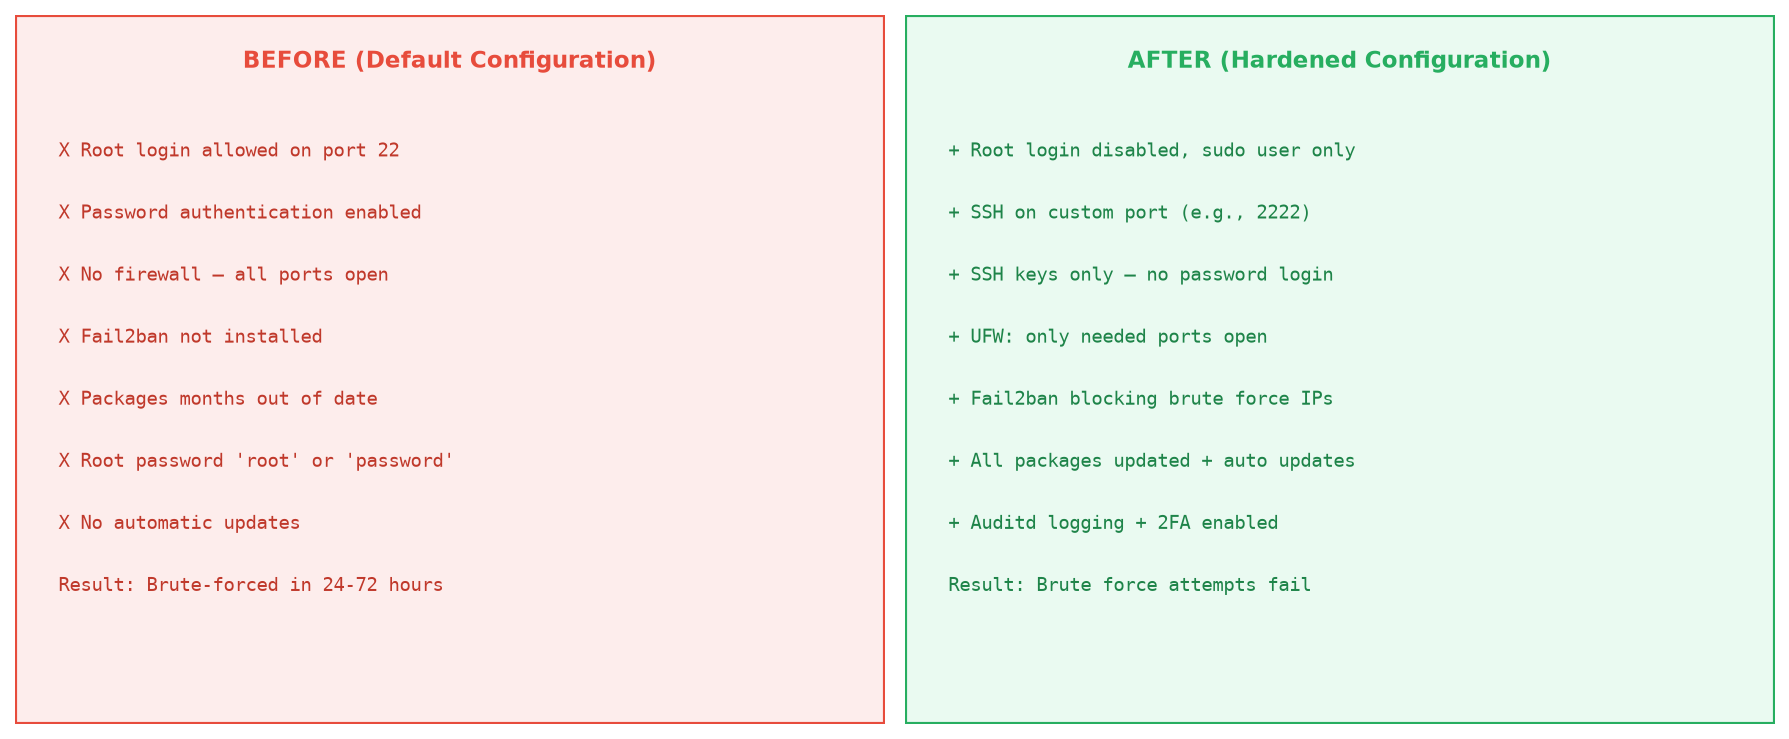 Figure 5: Before — root login on port 22 with password auth, brute-forced in 24-72 hours. After — key-only auth on custom port, with Fail2ban blocking brute force attempts.
Step 8: Enable Automatic Security Updates
Critical security patches should be applied automatically. Feature updates can wait, but security updates shouldn't.
For Ubuntu/Debian:
sudo dpkg-reconfigure -plow unattended-upgrades
# Select "Yes" when prompted
Edit the config to customize what gets auto-updated:
sudo nano /etc/apt/apt.conf.d/50unattended-upgrades
Recommended settings:
Unattended-Upgrade::Allowed-Origins {
    "${distro_id}:${distro_codename}";
    "${distro_id}:${distro_codename}-security";
    "${distro_id}ESMApps:${distro_codename}-apps-security";
    "${distro_id}ESM:${distro_codename}-infra-security";
};

// Auto-reboot when required (e.g., kernel updates)
Unattended-Upgrade::Automatic-Reboot "true";
Unattended-Upgrade::Automatic-Reboot-Time "03:00";

// Remove unused dependencies
Unattended-Upgrade::Remove-Unused-Dependencies "true";
Enable the timer:
sudo systemctl enable --now apt-daily-upgrade.timer
For RHEL/CentOS with dnf-automatic:
sudo systemctl enable --now dnf-automatic-install.timer
Step 9: Set Up Accurate Time Synchronization
Accurate time is critical for logging, certificate validation, two-factor authentication (TOTP drifts), and security incident forensics. A server with wrong time can have certificate errors, fail 2FA, or produce logs that don't make sense during an investigation.
# Ubuntu 22.04+ uses systemd-timesyncd by default
# Verify it's active:
timedatectl status

# If not active, enable it:
sudo timedatectl set-ntp true

# Or install chrony for more precise synchronization:
sudo apt install chrony -y
sudo systemctl enable --now chronyd

# Verify synchronization
chronyc tracking
chronyc sources
Set your timezone:
# List timezones
timedatectl list-timezones | grep -i asia

# Set to UTC (recommended for servers) or your local TZ
sudo timedatectl set-timezone UTC
Step 10: Install Audit Logging (auditd)
Linux Audit (auditd) lets you log specific security-relevant events on your system — like file access, user logins, privilege escalations, and system calls. If you ever get hacked, audit logs are invaluable for forensic analysis.
sudo apt install auditd audispd-plugins -y
sudo systemctl enable --now auditd
Add some basic audit rules:
sudo nano /etc/audit/rules.d/audit.rules
Add:
# Monitor authentication files
-w /etc/passwd -p wa -k identity
-w /etc/shadow -p wa -k identity
-w /etc/group -p wa -k identity
-w /etc/gshadow -p wa -k identity

# Monitor sudo usage
-w /etc/sudoers -p wa -k sudo
-w /etc/sudoers.d/ -p wa -k sudo

# Monitor SSH config
-w /etc/ssh/sshd_config -p wa -k sshd

# Monitor cron jobs
-w /etc/crontab -p wa -k cron
-w /etc/cron.d/ -p wa -k cron
-w /var/spool/cron/ -p wa -k cron

# Monitor login events
-w /var/log/auth.log -p wa -k auth

# Make the configuration immutable (requires reboot to change)
# Uncomment after verifying rules work:
# -e 2
Apply the rules:
sudo augenrules --load
sudo auditctl -l   # List loaded rules
Note: Don't enable -e 2 (immutable mode) until you're confident the rules work — it prevents any modification to audit rules until reboot.
Step 11: Install Rootkit and Malware Detection
You need tools to detect if your server has already been compromised. Two good options:
RKHunter (rootkit hunter) — scans for known rootkits, backdoors, and suspicious files:
sudo apt install rkhunter -y
sudo rkhunter --update
sudo rkhunter --propupd   # Build baseline
sudo rkhunter --check
AIDE (Advanced Intrusion Detection Environment) — creates a database of file hashes and alerts you when critical files are modified:
sudo apt install aide -y
sudo aideinit     # Initialize database (takes a few minutes)
sudo cp /var/lib/aide/aide.db.new /var/lib/aide/aide.db

# Run a check
sudo aide --check
You can set up cron jobs to run these checks daily and email you reports, but start with manual runs first.
ClamAV (antivirus) — particularly important if your server handles file uploads or runs email:
sudo apt install clamav clamav-daemon -y
sudo freshclam   # Update virus definitions
sudo systemctl enable --now clamav-daemon

# Scan your system
sudo clamscan -r --bell -i /
Step 12: Enable Two-Factor Authentication (2FA) for SSH (Optional but Recommended)
For production servers, 2FA adds a critical second layer — even if your SSH key is somehow compromised (e.g., your laptop is stolen and unlocked), an attacker still needs your TOTP code.
sudo apt install libpam-google-authenticator -y
As your deploy user (NOT root), run:
google-authenticator
Answer the prompts:
- Do you want authentication tokens to be time-based? → Yes
- Scan the QR code with Google Authenticator / Authy / 1Password / etc.
- Do you want me to update your "/home/deploy/.google_authenticator" file? → Yes
- Do you want to disallow multiple uses of the same authentication token? → Yes
- By default, tokens are good for 30 seconds... Do you want to do so? → Yes (window size of ~3)
- Do you want to enable rate-limiting? → Yes
Enable Google Authenticator in PAM:
sudo nano /etc/pam.d/sshd
Add at the top:
auth required pam_google_authenticator.so
Edit SSH config to require both key AND 2FA:
sudo nano /etc/ssh/sshd_config
Add/modify:
ChallengeResponseAuthentication yes
AuthenticationMethods publickey,keyboard-interactive
Restart SSH:
sudo systemctl restart sshd
CRITICAL: Test from a new terminal before closing your session!
ssh -p 2222 deploy@your-server-ip
# Should ask for both key (passphrase if set) AND verification code
Step 13: Optimize Kernel Parameters (sysctl Hardening)
The Linux kernel has several network and security parameters that can be hardened against common network attacks.
sudo nano /etc/sysctl.d/99-hardening.conf
Add these settings:
# Protect against SYN flood attacks
net.ipv4.tcp_syncookies = 1
net.ipv4.tcp_max_syn_backlog = 2048
net.ipv4.tcp_synack_retries = 2

# Disable IP forwarding (unless you're running a VPN/router)
net.ipv4.ip_forward = 0
net.ipv6.conf.all.forwarding = 0

# Disable source routing
net.ipv4.conf.all.accept_source_route = 0
net.ipv4.conf.default.accept_source_route = 0

# Enable reverse path filtering (anti-spoofing)
net.ipv4.conf.all.rp_filter = 1
net.ipv4.conf.default.rp_filter = 1

# Disable ICMP redirects (prevent MITM attacks)
net.ipv4.conf.all.accept_redirects = 0
net.ipv4.conf.default.accept_redirects = 0
net.ipv6.conf.all.accept_redirects = 0
net.ipv4.conf.all.secure_redirects = 0
net.ipv4.conf.default.secure_redirects = 0

# Don't send ICMP redirects
net.ipv4.conf.all.send_redirects = 0
net.ipv4.conf.default.send_redirects = 0

# Ignore broadcast ICMP requests (prevents smurf attacks)
net.ipv4.icmp_echo_ignore_broadcasts = 1

# Enable bad error message protection
net.ipv4.icmp_ignore_bogus_error_responses = 1

# Log martian packets (spoofed source addresses)
net.ipv4.conf.all.log_martians = 1

# Protect against hardlink/symlink exploits
fs.protected_hardlinks = 1
fs.protected_symlinks = 1

# Restrict access to kernel logs
kernel.dmesg_restrict = 1
kernel.kptr_restrict = 2

# Restrict ptrace (process debugging) to prevent process injection
kernel.yama.ptrace_scope = 1

# ASLR (Address Space Layout Randomization)
kernel.randomize_va_space = 2
Apply the settings:
sudo sysctl -p /etc/sysctl.d/99-hardening.conf
Step 14: Install Monitoring
You can't detect breaches if you're not monitoring. Two good options:
Option A: Netdata (real-time performance and security dashboard, easy to set up):
wget -O /tmp/netdata-kickstart.sh https://get.netdata.cloud/kickstart.sh
sudo sh /tmp/netdata-kickstart.sh --non-interactive
Access it at http://your-server-ip:19999 (don't forget to allow that port in UFW, or better, put it behind nginx with HTTP basic auth).
Option B: Uptime Kuma (simple uptime monitoring, alerts you if services go down):
# Install with Docker for simplicity
docker run -d --restart=always -p 3001:3001 -v uptime-kuma:/app/data --name uptime-kuma louislam/uptime-kuma:1
At minimum, set up a basic health check cron job that emails/Slack-alerts you on abnormal conditions. Even simple monitoring will alert you to problems (like high CPU from a cryptominer or unexpected outbound traffic from malware).
Step 15: Set Up Automated Backups (The Most Important Step of All)
Security incidents happen. When they do, backups are your last line of defense. Without backups, ransomware, accidental deletion, or a malicious actor can destroy all your data.
I recommend a 3-2-1 backup strategy:
- 3 copies of your data (production + 2 backups)
- 2 different media types
- 1 backup offsite (not on the same server/datacenter)
A simple but effective setup using rsnapshot (for filesystem backups) and rclone (for offsite sync to S3-compatible storage like Cloudflare R2, Backblaze B2, or AWS S3):
sudo apt install rsnapshot rclone -y

# Configure rsnapshot
sudo nano /etc/rsnapshot.conf
Set up snapshot intervals and what to back up:
snapshot_root   /var/backups/rsnapshot/
retain  alpha   6
retain  beta    7
retain  gamma   4

# Directories to backup (use tabs, not spaces!)
backup  /home/          localhost/
backup  /etc/           localhost/
backup  /var/www/       localhost/
backup  /var/log/       localhost/

# Exclude things you don't need
exclude  /home/*/.cache/
Test the config:
sudo rsnapshot configtest
Run the first backup:
sudo rsnapshot alpha
Set up cron to run automatically:
sudo nano /etc/cron.d/rsnapshot
Add:
0 */4 * * * root /usr/bin/rsnapshot alpha
0 3 * * * root /usr/bin/rsnapshot beta
0 2 * * 0 root /usr/bin/rsnapshot gamma
Then configure rclone to sync backups offsite to your preferred cloud storage provider:
rclone config
# Follow the prompts to set up your S3/B2/R2 remote
# Then sync daily:
# rclone sync /var/backups/rsnapshot/ remote:your-bucket/server-backups/
Add the offsite sync to crontab as well.
Also: LuckVM and most cloud providers offer snapshot functionality — take a snapshot of your VPS before major changes and on a weekly schedule. Snapshots are not a substitute for proper backups (they're on the same infrastructure), but they're useful for quick recovery from botched updates.
4. Additional Hardening for Production Environments
The 15 steps above cover 99% of what most servers need. For production servers handling sensitive data, consider these additional measures:
Use a non-standard user agent / stealth measures:
- Install
portsentryto detect port scans and automatically block scanners - Use
psad(Port Scan Attack Detector) for more sophisticated scan detection
Web server hardening:
- If running nginx/Apache, add security headers (HSTS, CSP, X-Frame-Options, X-Content-Type-Options)
- Install a WAF (Web Application Firewall) like ModSecurity or Cloudflare WAF
- Disable server tokens/version banners
Docker hardening (if using containers):
- Don't run containers as root
- Use official images from trusted sources
- Enable Docker Content Trust (image signing)
- Don't mount host sockets into containers
- Use user-defined bridge networks, not host networking
- Enable seccomp/AppArmor profiles
Database hardening:
- Run
mysql_secure_installationfor MySQL/MariaDB - Don't expose database ports (3306, 5432) to the internet — bind to localhost or a private network
- Use strong, unique database passwords
- Enable SSL/TLS for database connections
Application-level security:
- Keep all application dependencies updated (use
npm audit,pip audit,composer audit, etc.) - Never hardcode secrets in code — use environment variables or a secrets manager
- Use HTTPS everywhere with Let's Encrypt (Certbot)
- Implement rate limiting at the application level
Consider a VPN/Bastion host setup: For highly sensitive environments, block SSH entirely from the internet and require all SSH access through a WireGuard/OpenVPN tunnel or a dedicated bastion host.
5. VPS Security FAQ
How quickly do real attacks start after setting up a server?
Within seconds to minutes. We've observed SSH brute-force attempts starting as early as 60 seconds after a new IP is assigned to a VPS. Automated botnets (like Mirai, Hajime, and various crypto-mining botnets) constantly scan the entire IPv4 address space on common ports. You don't need to be targeted — you're already being scanned.
Is changing the SSH port "security through obscurity"?
This is the most common debate in VPS security. Yes, changing the port is technically "obscurity" in the academic sense. But in practical terms:
- It reduces log noise by 95%+ (your logs become readable)
- It eliminates all drive-by botnet scans (they only scan port 22)
- It doesn't replace any real security (you still need keys, firewall, Fail2ban)
Think of it like locking your car door in a parking lot. It won't stop a determined thief with tools, but it stops the opportunist who walks by trying door handles. The goal is to not be the lowest-hanging fruit.
Do I really need 2FA? I already use SSH keys.
SSH keys are very secure. But consider:
- If your private key is stolen (unencrypted laptop, compromised backup)
- If you accidentally expose your private key (committed to GitHub, etc.)
- If a zero-day in SSH daemon exposes key-based auth (rare but has happened)
2FA is a second factor that neutralizes all of these scenarios. For personal projects, it's optional. For production, financial, or client data servers, it's strongly recommended.
My provider offers DDoS protection. Do I still need a firewall?
Yes. DDoS protection prevents volumetric attacks from overwhelming your network connection, but it does nothing to stop:
- SSH brute-force attempts
- Vulnerability scans
- Application-layer attacks
- Compromised credentials
DDoS protection and firewalls solve different problems. You need both.
Can I just use Cloudflare instead of all this?
Cloudflare is excellent for protecting web traffic (ports 80/443) and offers WAF, DDoS, and bot management. However:
- It only proxies HTTP/HTTPS — SSH, databases, game servers, custom ports, etc. are exposed directly if you don't have a server-side firewall
- A misconfigured Cloudflare setup can accidentally expose your origin IP (bypassing all protection)
- Cloudflare can read all your traffic (use end-to-end encryption with Cloudflare Origin CA certs)
Cloudflare is a great addition to your security setup but does not replace server hardening.
What's the single most important thing I can do?
SSH key authentication + disable password login + disable root login (Steps 2 and 3). This alone blocks the majority of automated attacks. If you only do one thing from this guide, do that.
If you do two things: add Fail2ban (Step 6). That blocks the remaining persistent brute-forcers.
6. Final Checklist and Quick Reference
After completing all 15 steps, here's a quick verification checklist you should run on any new VPS:
| # | Check | Command / Action | Done? |
|---|---|---|---|
| 1 | System fully updated | apt update && apt upgrade -y |
☐ |
| 2 | Sudo user created | ssh deploy@ip works, sudo works |
☐ |
| 3 | SSH keys only | PasswordAuthentication no in sshd_config |
☐ |
| 4 | Custom SSH port | SSH runs on non-standard port, UFW updated | ☐ |
| 5 | Firewall active | sudo ufw status shows defaults deny + specific allows |
☐ |
| 6 | Fail2ban running | sudo fail2ban-client status sshd |
☐ |
| 7 | SSH hardened | Root login disabled, X11 off, MaxAuthTries 3 | ☐ |
| 8 | Auto updates on | systemctl status apt-daily-upgrade.timer |
☐ |
| 9 | NTP synced | timedatectl status shows NTP active |
☐ |
| 10 | Auditd logging | sudo auditctl -l shows rules |
☐ |
| 11 | RKHunter/AIDE installed | Initial baseline created | ☐ |
| 12 | 2FA configured (optional) | Google Authenticator working | ☐ |
| 13 | sysctl hardened | sysctl net.ipv4.tcp_syncookies returns 1 |
☐ |
| 14 | Monitoring installed | Netdata/UptimeKuma running and alerting | ☐ |
| 15 | Backups configured | First rsnapshot completed + offsite sync tested | ☐ |
Security doesn't end here. Here's your ongoing maintenance routine:
- Weekly: Check
sudo fail2ban-client statusand review/var/log/auth.logfor anything unusual - Monthly: Run
sudo rkhunter --checkandsudo aide --check, apply updates, verify backups are working (actually restore a file periodically!) - Quarterly: Audit sudo users, SSH keys, firewall rules, and installed packages. Remove anything you don't need.
- After any security advisory: Patch immediately. Subscribe to your distro's security mailing list (Ubuntu Security Notices, Debian Security Announcements, etc.)
A well-hardened VPS is not a "set it and forget it" thing, but putting in this hour of work upfront will save you from 99% of the automated attacks that will hit your server. If you have questions about any specific step or your particular use case, feel free to reach out to LuckVM support — we're happy to help our customers secure their servers.
Next steps and related reading: